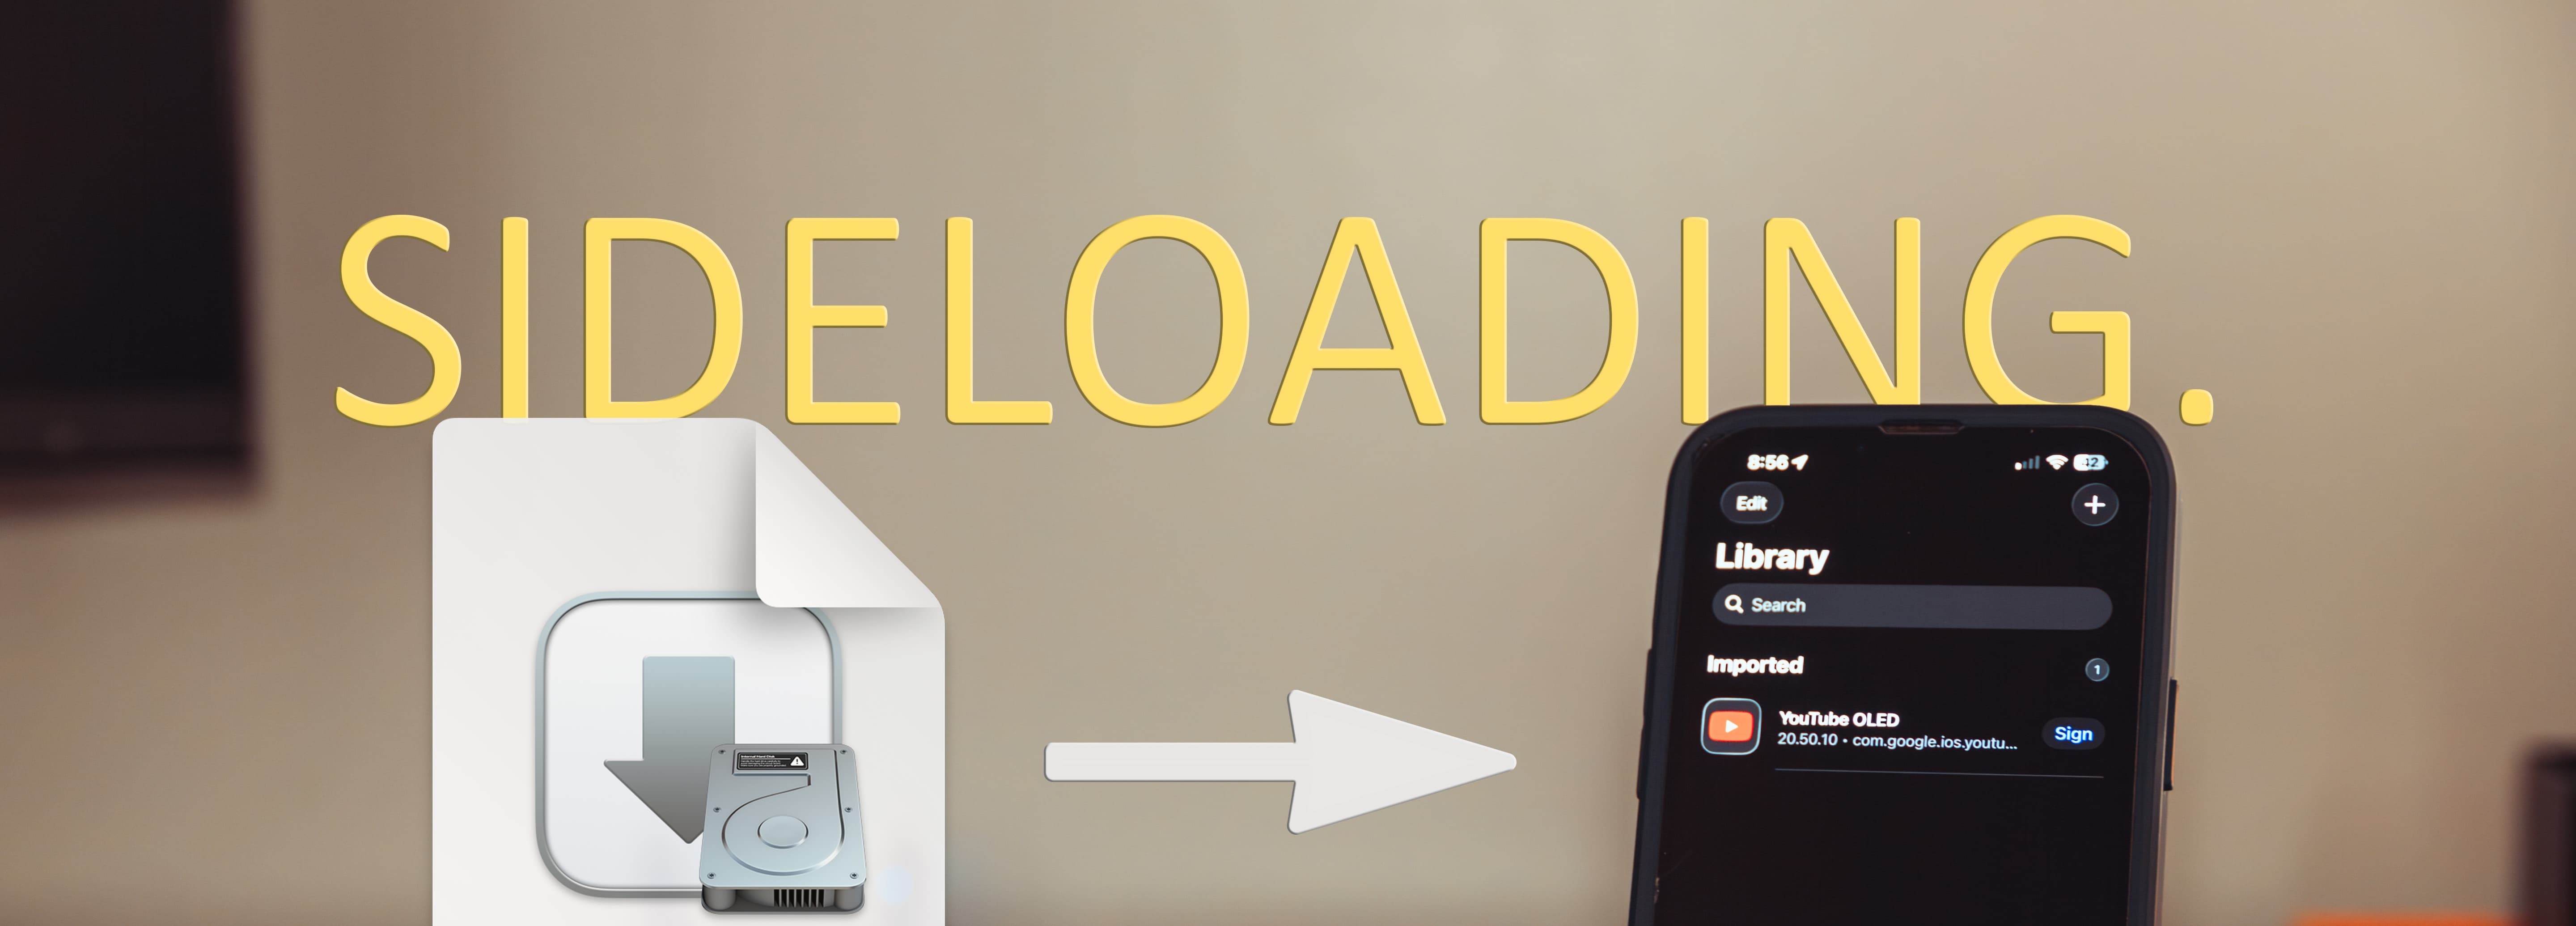
Sideloading Apps in Apple's Ecosystem.
Apple tries to make signing IPA files complicated to stop people from sideloading. This post will demonstrate how to sideload in a simple step-by-step format.
Sideloading is installing an app from somewhere other than the device’s official app store. On Android, sideloading is mostly a user choice feature. You can download an APK (or use an installer) and, after approving a permission like “install unknown apps,” the phone will let you install it.
But on iPhones and iPads, sideloading is much more restricted because iOS requires apps to be approved through Apple’s signing system. So installing an app outside the App Store usually means using a developer/testing method (like a signed build for specific devices) or, in some regions, an approved alternative marketplace (but sadly that only really for EU/JP users). Either way, Apple controls the authorization rather than leaving it entirely up to you.
There are a couple ways to sideload in Apple’s ecosystem: some are free, and some are paid. (I’m not covering TrollStore or jailbreaking here. I’m assuming your device is updated to the latest iOS version.)
Free: Using something like AltStore with a free developer account
Paid ($10–$20ish): Using a signing service (they provide a
.mobileprovisionand.p12you can sign apps with)Paid ($100/year — YIKES!): Using a paid Apple Developer account
So what’s the difference?
If you use something like AltStore with a “free developer account” (basically just your Apple ID), you’re usually limited to 3 apps, and they expire after 7 days. That means every week you have to connect to a computer and “refresh” them. (Yes, there are other methods. like VPN based tricks to refresh apps, but we’re not going down that rabbit hole.)
But if you use a paid option these limitations don’t affect you. You can install as many apps as you want. And only after a year will you have to “refresh” all your apps. But both come with there own issues.
With paid options, those limitations generally don’t apply. You can install more apps, and instead of refreshing weekly, you’re typically dealing with a yearly renewal. That said, each paid route comes with its own downsides.
If we look at signing services (I’m not listing any here because I’ve been away from that scene for a while and don’t know who’s reputable anymore), the biggest issue is Apple revocations. Apple can shut down these companies’ developer accounts at any time, which can cause apps you installed with those certificates to stop working. If the service offers “revoke protection,” you’ll usually need a new certificate issued. Then you have to delete your previously sideloaded apps and reinstall them using the new certificate.
And it gets worse: sometimes Apple also blacklists devices associated with those developer accounts, which can make it really annoying to join or switch to a different developer program. In many cases you may have to wait a while before you can get things working normally again. I’ve dealt with these issues before. The worst part was paying $10–$20 for a “year,” only for the signing service to get revoked and I’d end up with maybe a month of usable time.
Now for the last paid option, and what I’ve personally used for over 3 years: a paid Apple Developer account. It’s easily the most expensive route at $99/year USD (plus tax), but it also has the fewest headaches. A paid developer account can do a lot more than sideloading (we won’t get into all of that), but one of the biggest benefits is being able to sideload on up to 100 iOS/iPadOS devices and 100 tvOS devices per membership year. It avoids the 7-day limitations of free accounts and typically avoids the revoke/blacklist drama that signing services run into.
The two biggest downsides are:
The price, and
The setup
But don’t worry, I’ll walk you through it.
Its not that bad when you think on a larger scale. in my household we probably have closer 9 iOS devices and 3 Apple TV’s. If I used a signing service, I’d basically spend the same amount as just paying for the developer account. I also offset the cost by having family and friends pitch in for the year, so it doesn’t hit my wallet as hard.
I’m going to guide you through setting up your Apple Developer account so you can start sideloading apps on all your devices. (And yes. You can use AltStore with a paid developer account. The install is super easy, but weirdly you may still run into device limitations depending on how you’re using it.)
By the end of this post, you’ll have a paid Apple Developer account set up with a signing certificate and provisioning profile so you can sideload apps on your own devices omitting the weekly/7-day refresh headaches and not having to gamble on sketchy signing services getting revoked.
Step 1: Generating a Certificate Signing Request (CSR)
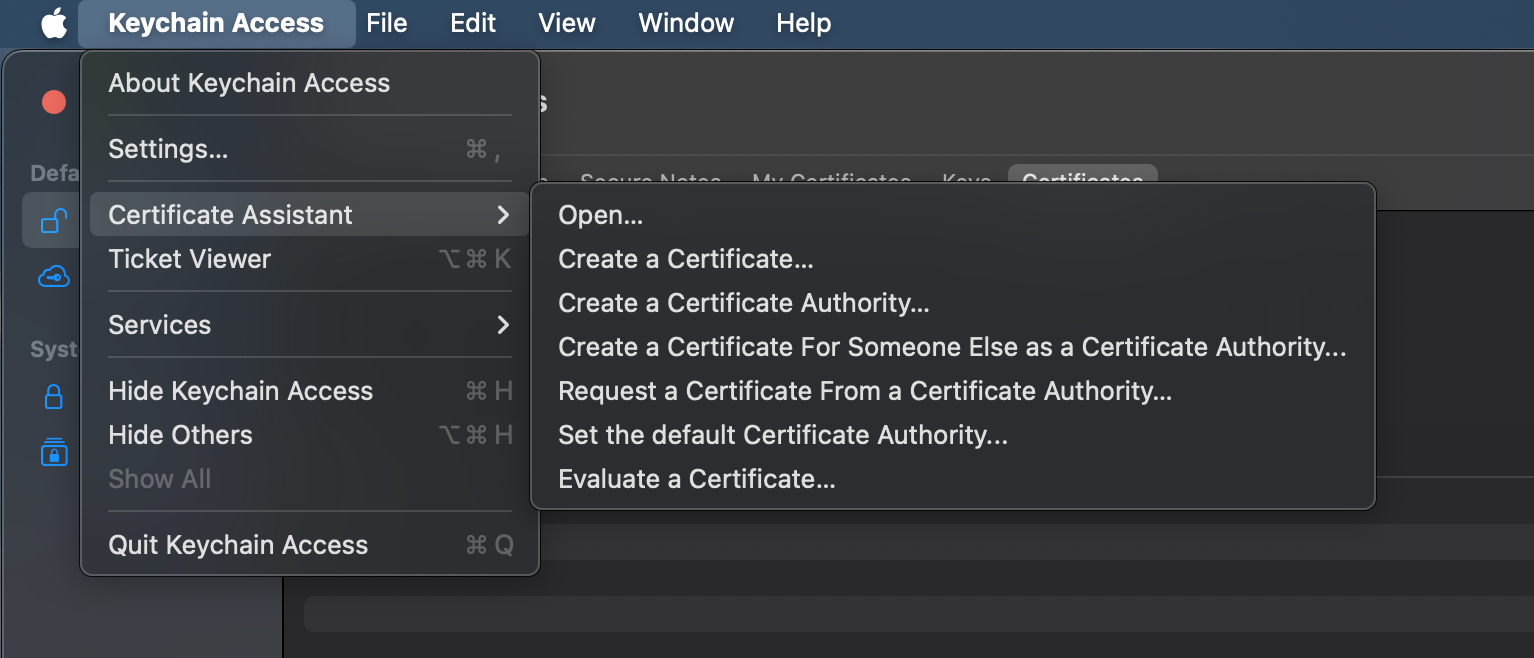
Open the “Keychain Access” app on a Mac.
Then go to to “Keychain Access” → “Certificate Assistant” → “Request a Certificate From a Certificate Authority” in the menubar and click on it.
- Fill out your email, a common name (can be anything), and a CA email (the email address of your developer account), then select “Saved to Disk” and click “Continue”.
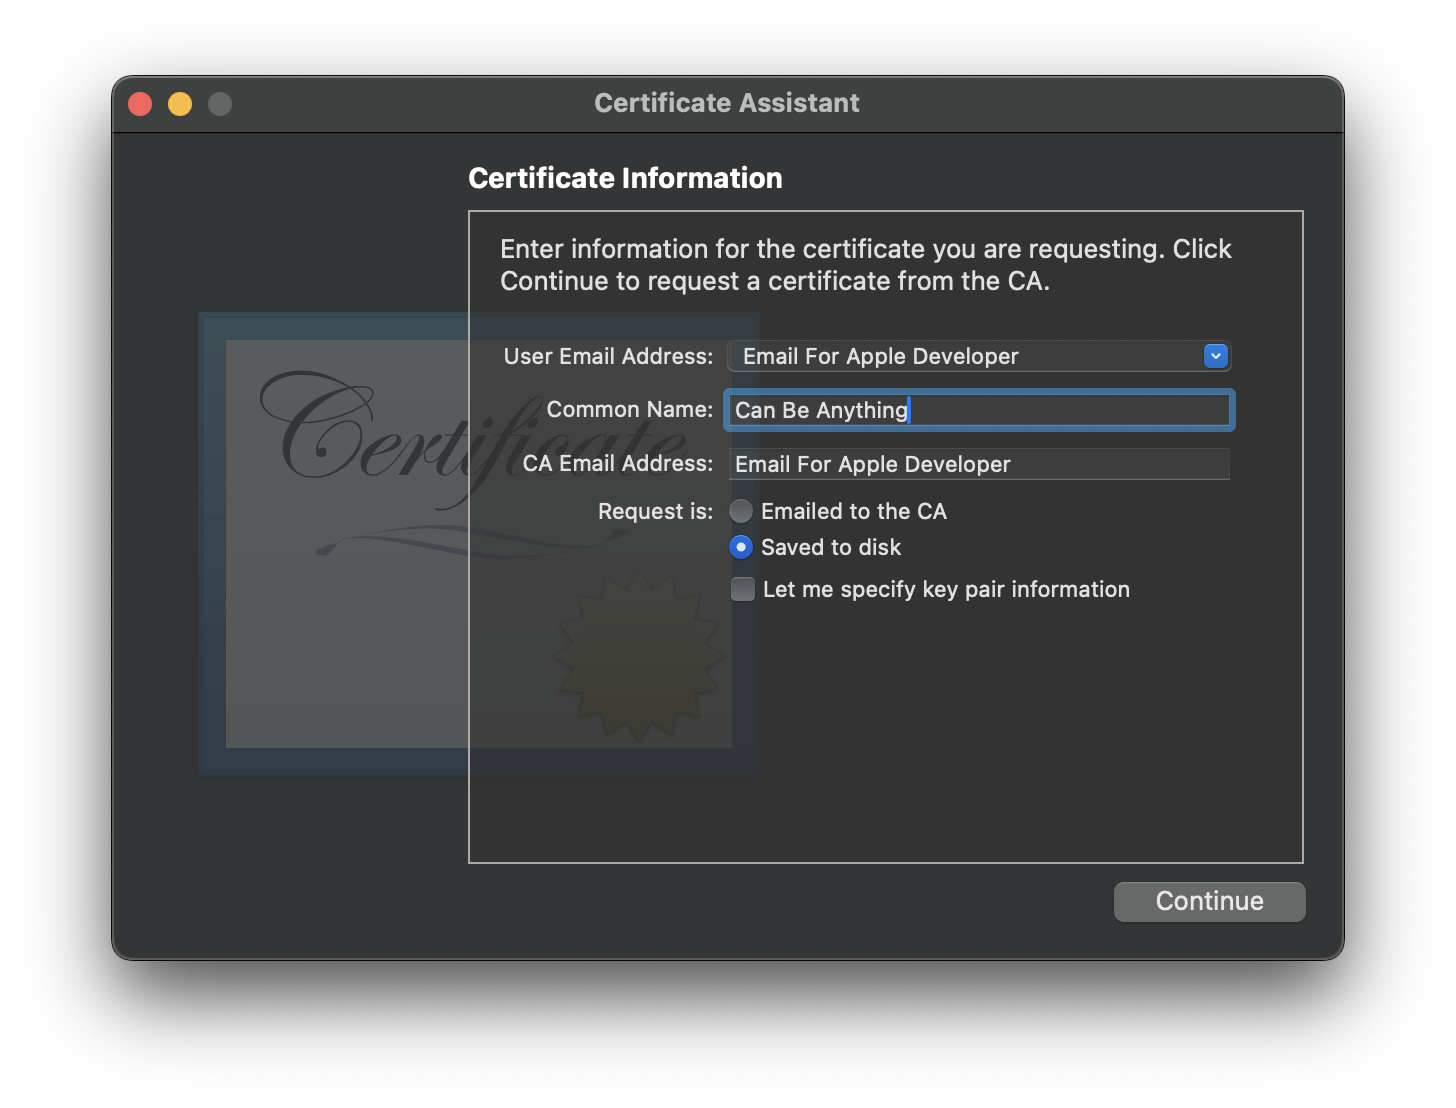
You now have a CSR file saved to your computer. The CSR file is what we use to request a certificate from Apple.
Step 2: Create a Certificate (CER)
Login to the Apple Developer Portal
Go to the Certificates Page
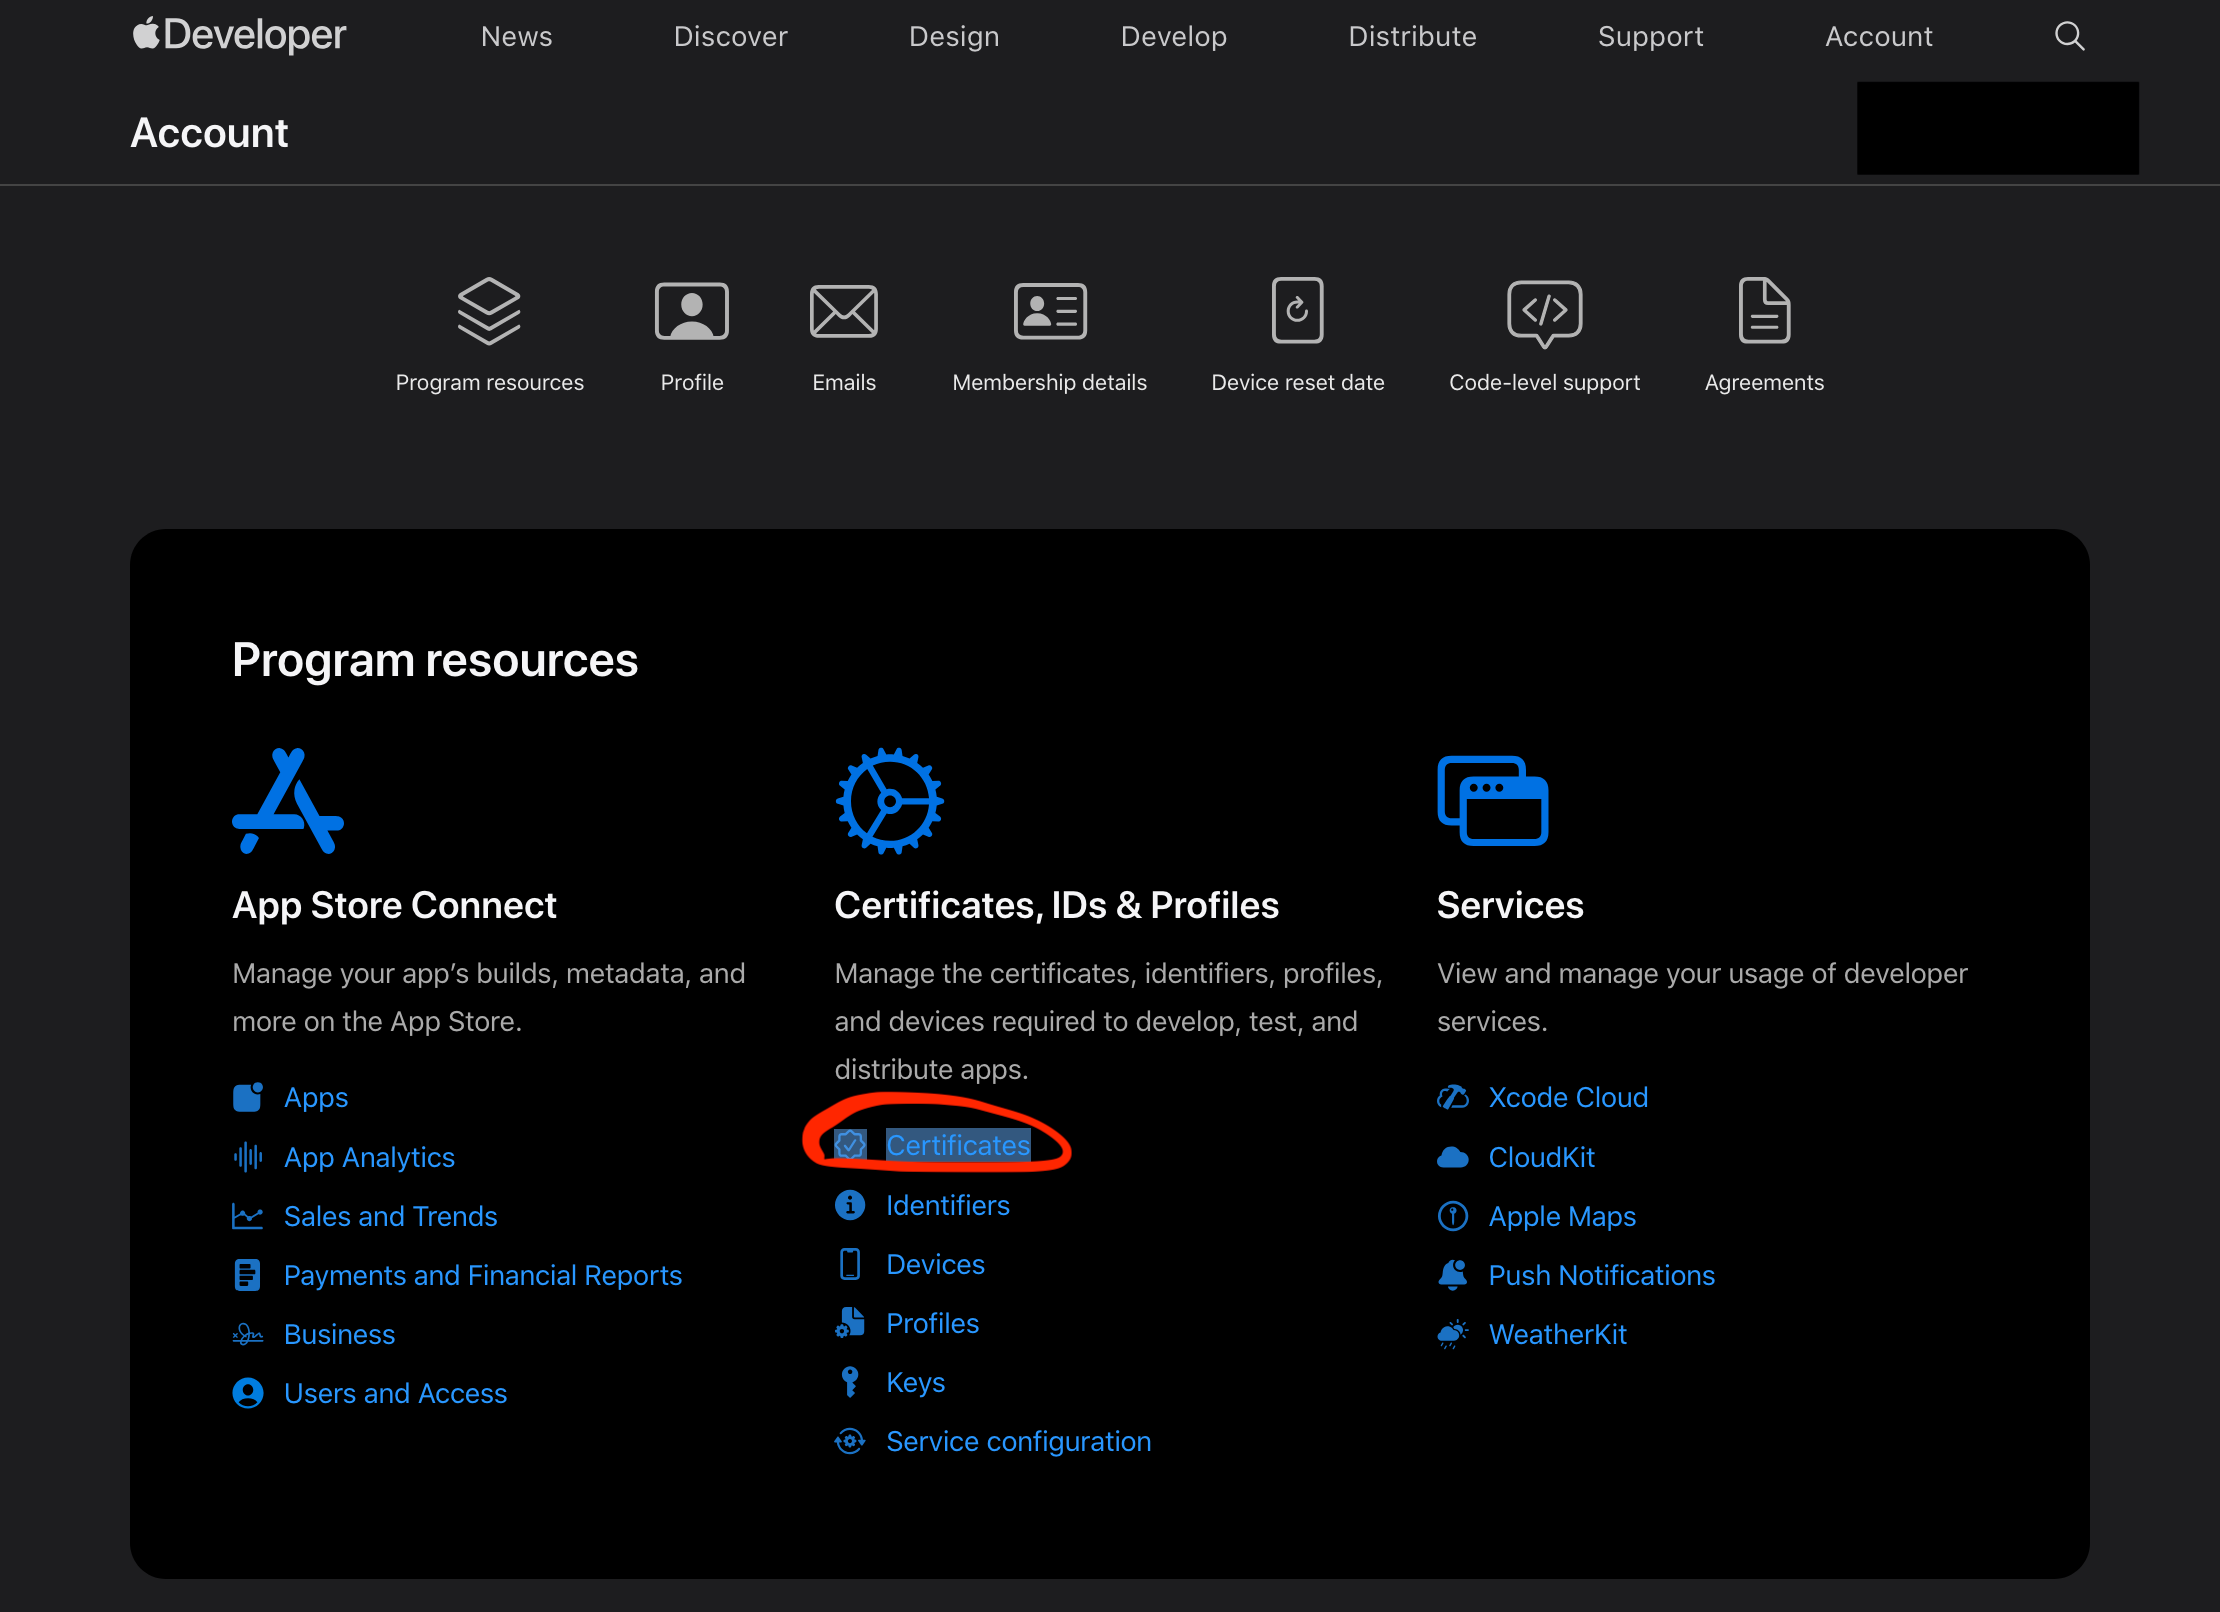
- Under “Certificates”, create a new certificate
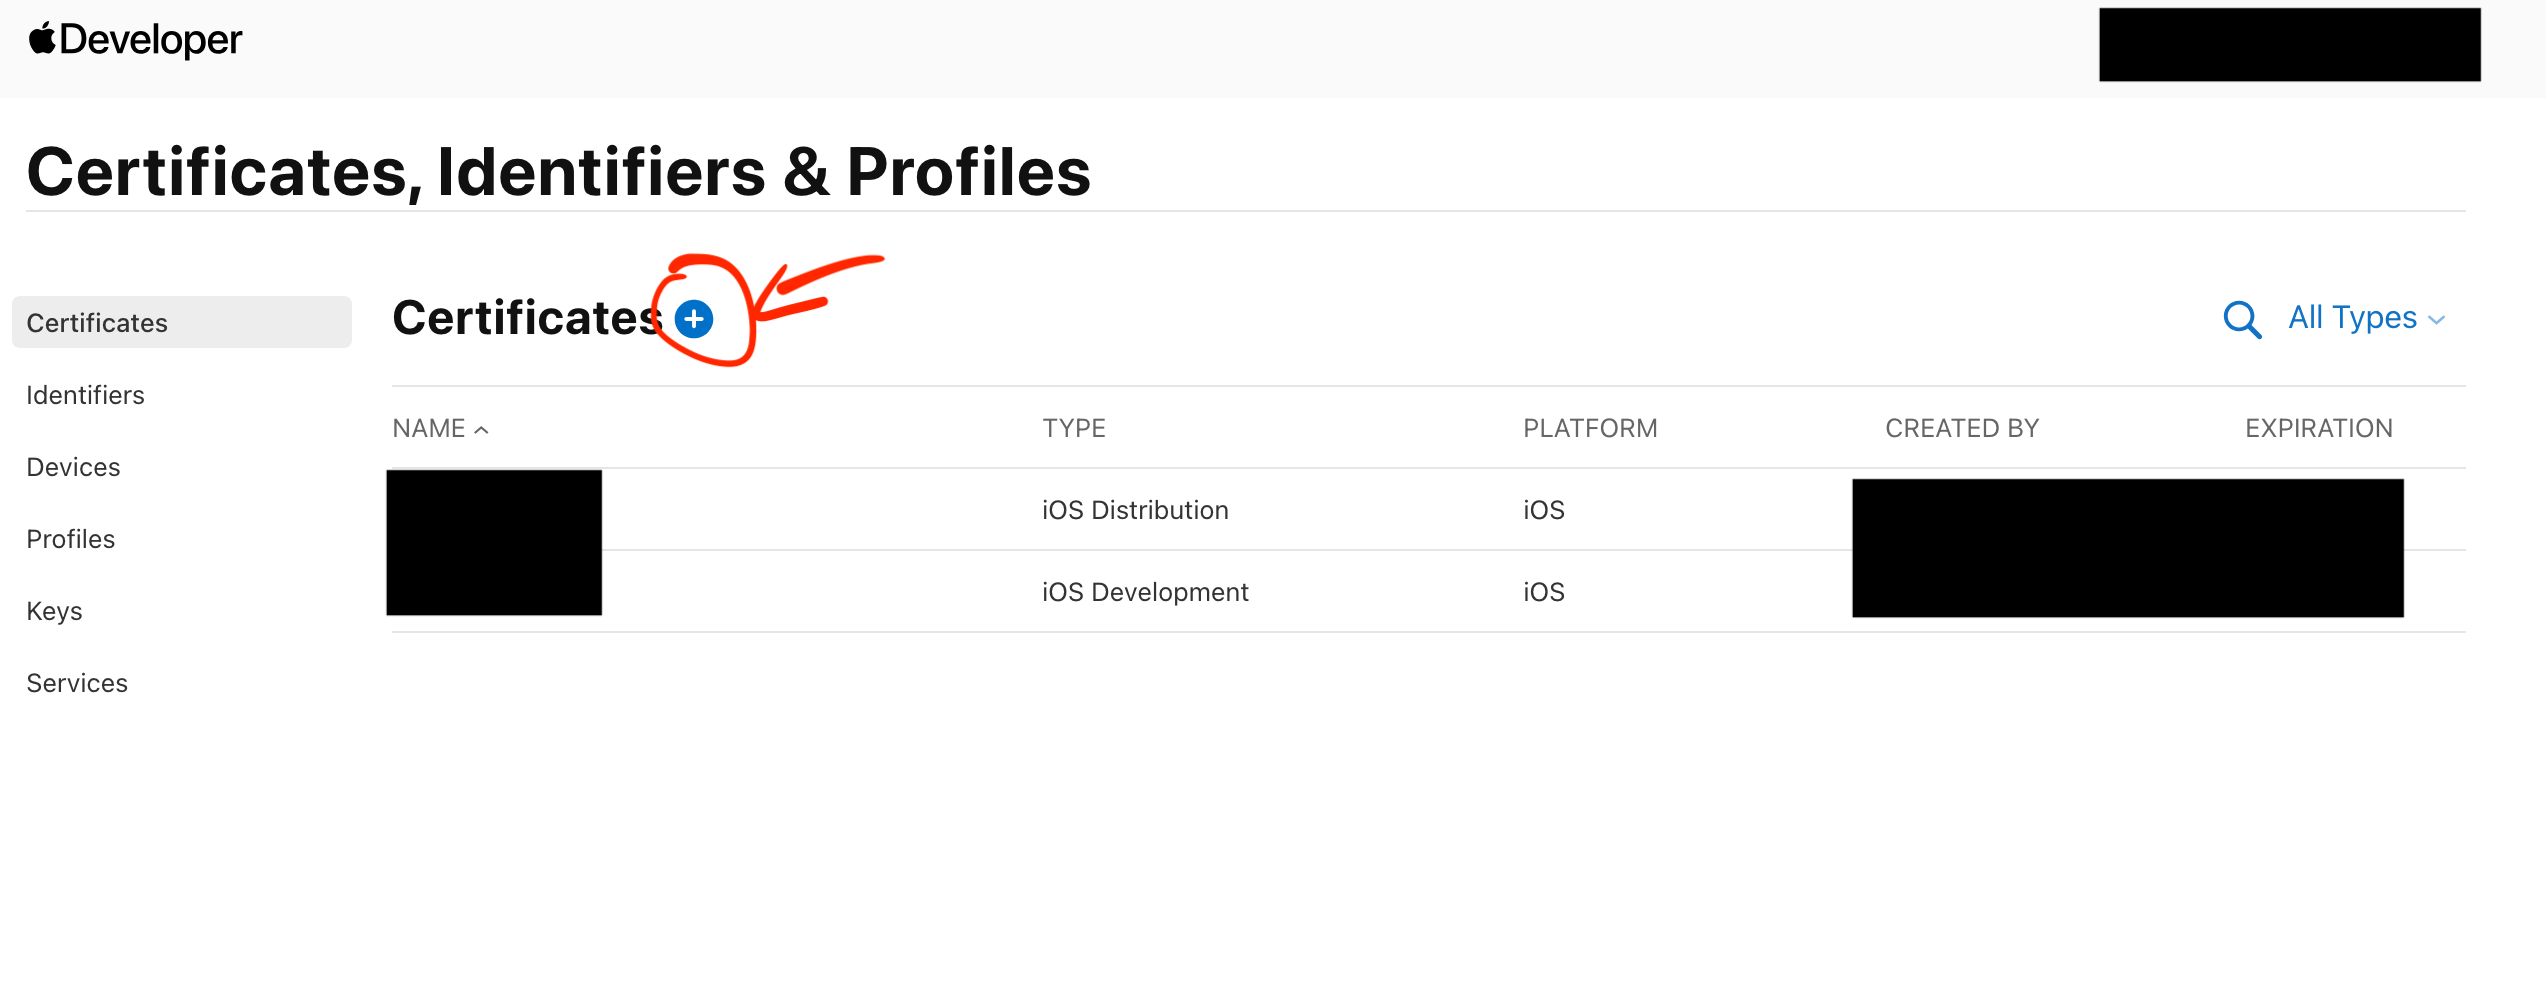
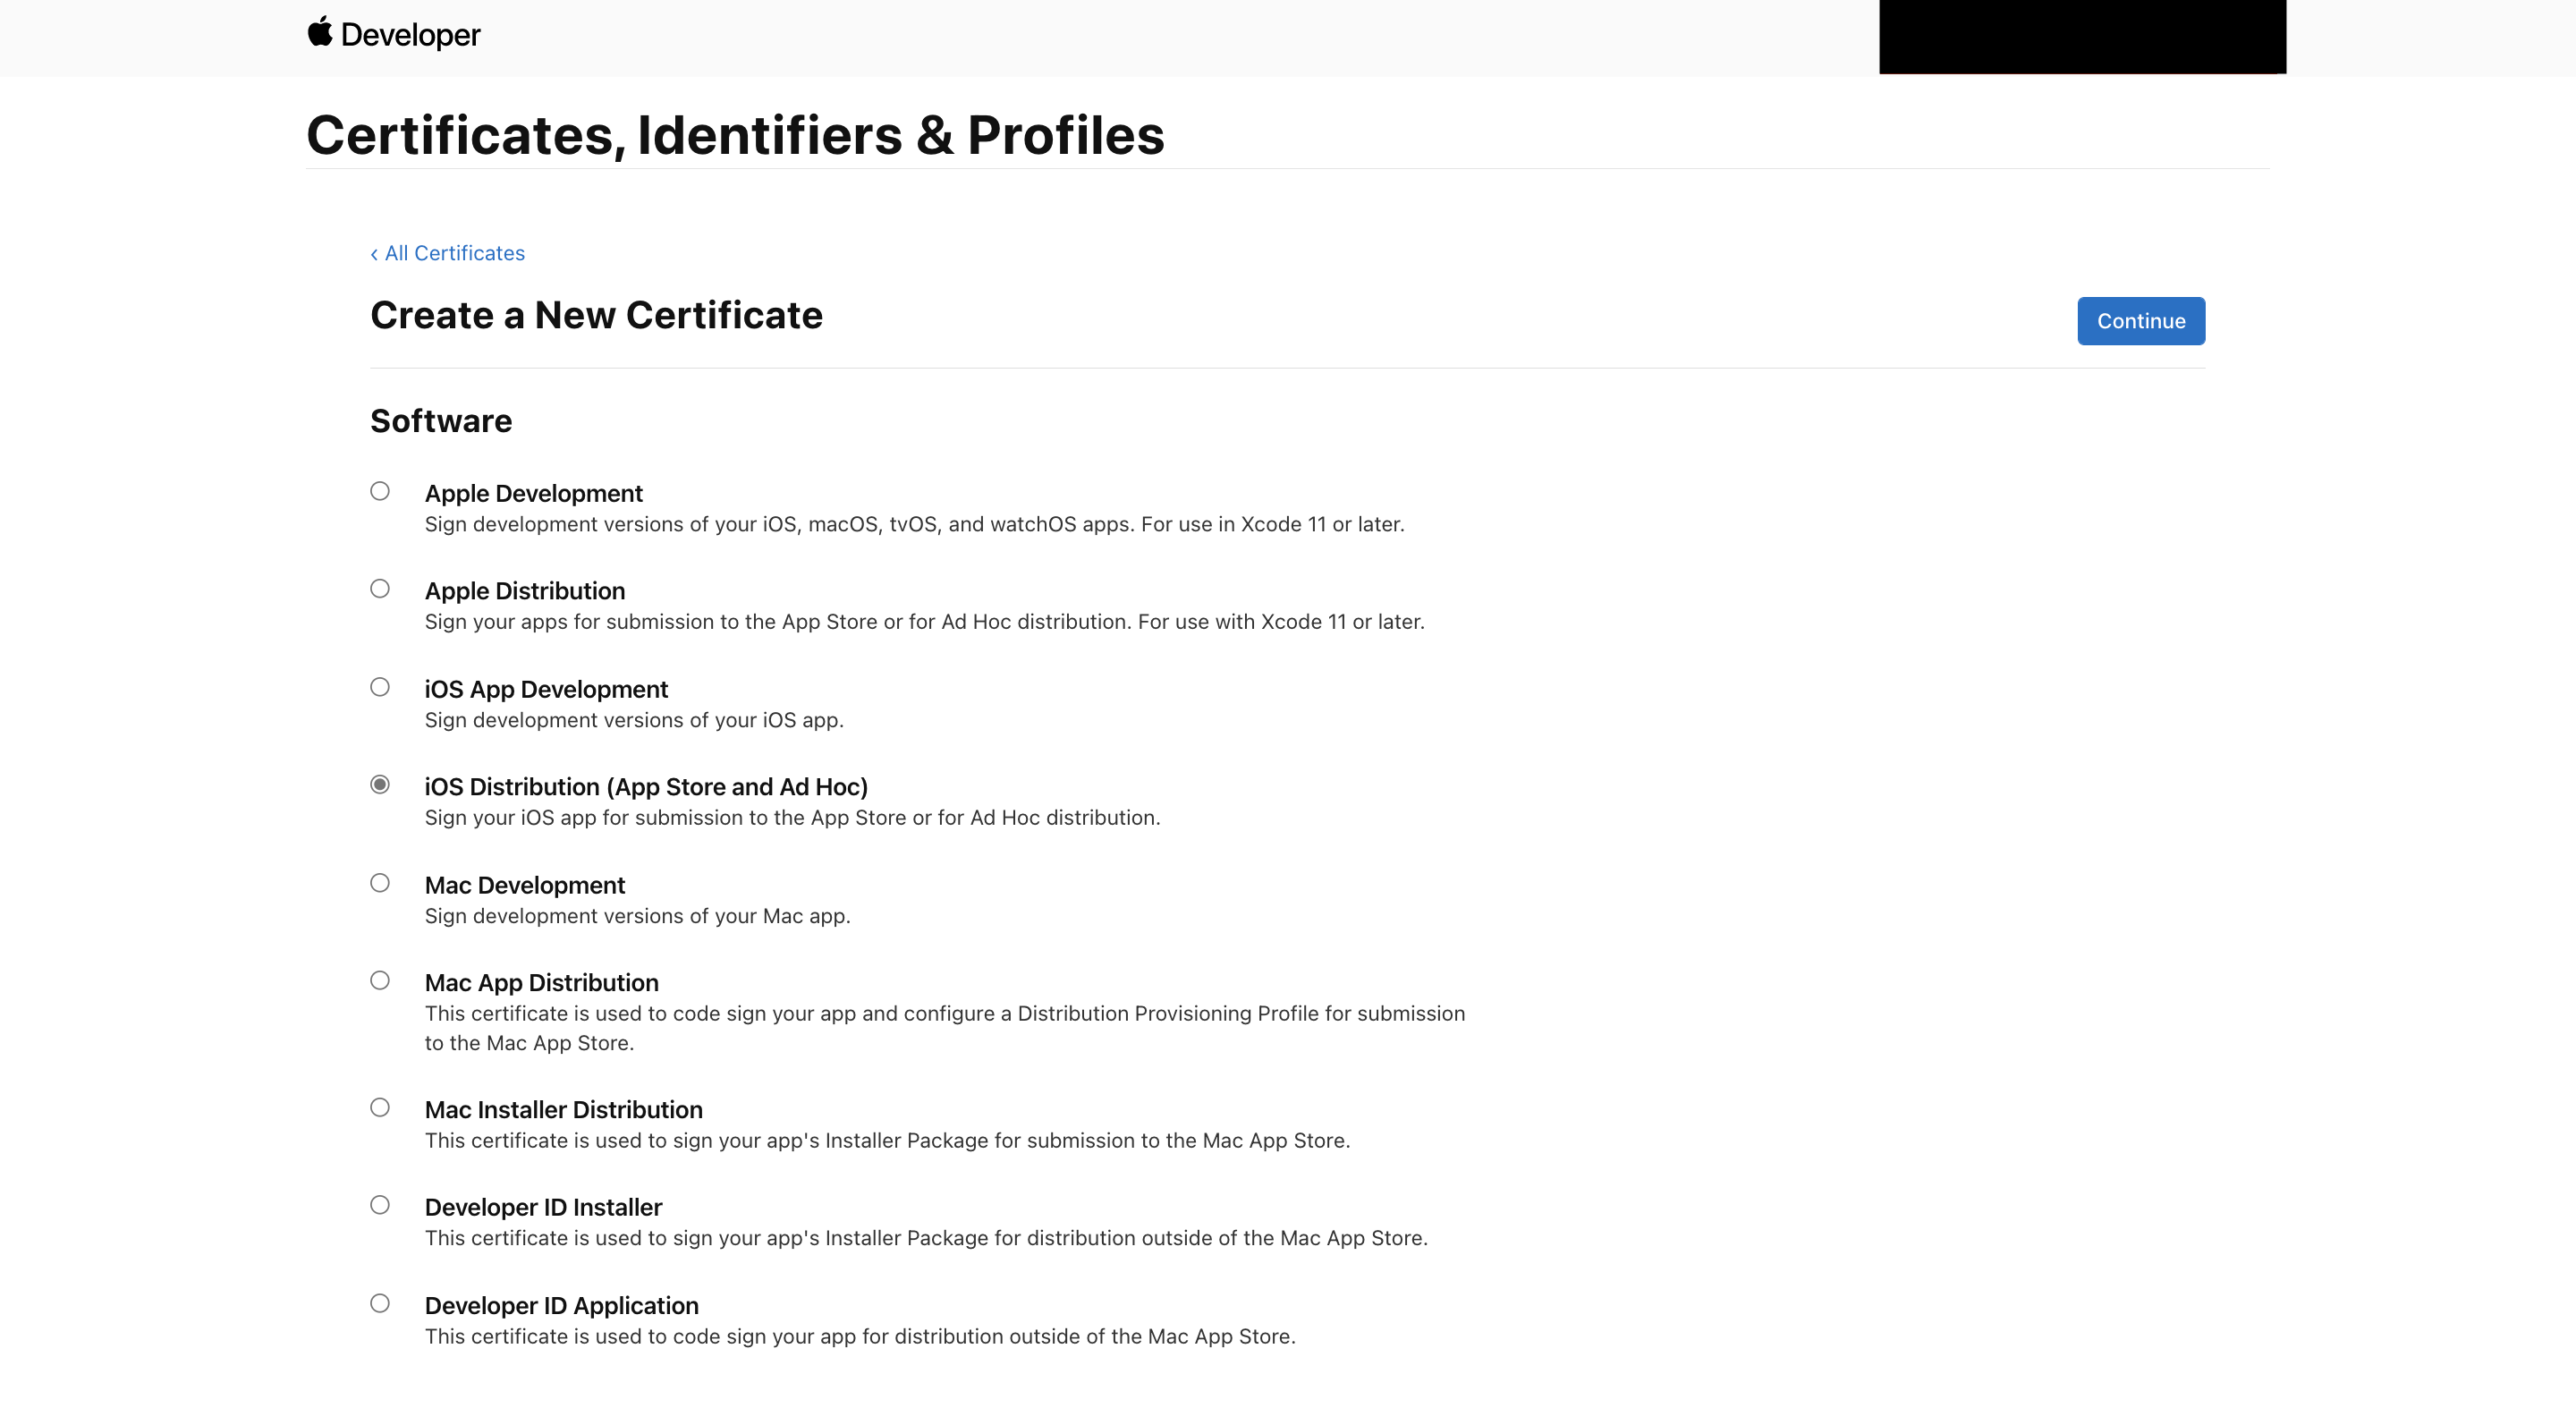
- Select “iOS Distribution (App Store and Ad Hoc)” and click “Continue”.
- Upload the CSR file you created in step 1 and click Continue.
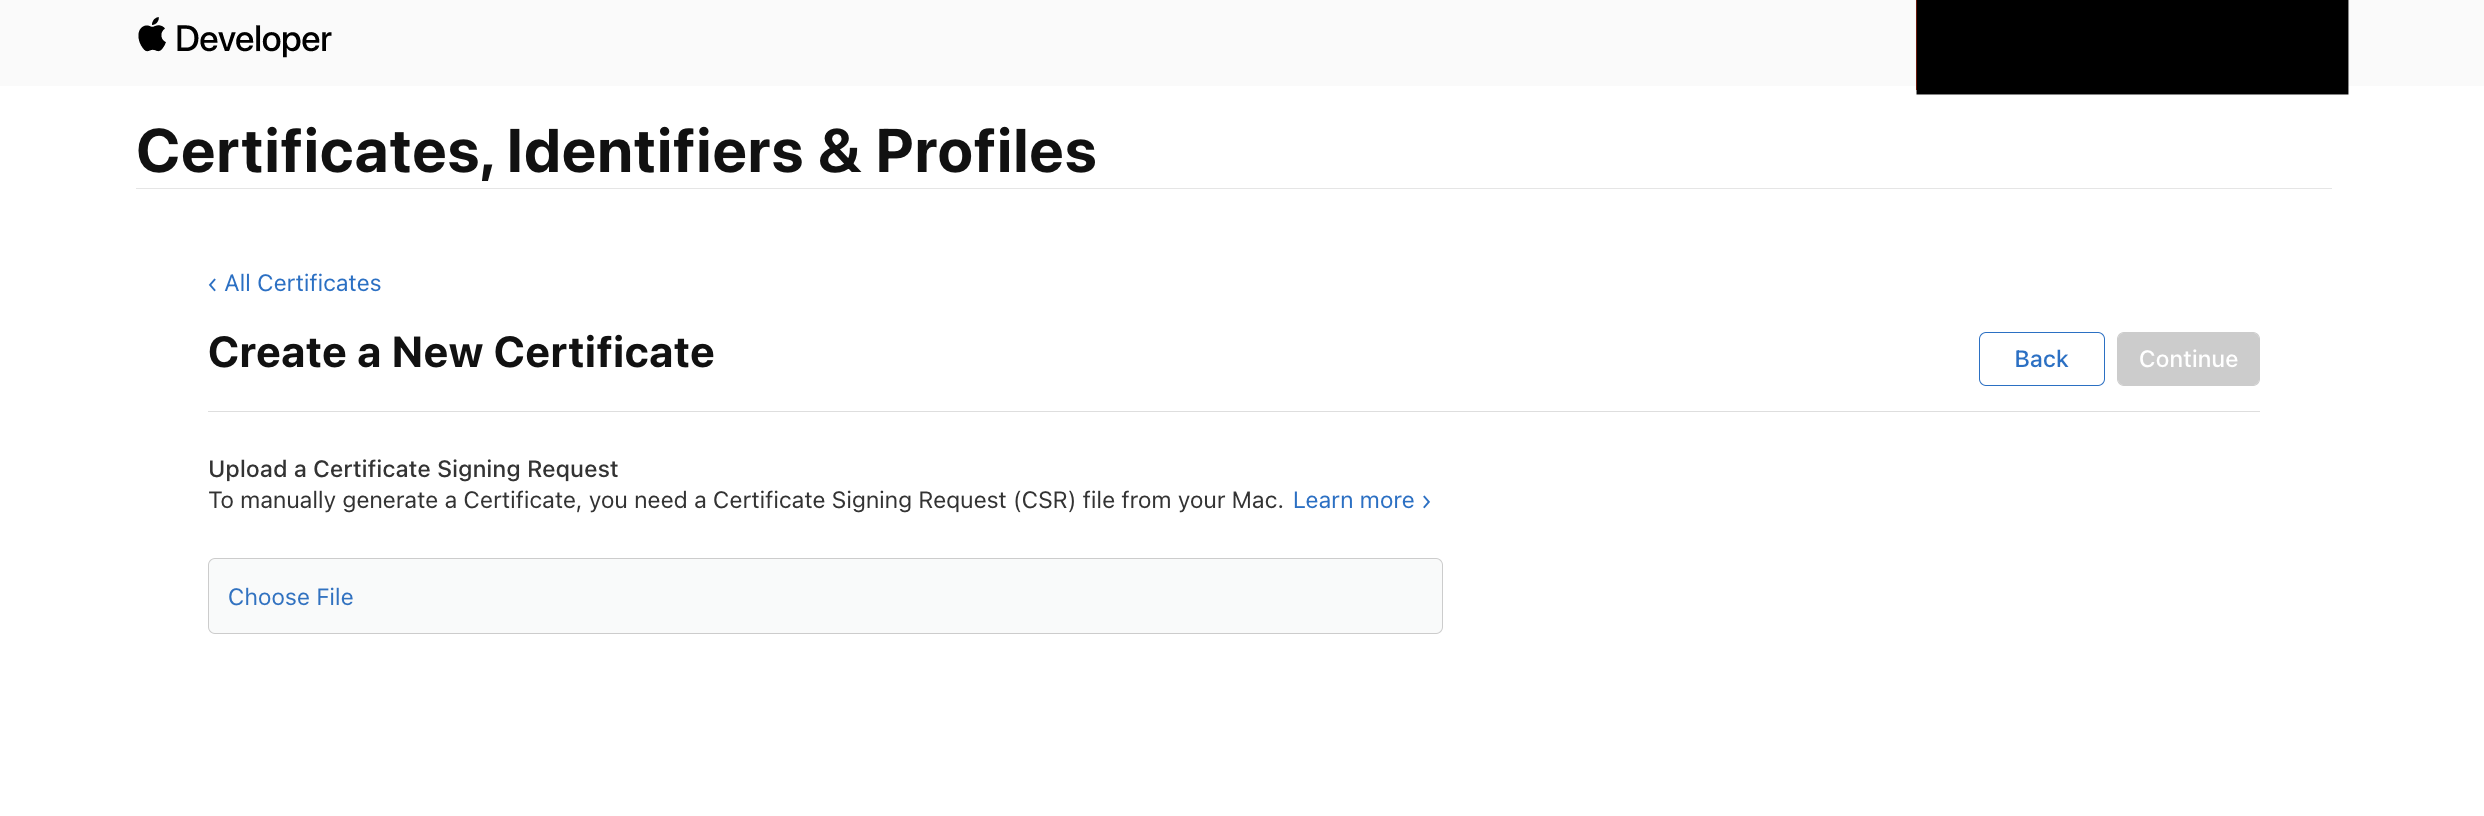
- Click Download
You now have a CER file! next, we’ll covert it to a P12 which we’ll use to sideload apps.
Step 3: Converting the CER file into a P12
Reopen “Keychain Access” on your Mac.
Make sure you have the “login” tab selected on the left sidebar, then click “Certificates”.
You will see a list of certificates, drag your CER file into the list.
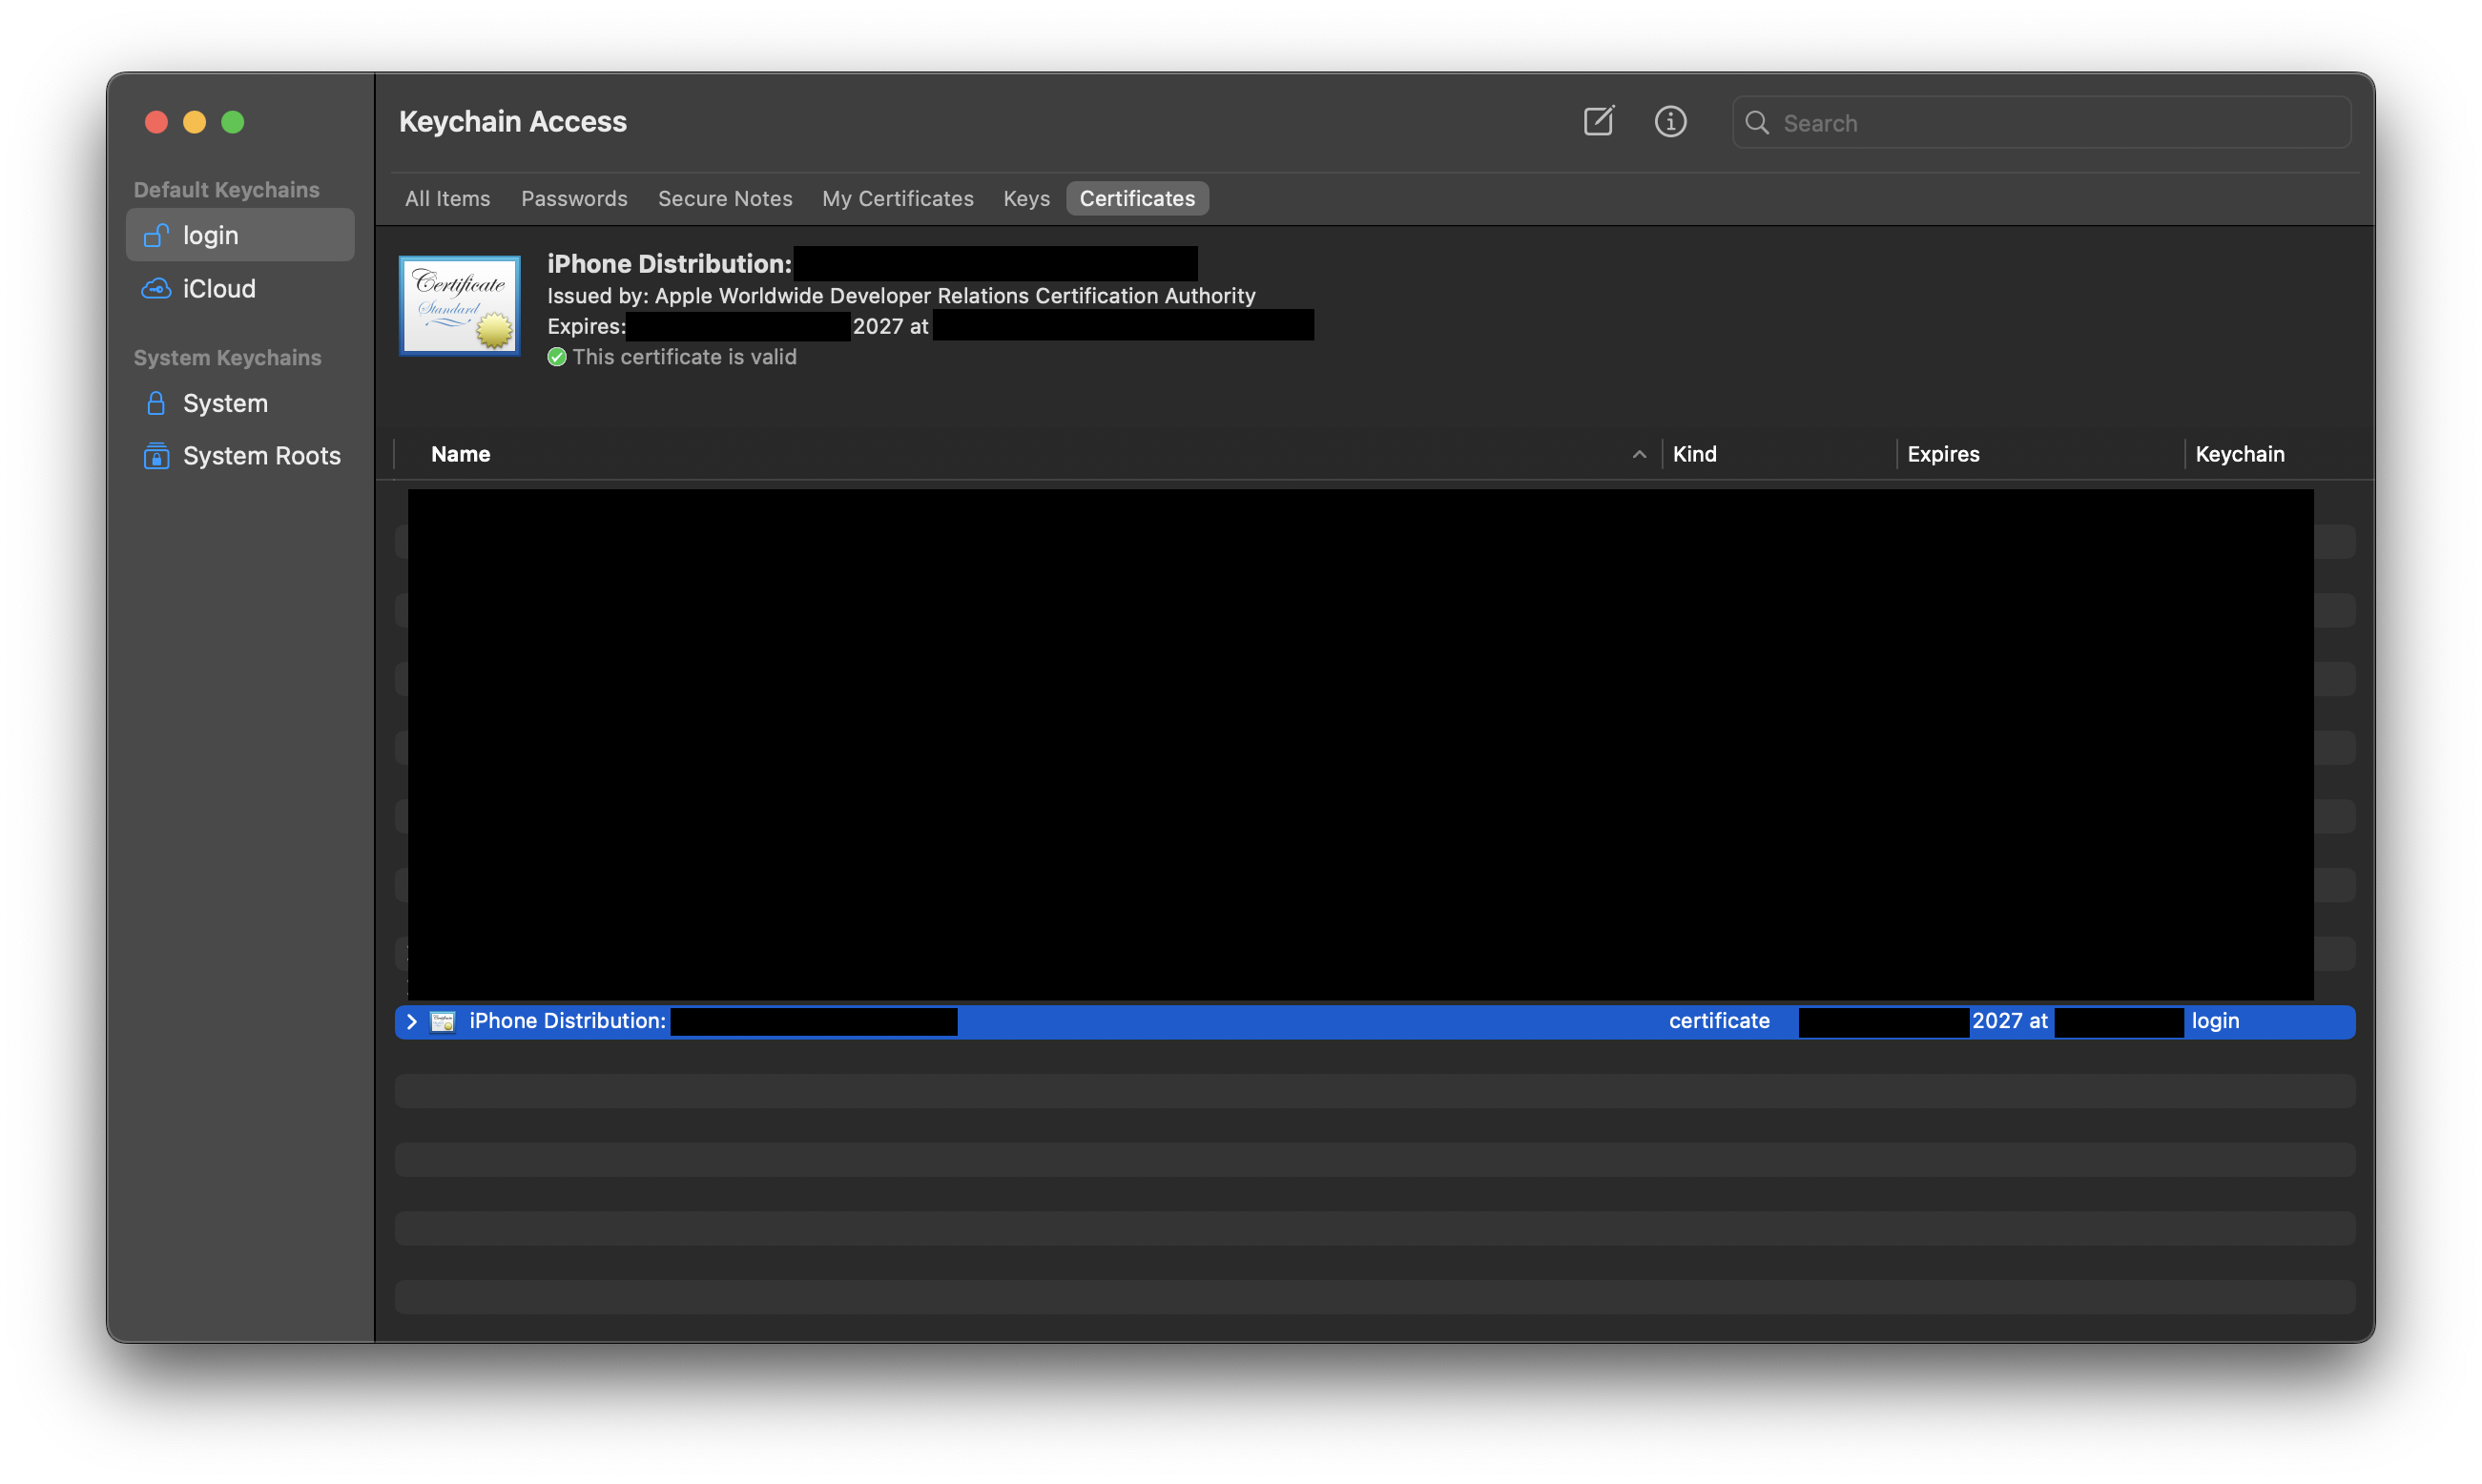
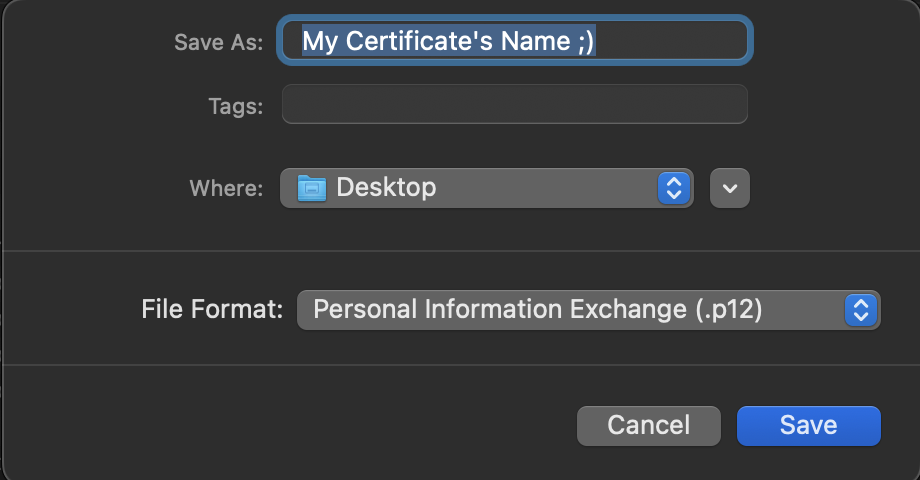
- Right click the certificate you just imported, then click “export”. (Tip: The expiration date should be exactly 1 year from the day it was created)

- Save the file as a .P12
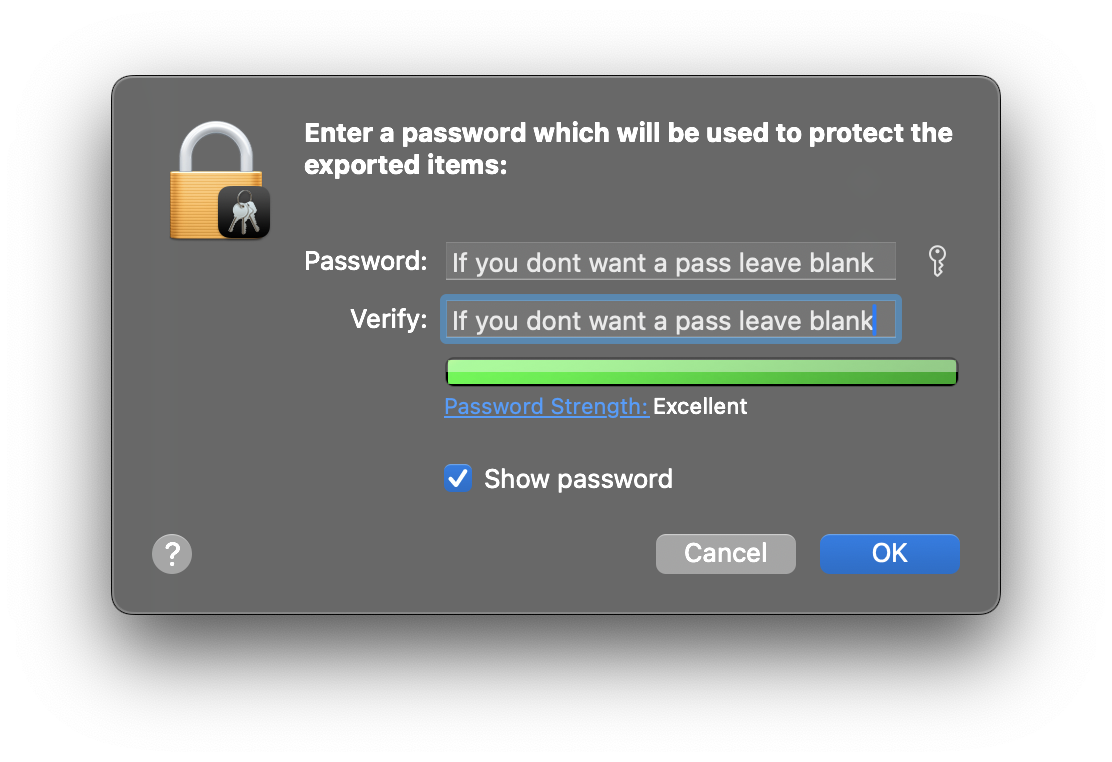
- Choose if you want the file to have a password (Id recommend it)
You now have the .P12 file, this is needed to sideload apps.
Step 4: Create an Identifier
Reopen the dev portal, and navigate to “Identifiers”.
Click the blue plus button
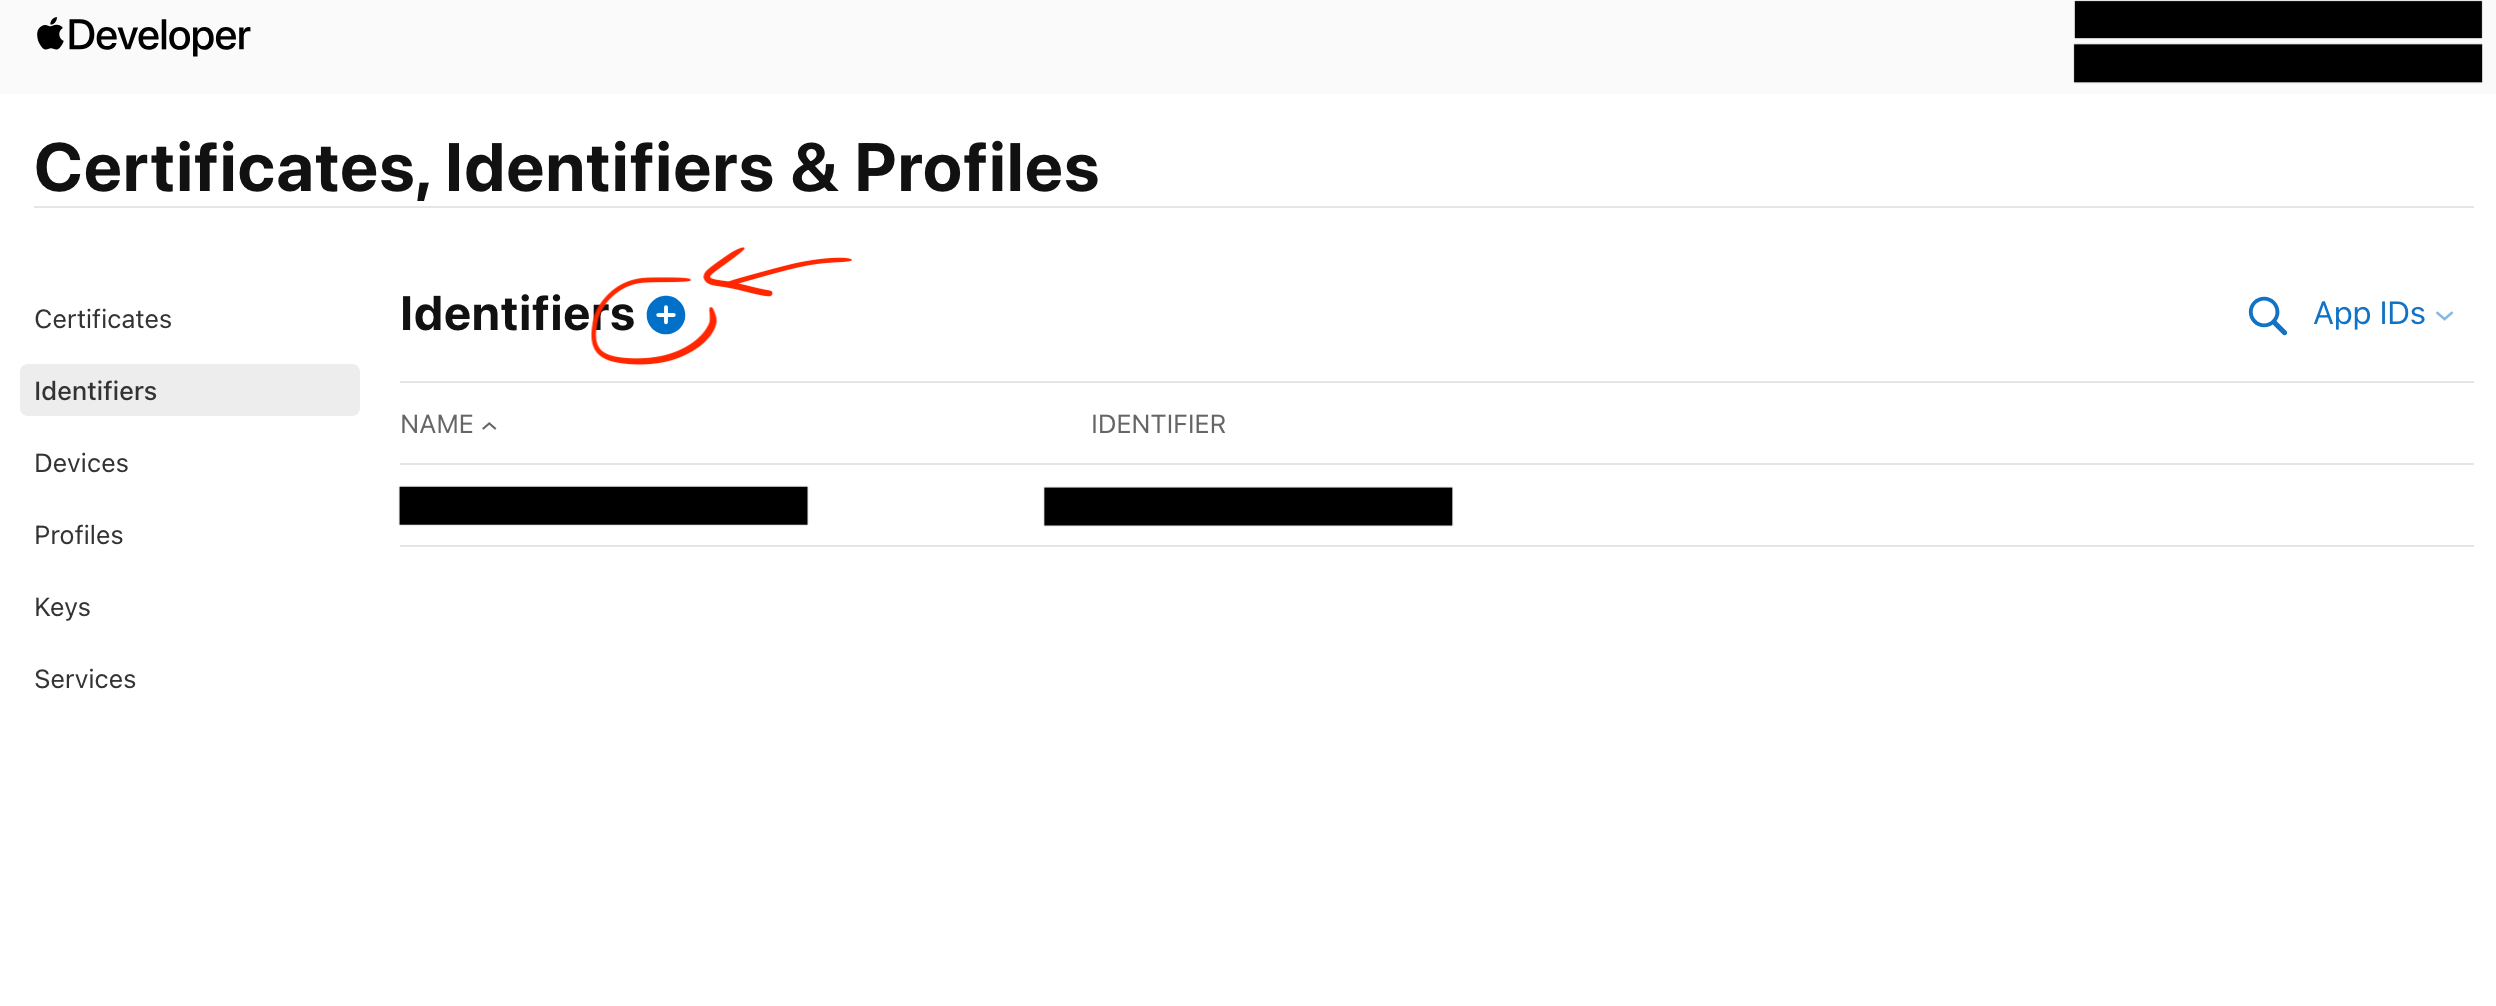
- Select “App IDs” then continue.
then in the “select a type” menu, select “App” not “App Clip” then continue.
Set your bundle ID to “Explicit” and write
com.RandomText.RandomText, and for the description it can be anything.
- Now under the Capabilities tab you can turn on certain capabilities to give sideloaded apps access to certain functions. Now to be honest you can leave most of them off but some sideloaded apps will have issues if they don’t have access to certain capabilities. id recommend turning on
Push Notifications.But if you want you can go ahead and select the Capabilities I have for my setup.
- After your done click “Continue”.
We have now set our identifier. This will be used to create the mobileprovision for our devices.
Step 5: Create a Mobileprovision file (under the Profile tab)
A .mobileprovision file is basically a whitelist: it tells iOS which specific devices are allowed to run apps signed with your certificate. Before you continue, make sure every iPhone/iPad (and Apple TV, if applicable) you want to sideload on is added to your Developer account under the Devices tab in the Dev Portal. To add a device, you’ll need its UUID/UDID. You can find it by plugging the device into a Mac and checking Finder (select the device, then click the serial number field to cycle until you see the UDID). There are many different types of apps and techniques to get the UUID off a device so im just going to let you guys google this one so that the tutorial wont be too long.
- After you’re done adding your devices to your account. Go to the Apple developer portal and select “Profiles” and create a profile.
in “Register a New Provisioning Profile” Select “Ad Hoc” under “Distribution” and press “Continue”.
Select the Identifier you made in the previous step, then click “Continue”.
Select the certificate you made in step 2, then click “Continue”.
Select the devices you want to allow to sideload, click “Continue”.
Type anything for your profile, click “Generate”, then “Download”
You now have everything you need to sideload! The .p12 certificate, the .mobileprovision file, and (if you set one) the password for your .p12.
If you add more devices later, you’ll need to go back to the Devices tab, register the new device, and then generate a new .mobileprovision that includes it. Your old provisioning profile won’t work because it doesn’t list the new device.
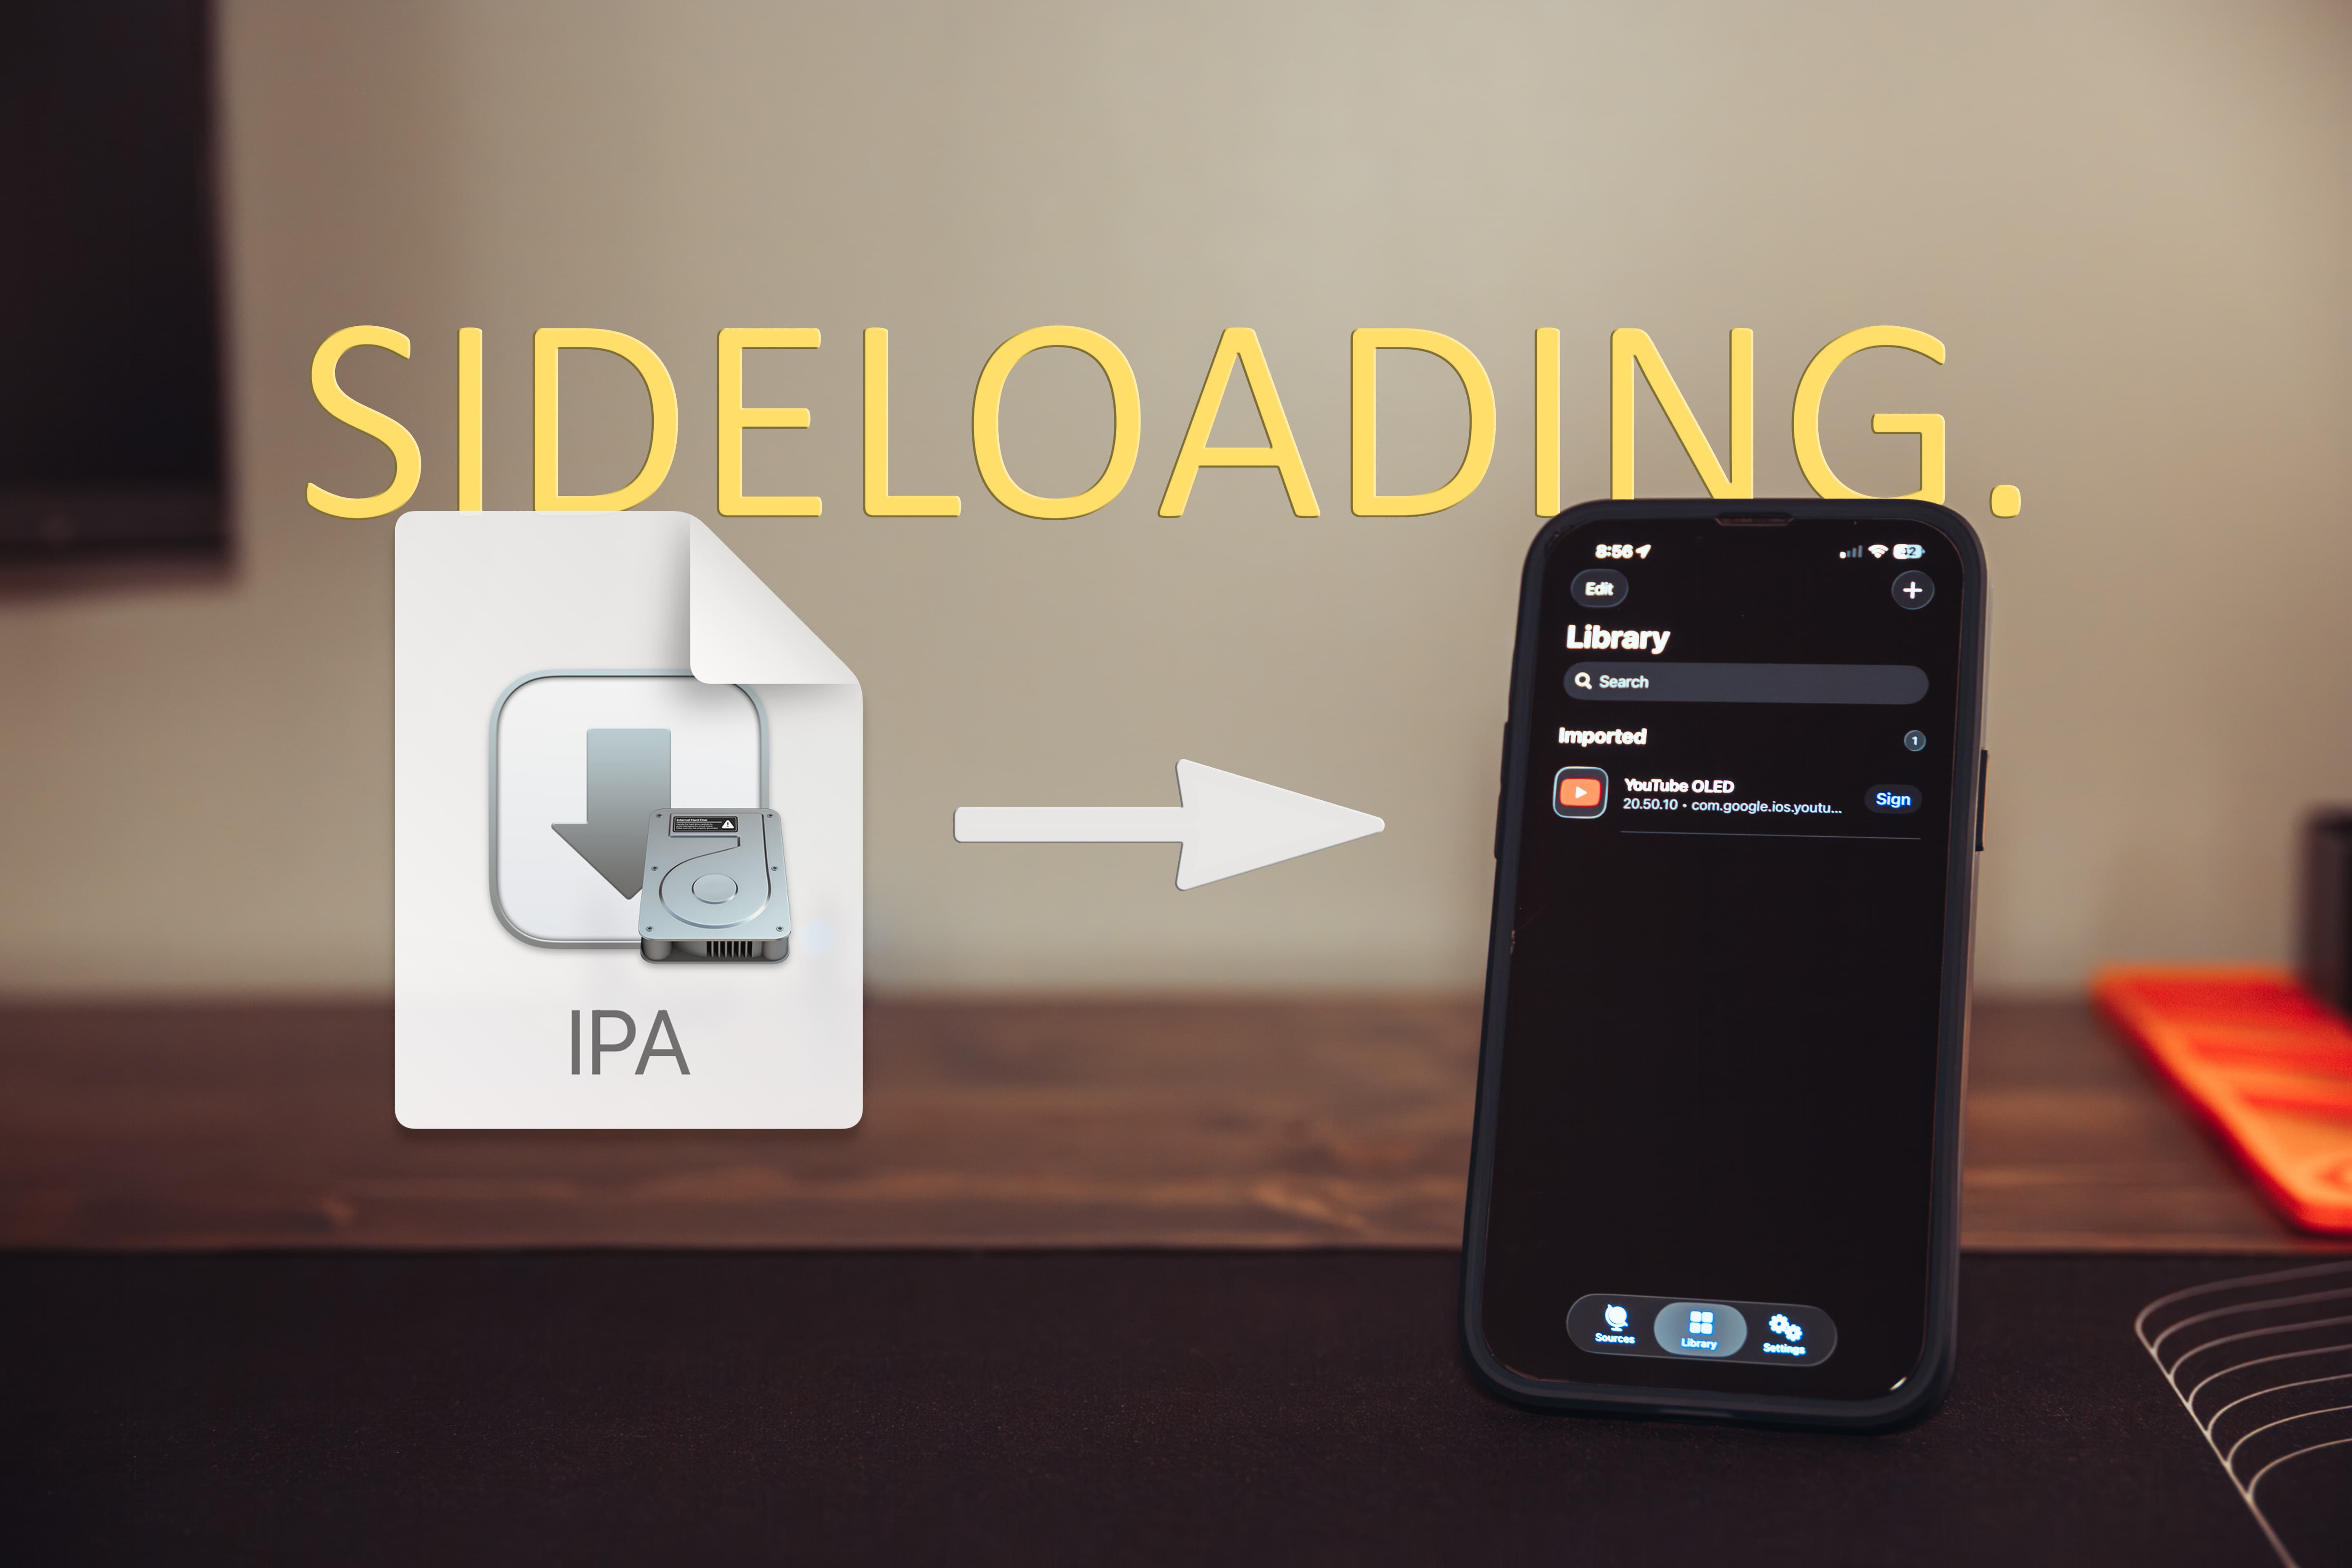
Now that you have the two files you need. Your .p12 and your .mobileprovision. You can start signing and sideloading IPA files.
How do you actually sign an app?
There are two general approaches: local signing (on your computer) and online signing (upload the files to a website and let it sign for you).
Option 1: Sign locally (on your PC/Mac)
If you want to do everything locally, these tools work well:
ios-app-signer: https://github.com/DanTheMan827/ios-app-signer
Local signing is great if you care about privacy and control, but it can be a bit of a hassle to set up the first time.
Option 2: Sign online (quick and easy)
For a simpler first step, I recommend using:
All you do is upload:
the IPA you want to install (we’ll grab one in a second),
your
.p12 (and pass), andyour
.mobileprovision
Then click Sign. Once it finishes, hit Install and you’ll get your freshly signed sideloaded app on your device.
Quick note
The site above is open-source and based on zsign:
I’m also working on my own version of this kind of signing site. I’ll update this section of the post once mine is ready (currently rewriting and hardening a couple of things).
Next, let’s grab an IPA to test with. Head over to Feather’s releases page and download the latest IPA for the on-device open-source signer Feather:
https://github.com/khcrysalis/Feather/releases
- Once you got all your files lets head over to https://daisign.lol/ and upload them.
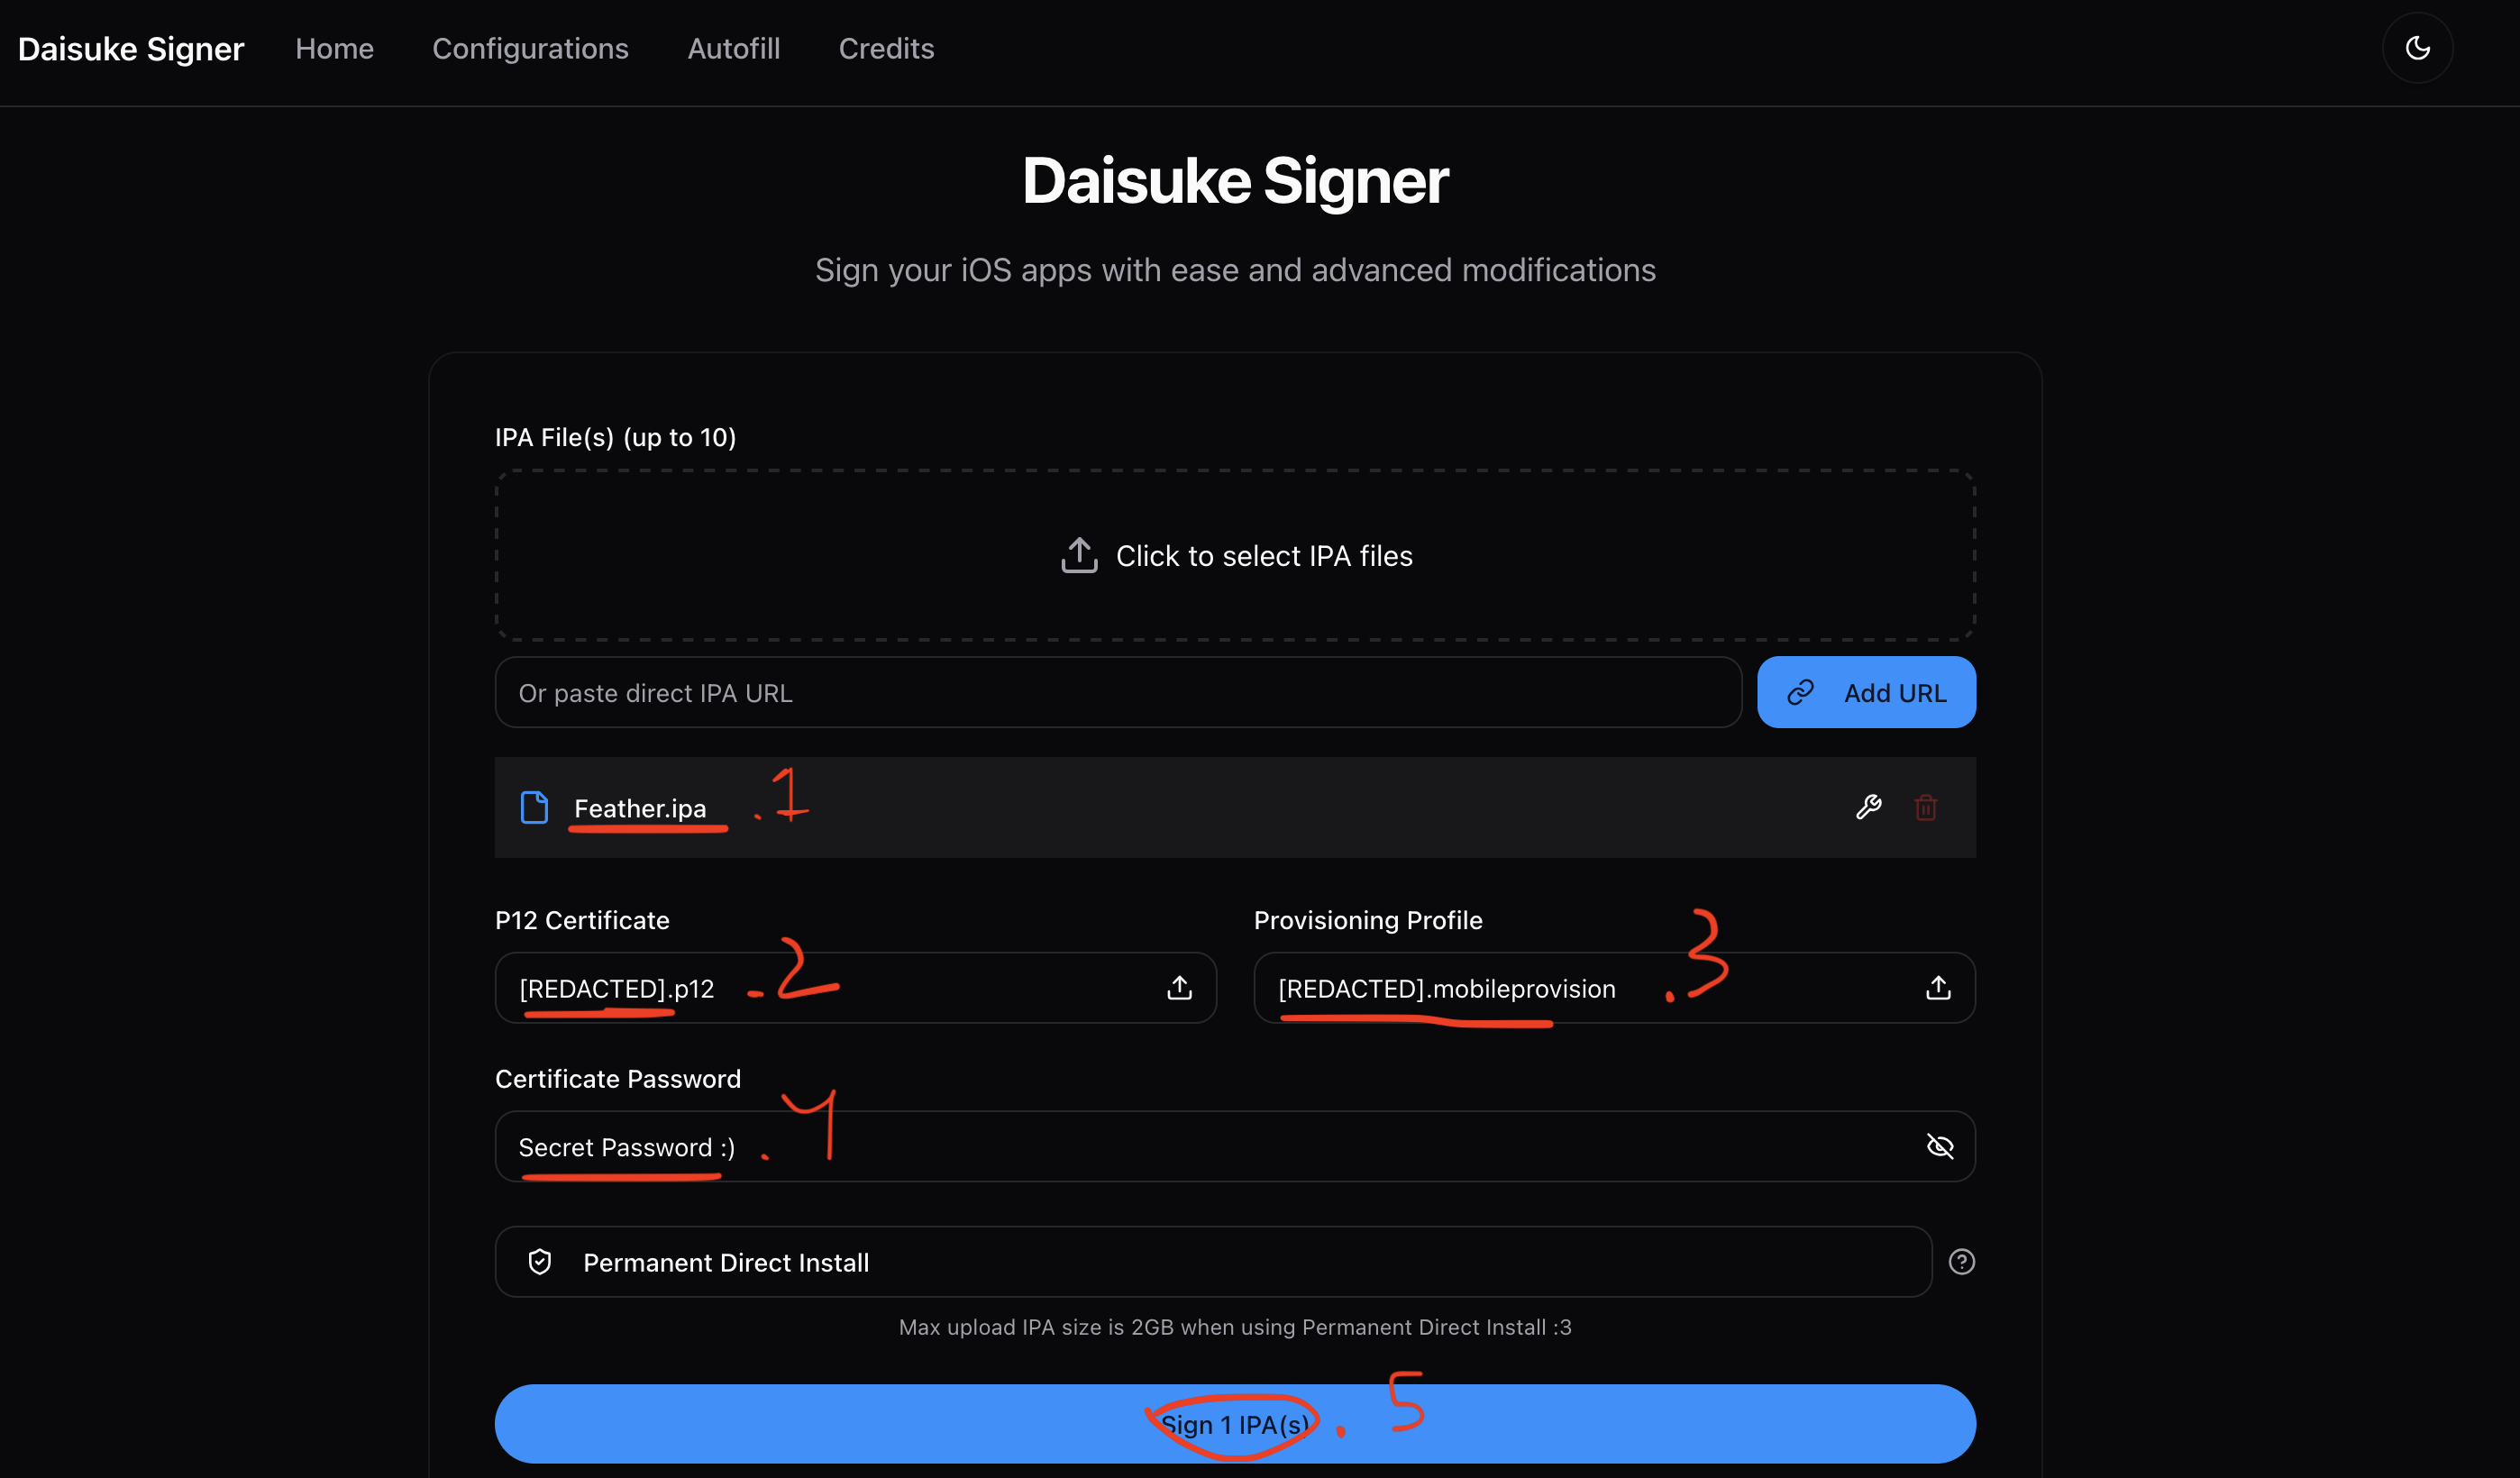
- Click “Sign”
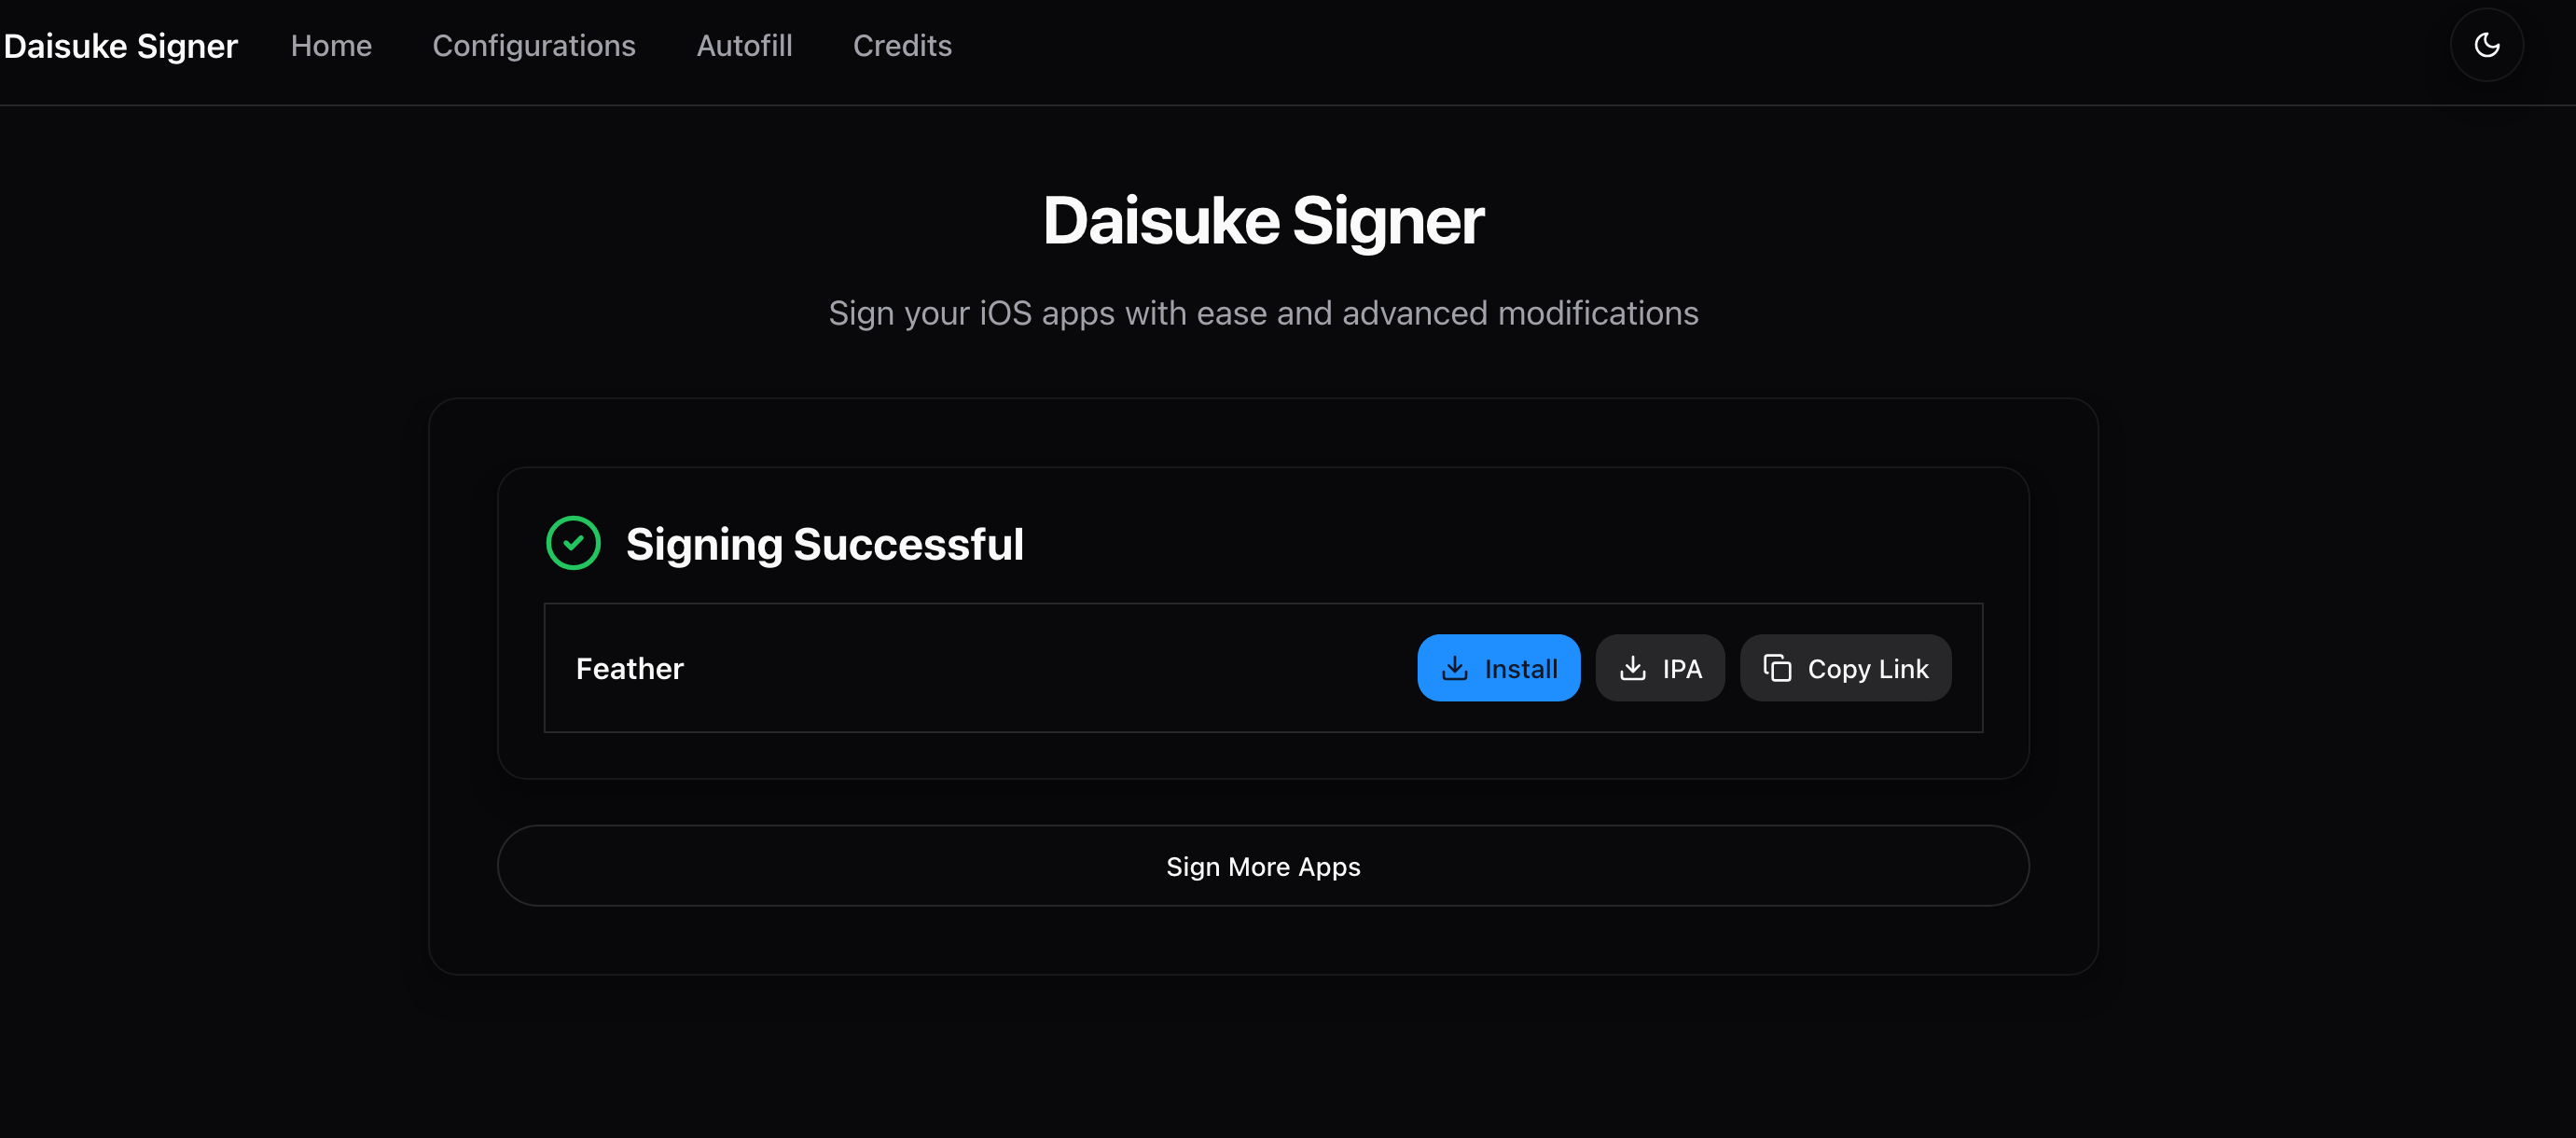
If you are on your iOS Device click install. If not click copy link and send that URL over to your iOS Device.
Once installed open up the Feather App and follow these setups to get it set up
Setting up the Feather App
Feather is a free opensource on-device iOS/iPadOS application manager/installer, using certificates part of the Apple Developer Program. Ill be using Version v2.6.0 (latest as of this post) for this tutorial.
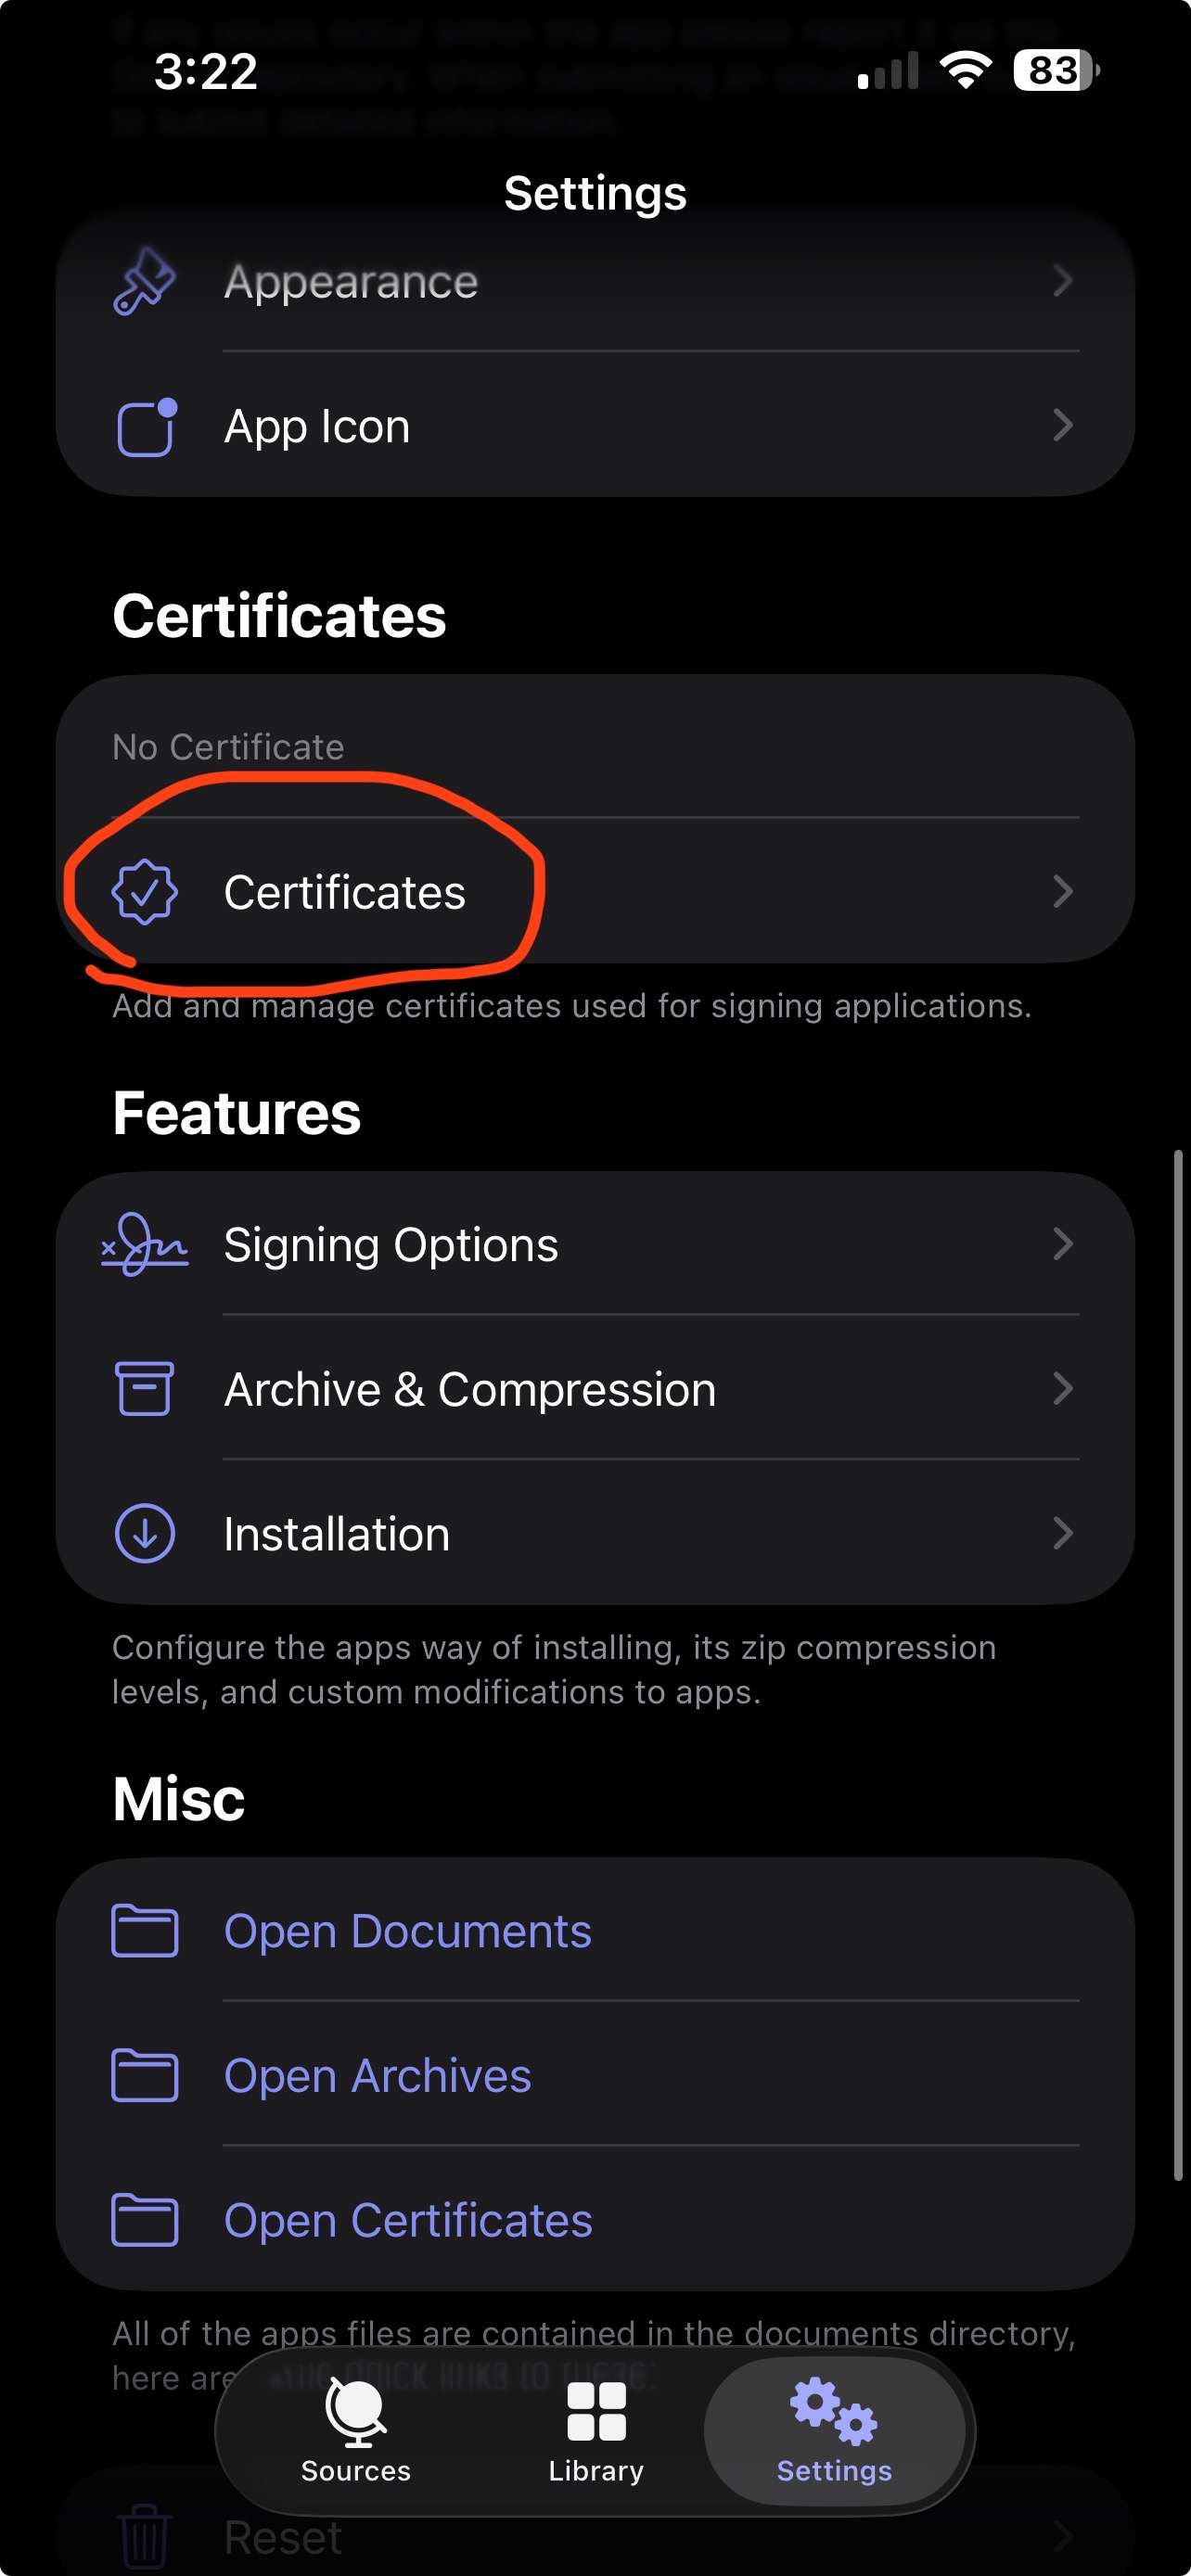
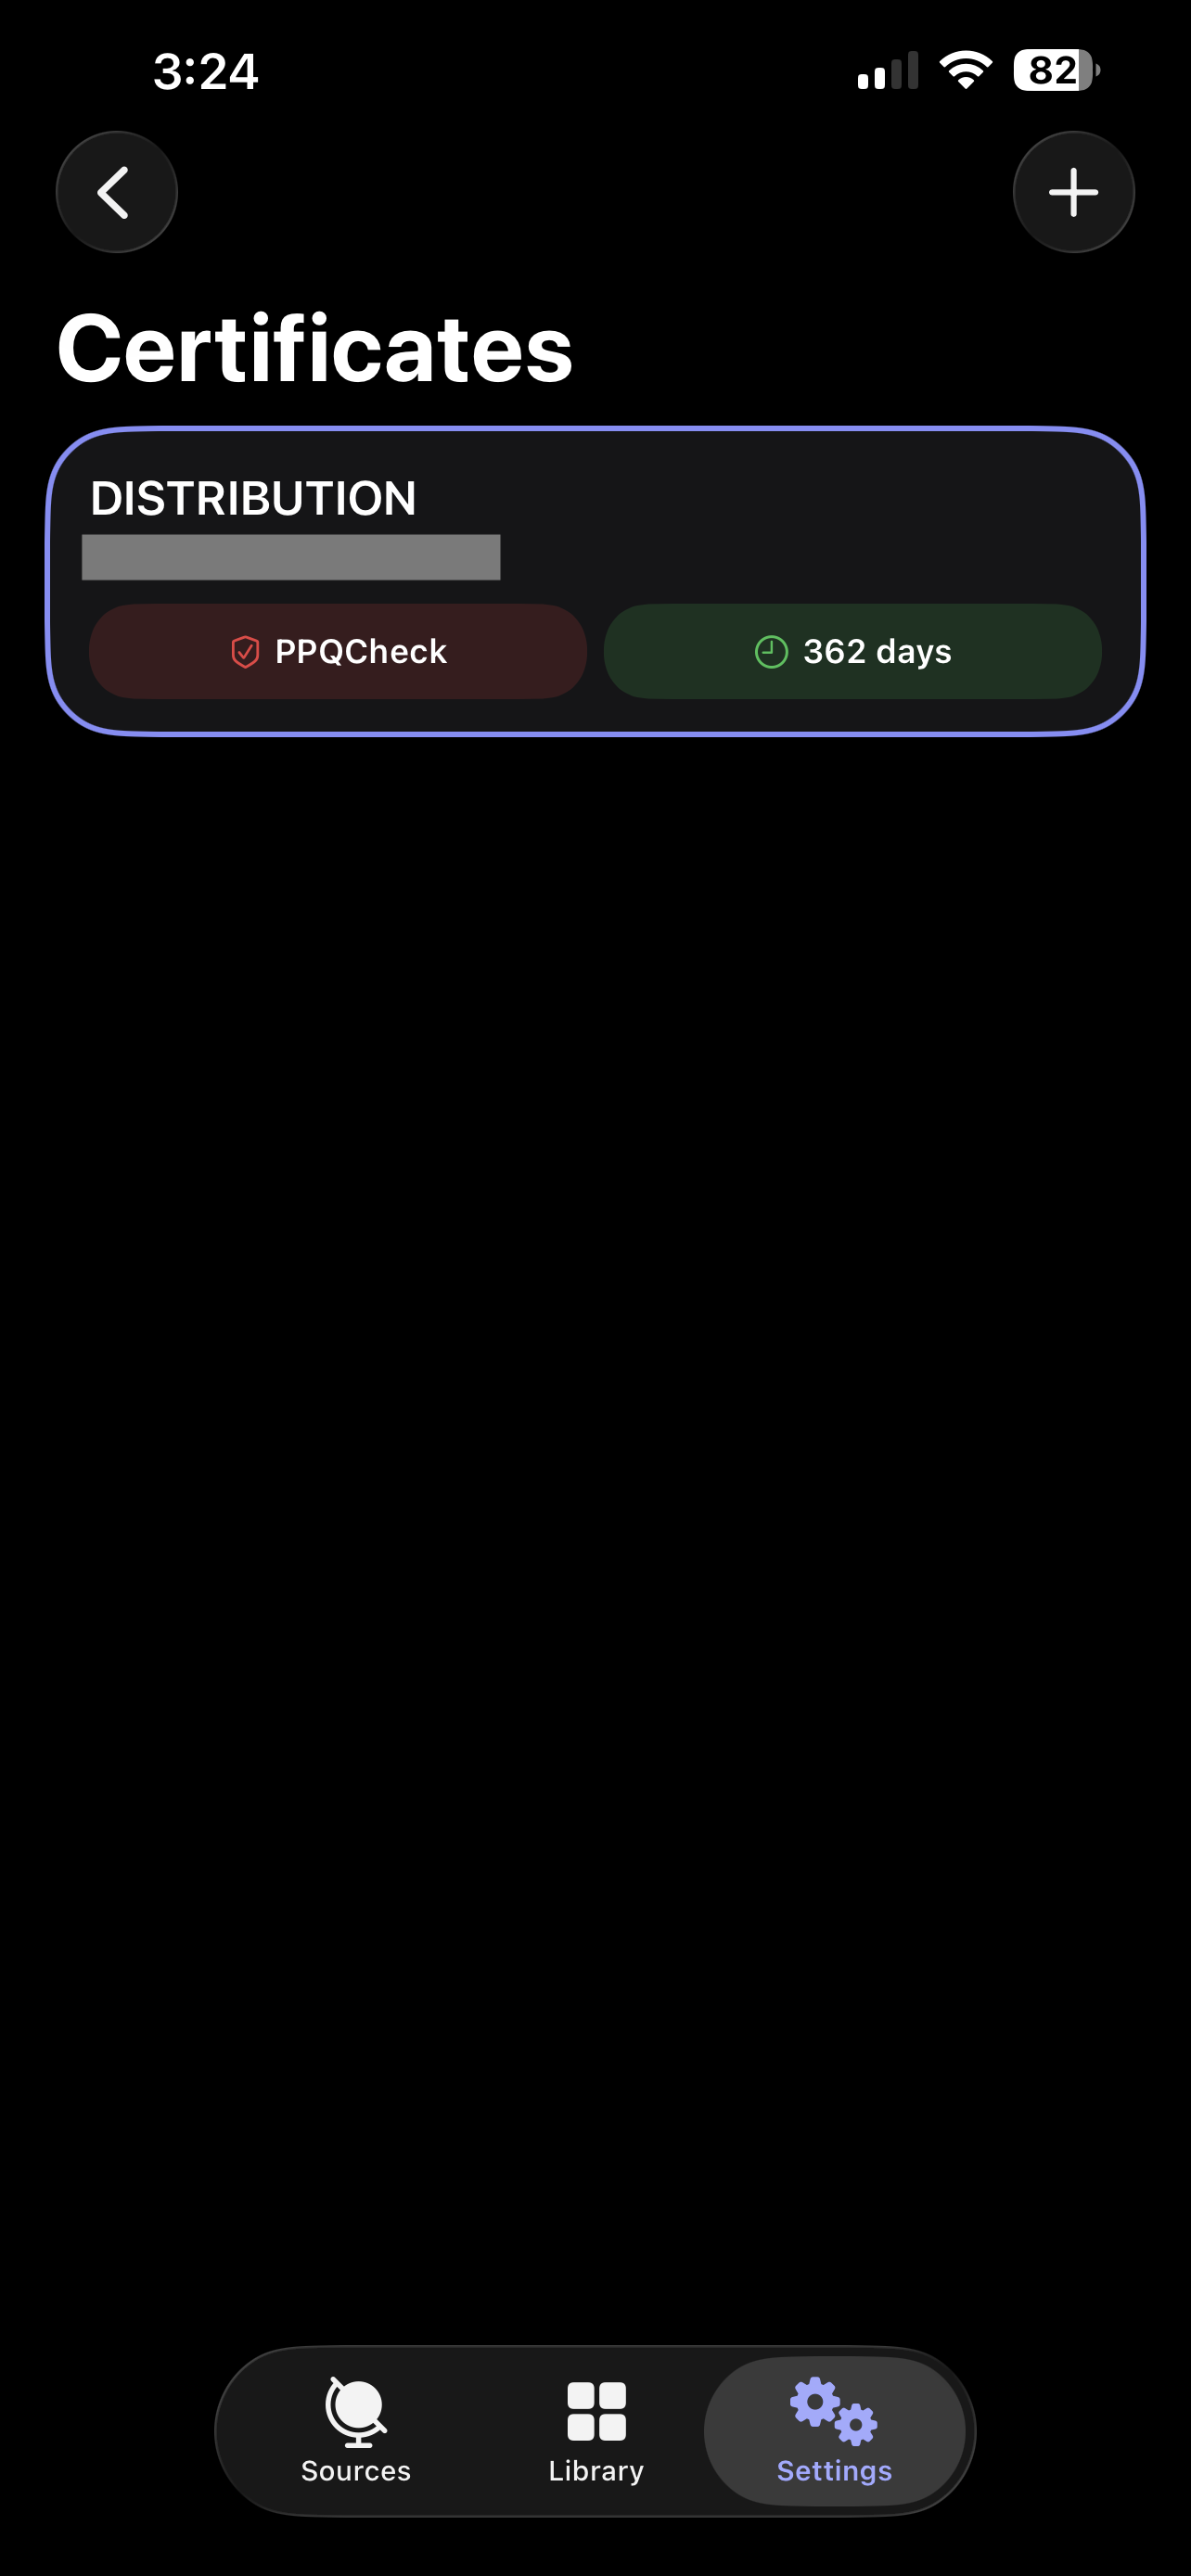
- In the Feather app go to the “settings” tab and scroll down to “Certificates” and click on it.
- Click “import” then under the “Import Certificate File” add your .P12 file. And under “Import Provisioning File” add your .mobileprovision file. Then enter your password for your .p12 file (if you set one, If not leave blank) and give this cert a nickname.
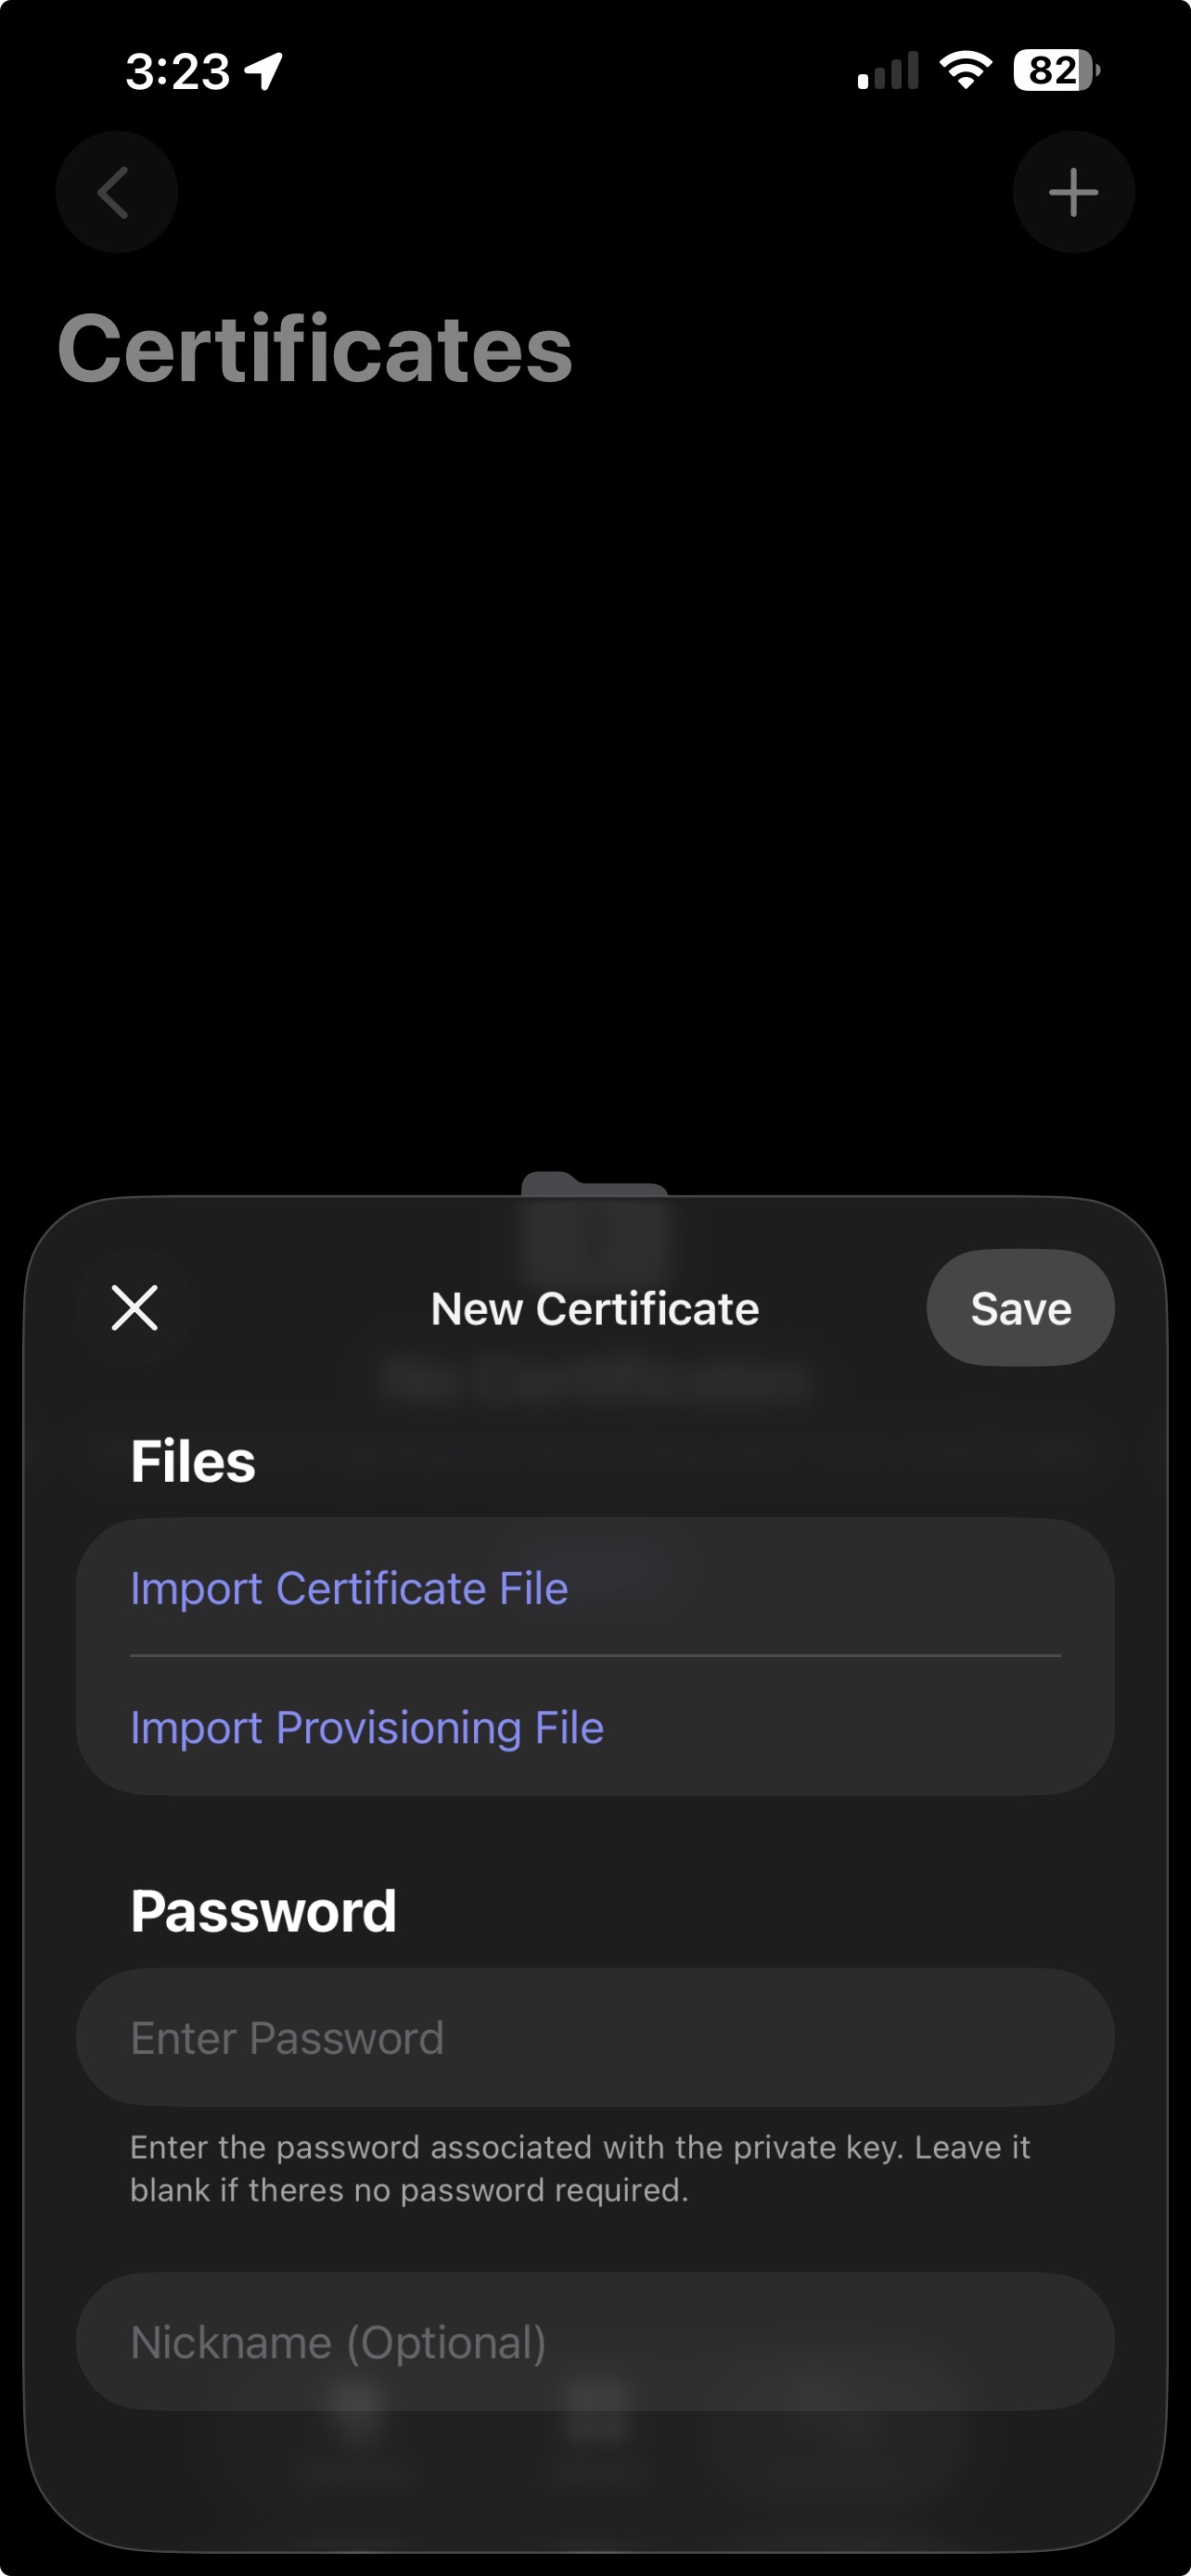
- Click “Save” and it should look something like this
- Now go back to the “settings” tab and scroll down to “Installation” and click on it.
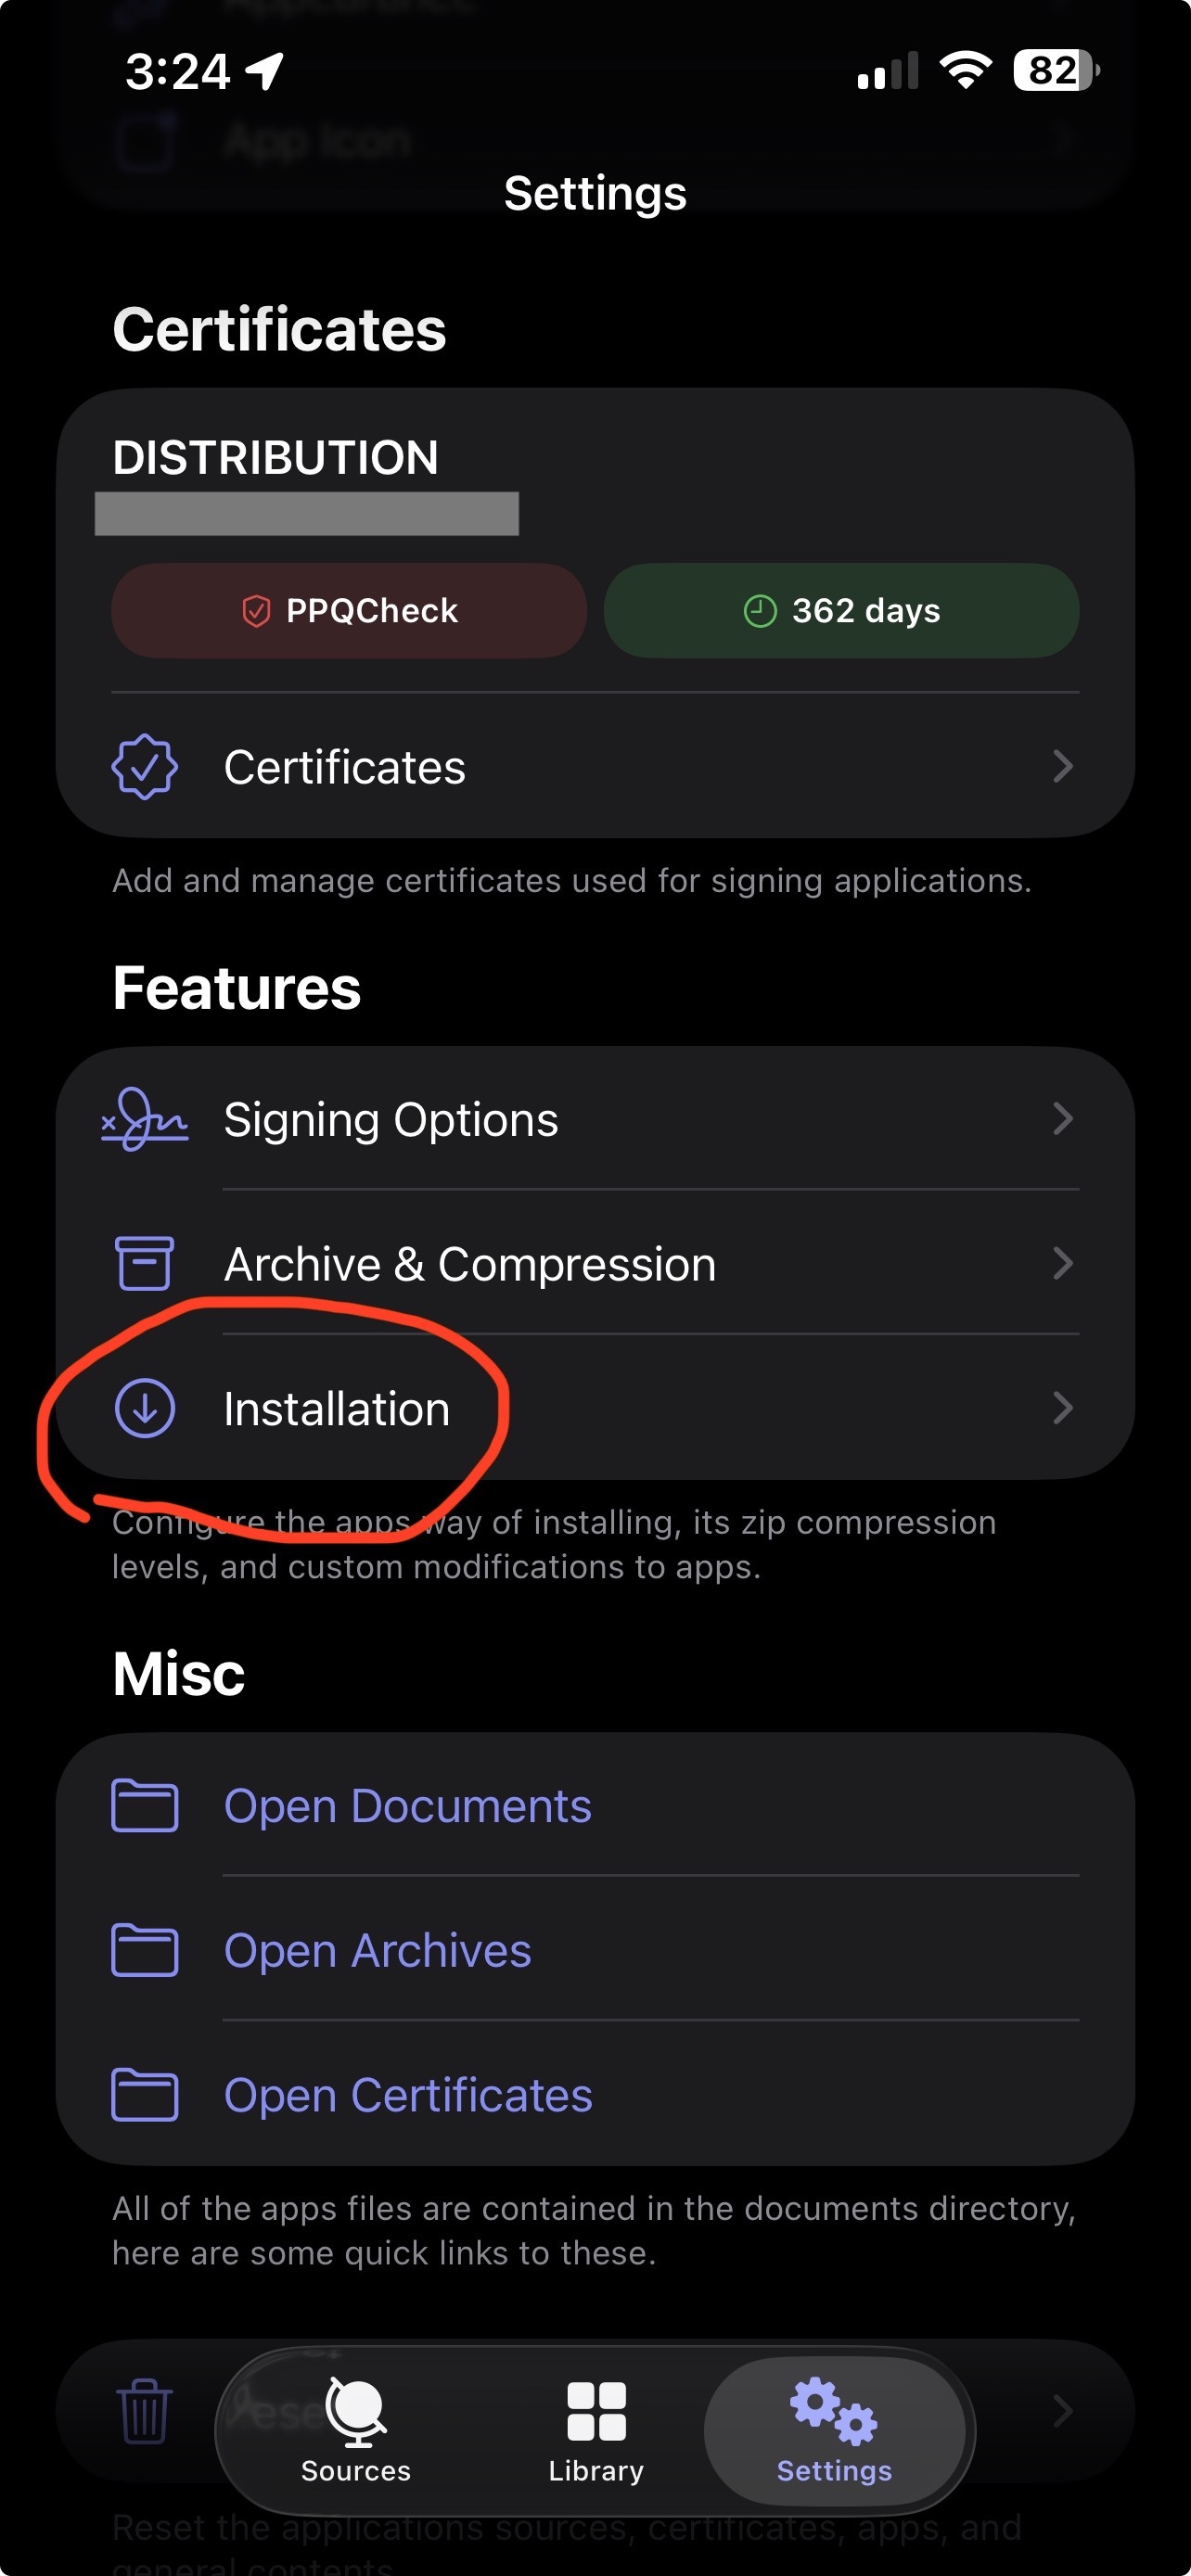
- In here we will select “Installation Type” as Server and for “Server Type” click semi local.
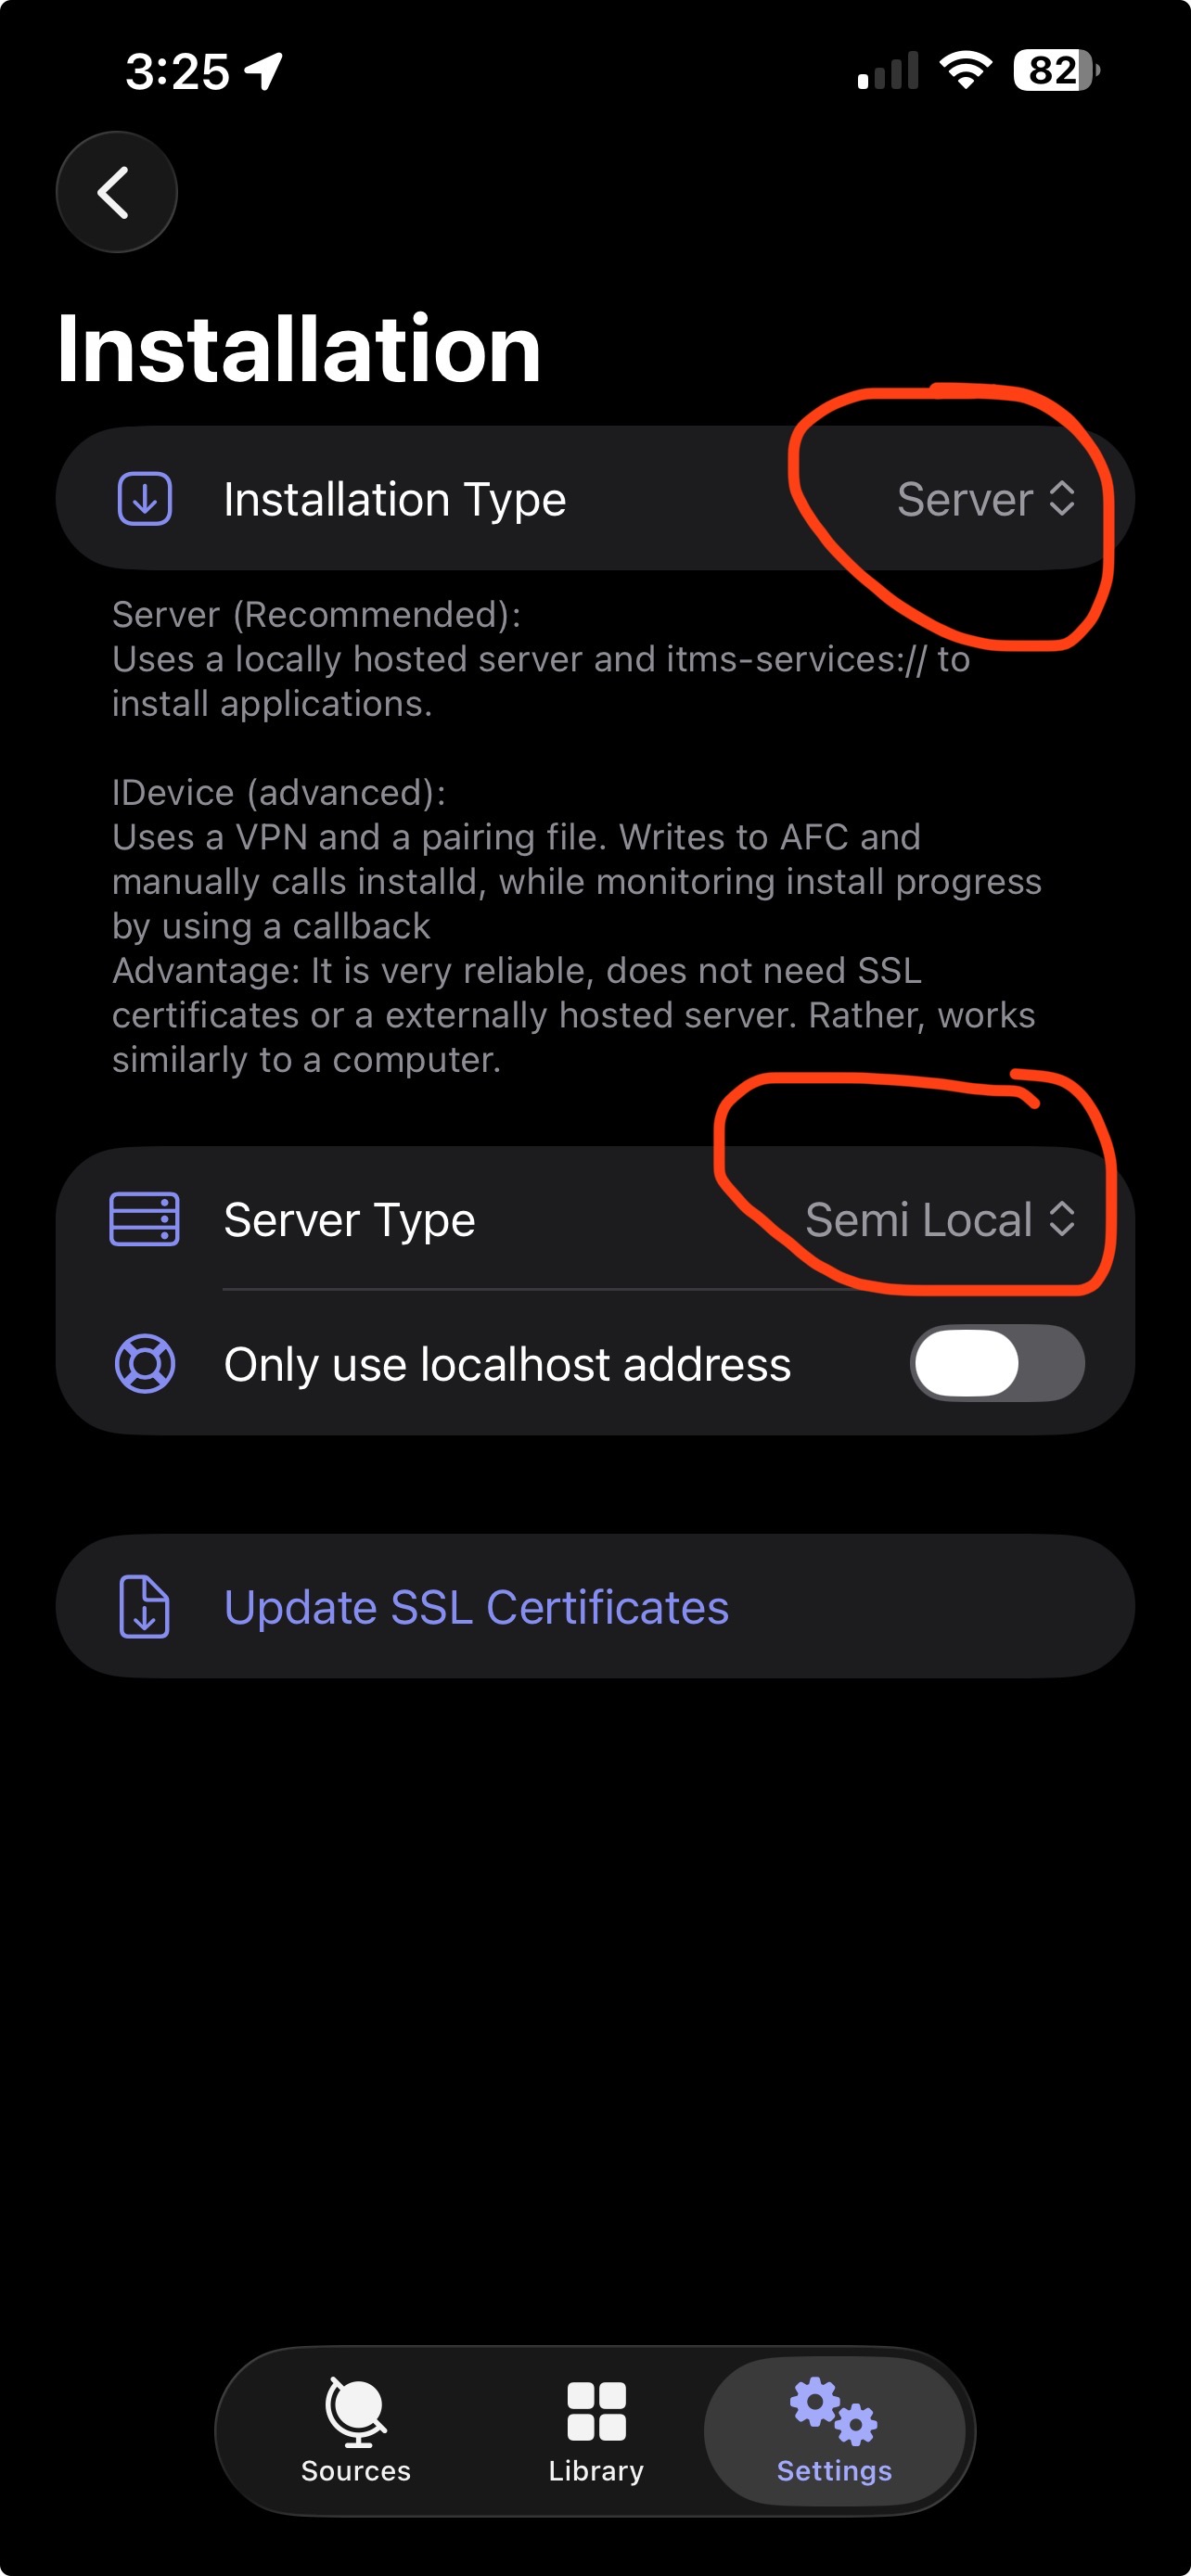
Just a quick FYI: what we did here is change how the app gets installed. When we set Installation Type to Server, the App hosts the IPA on a local server on the device and installs the app using an iOS install manifest (a .plist) instead of pushing the IPA directly.
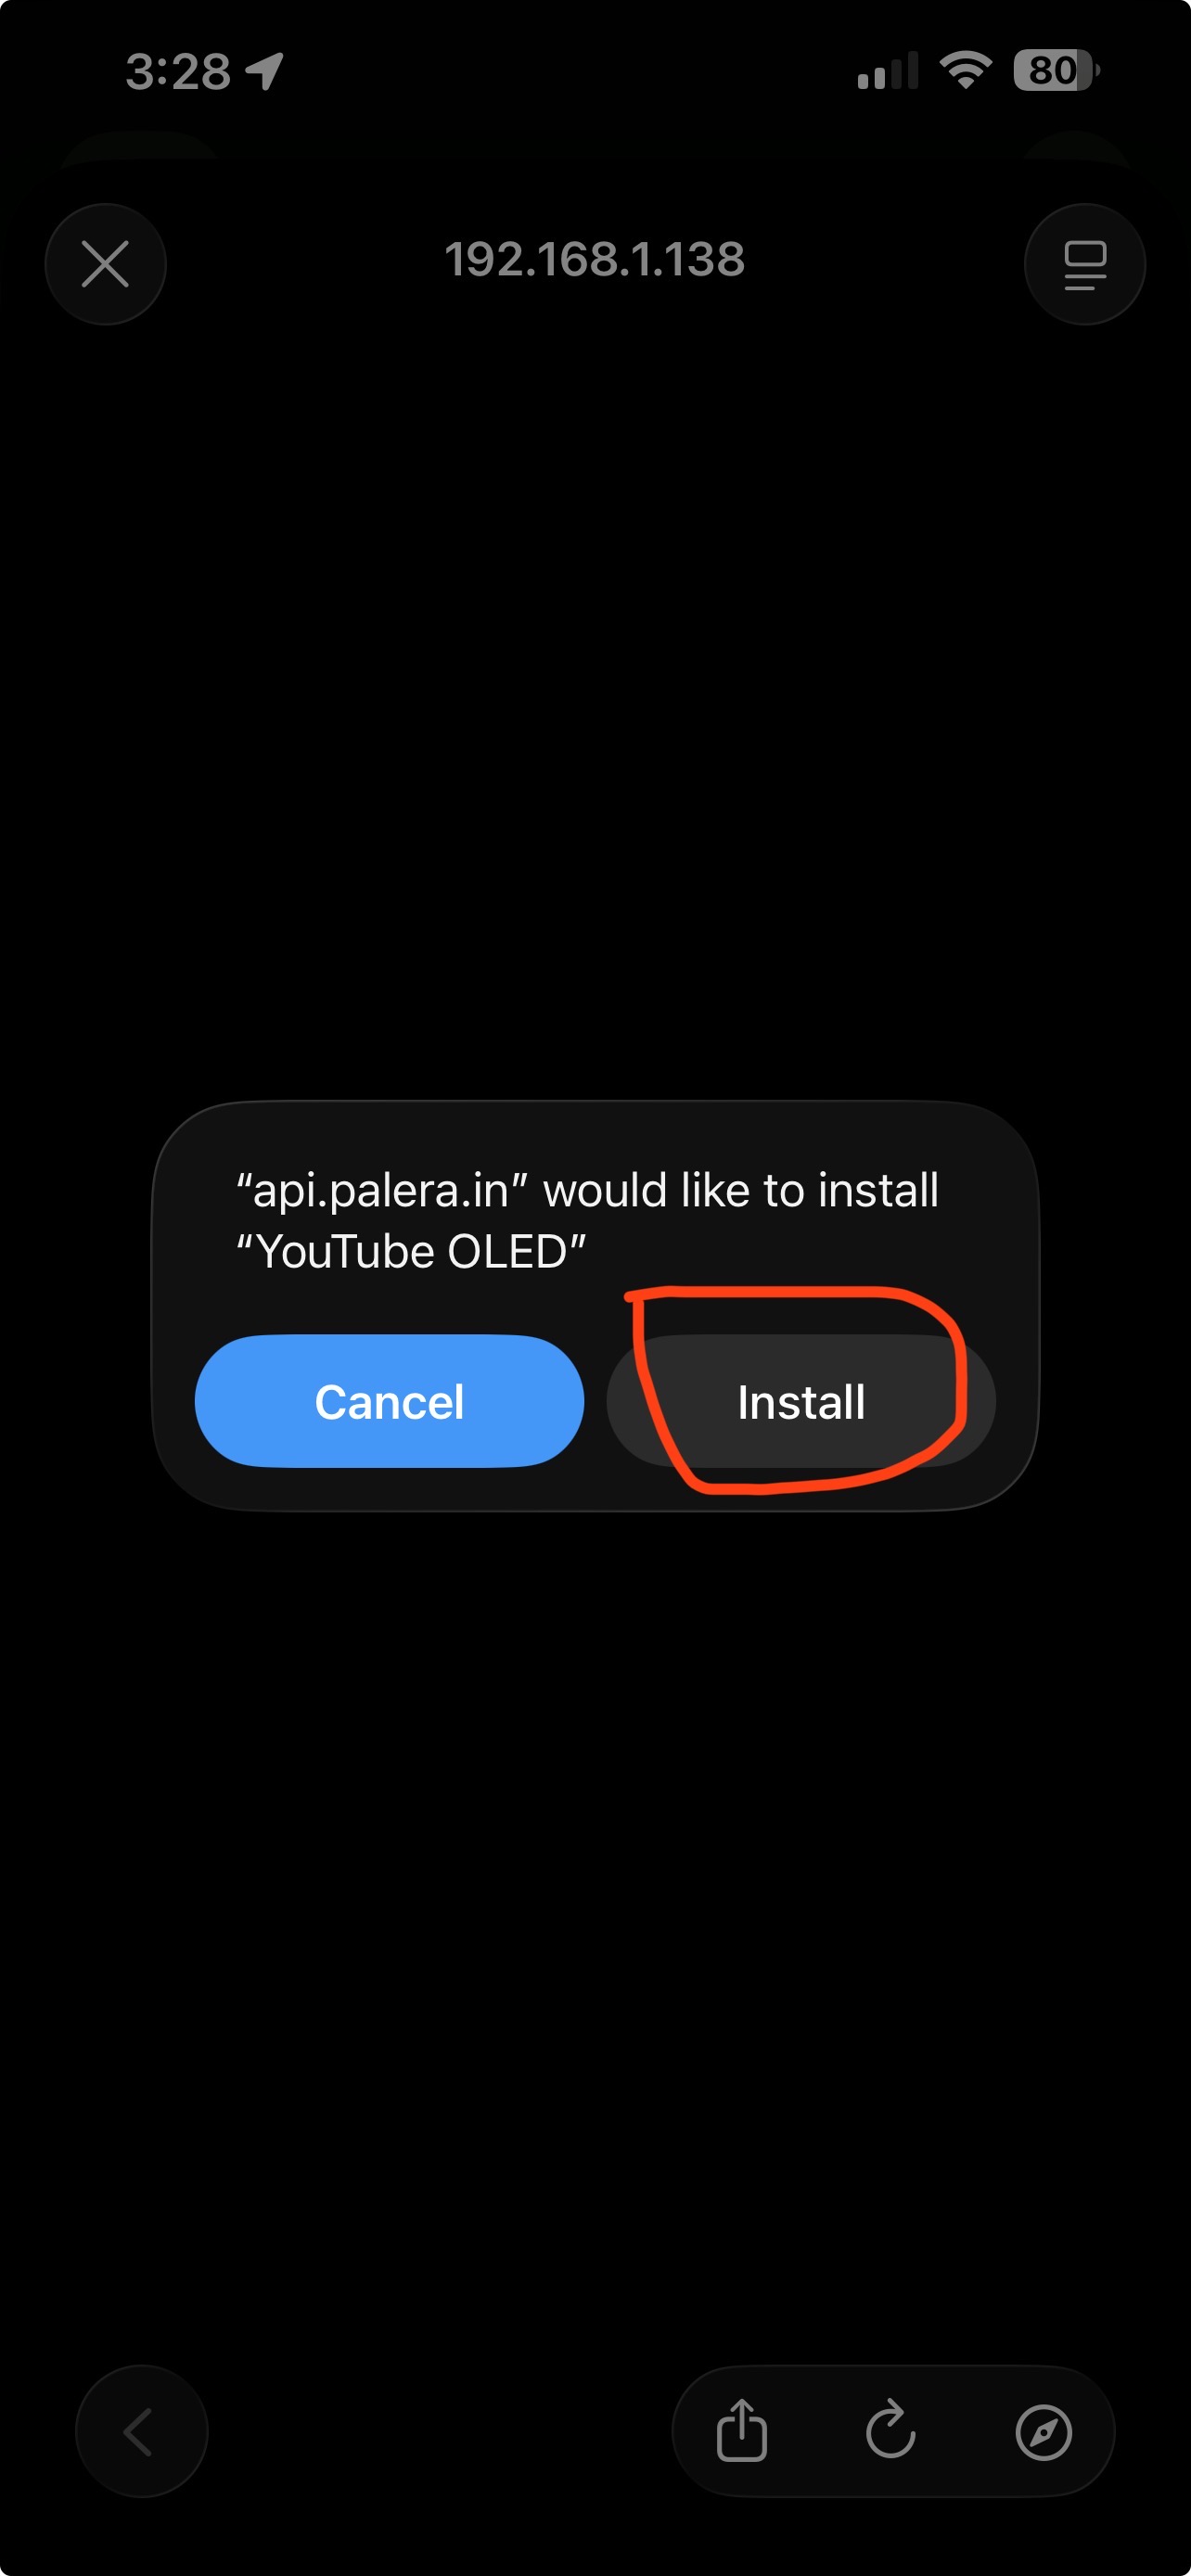
Because we chose Server Type: Semi-local, there is one outbound request: To api.palera.in which (as far as I understand) is running an API based on the open-source project plistserver (https://github.com/nekohaxx/plistserver). That API’s only job is to generate the install manifest link URL for us. It does not upload your signing certificates or your IPA to a remote server. The IPA stays on your local device/network; the manifest just points iOS to where it can fetch it.
Personally, I ended up self-hosting my own plistserver instance using this forked Docker setup to double check what it logs: https://github.com/castdrian/plistserver
Here’s an example of what a request to the manifest server looks like from Feather (notice the fetchurl points to a local IP hosting the IPA):

Just wanted to get that sorted away and understood before we move on. Because on newer iOS versions, the “fully local” install flows can be unreliable depending on the tool/route you use. So for the sake of this guide (and to keep things consistent and easy), we’re using the semi-local method.
Feather is now setup and ready to start sideloading!
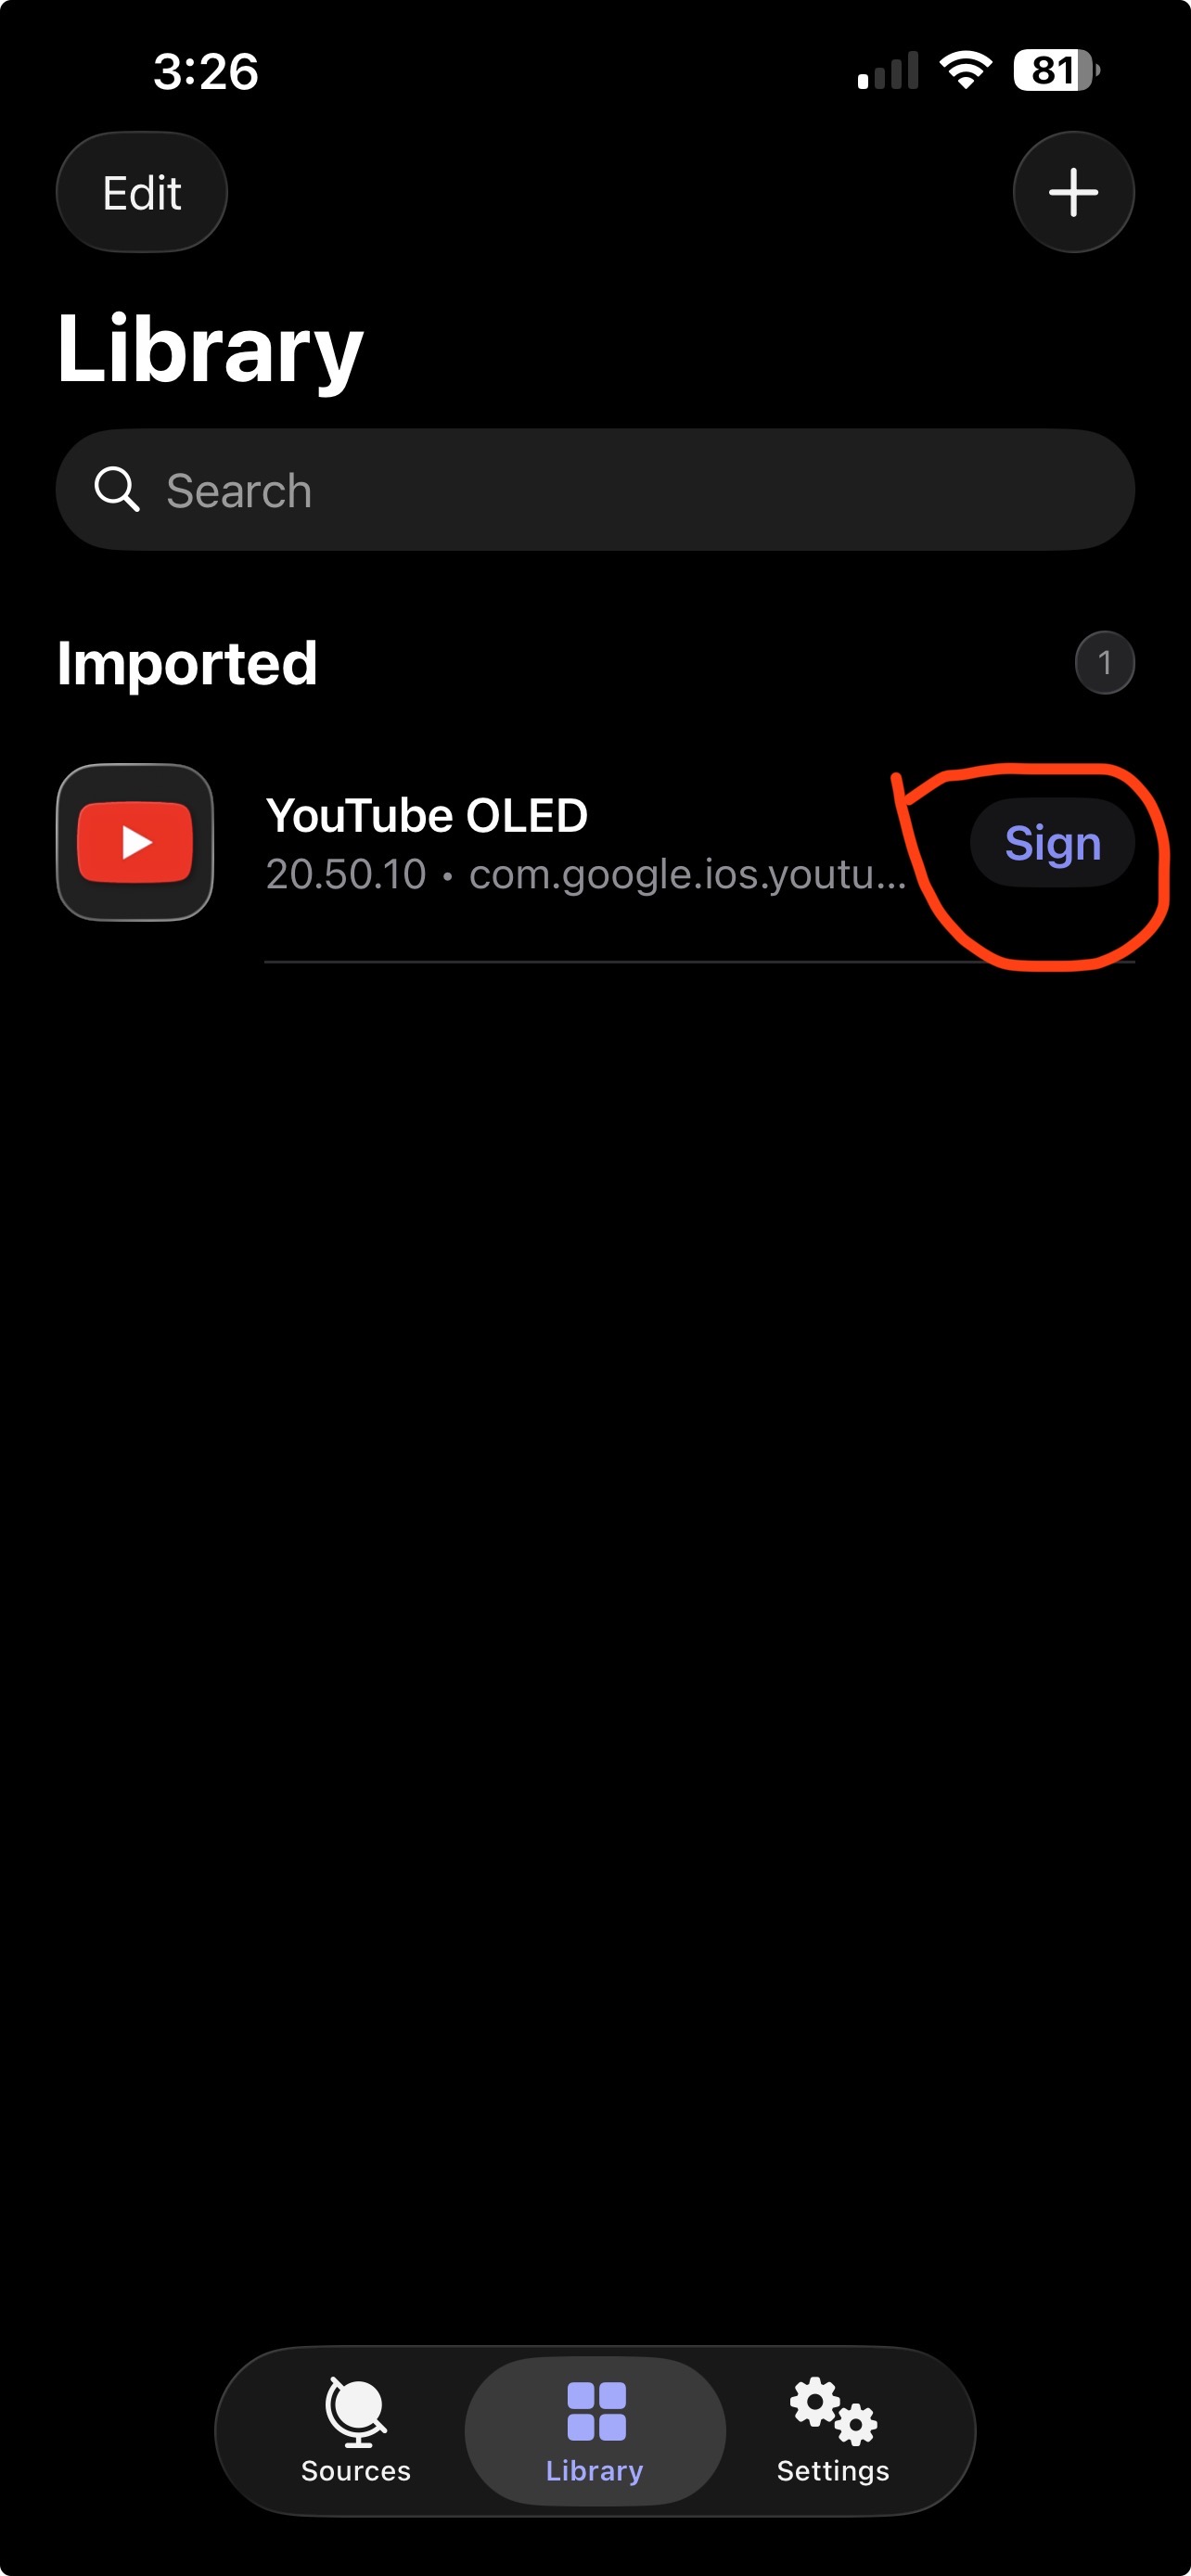
How to sideload apps using Feather
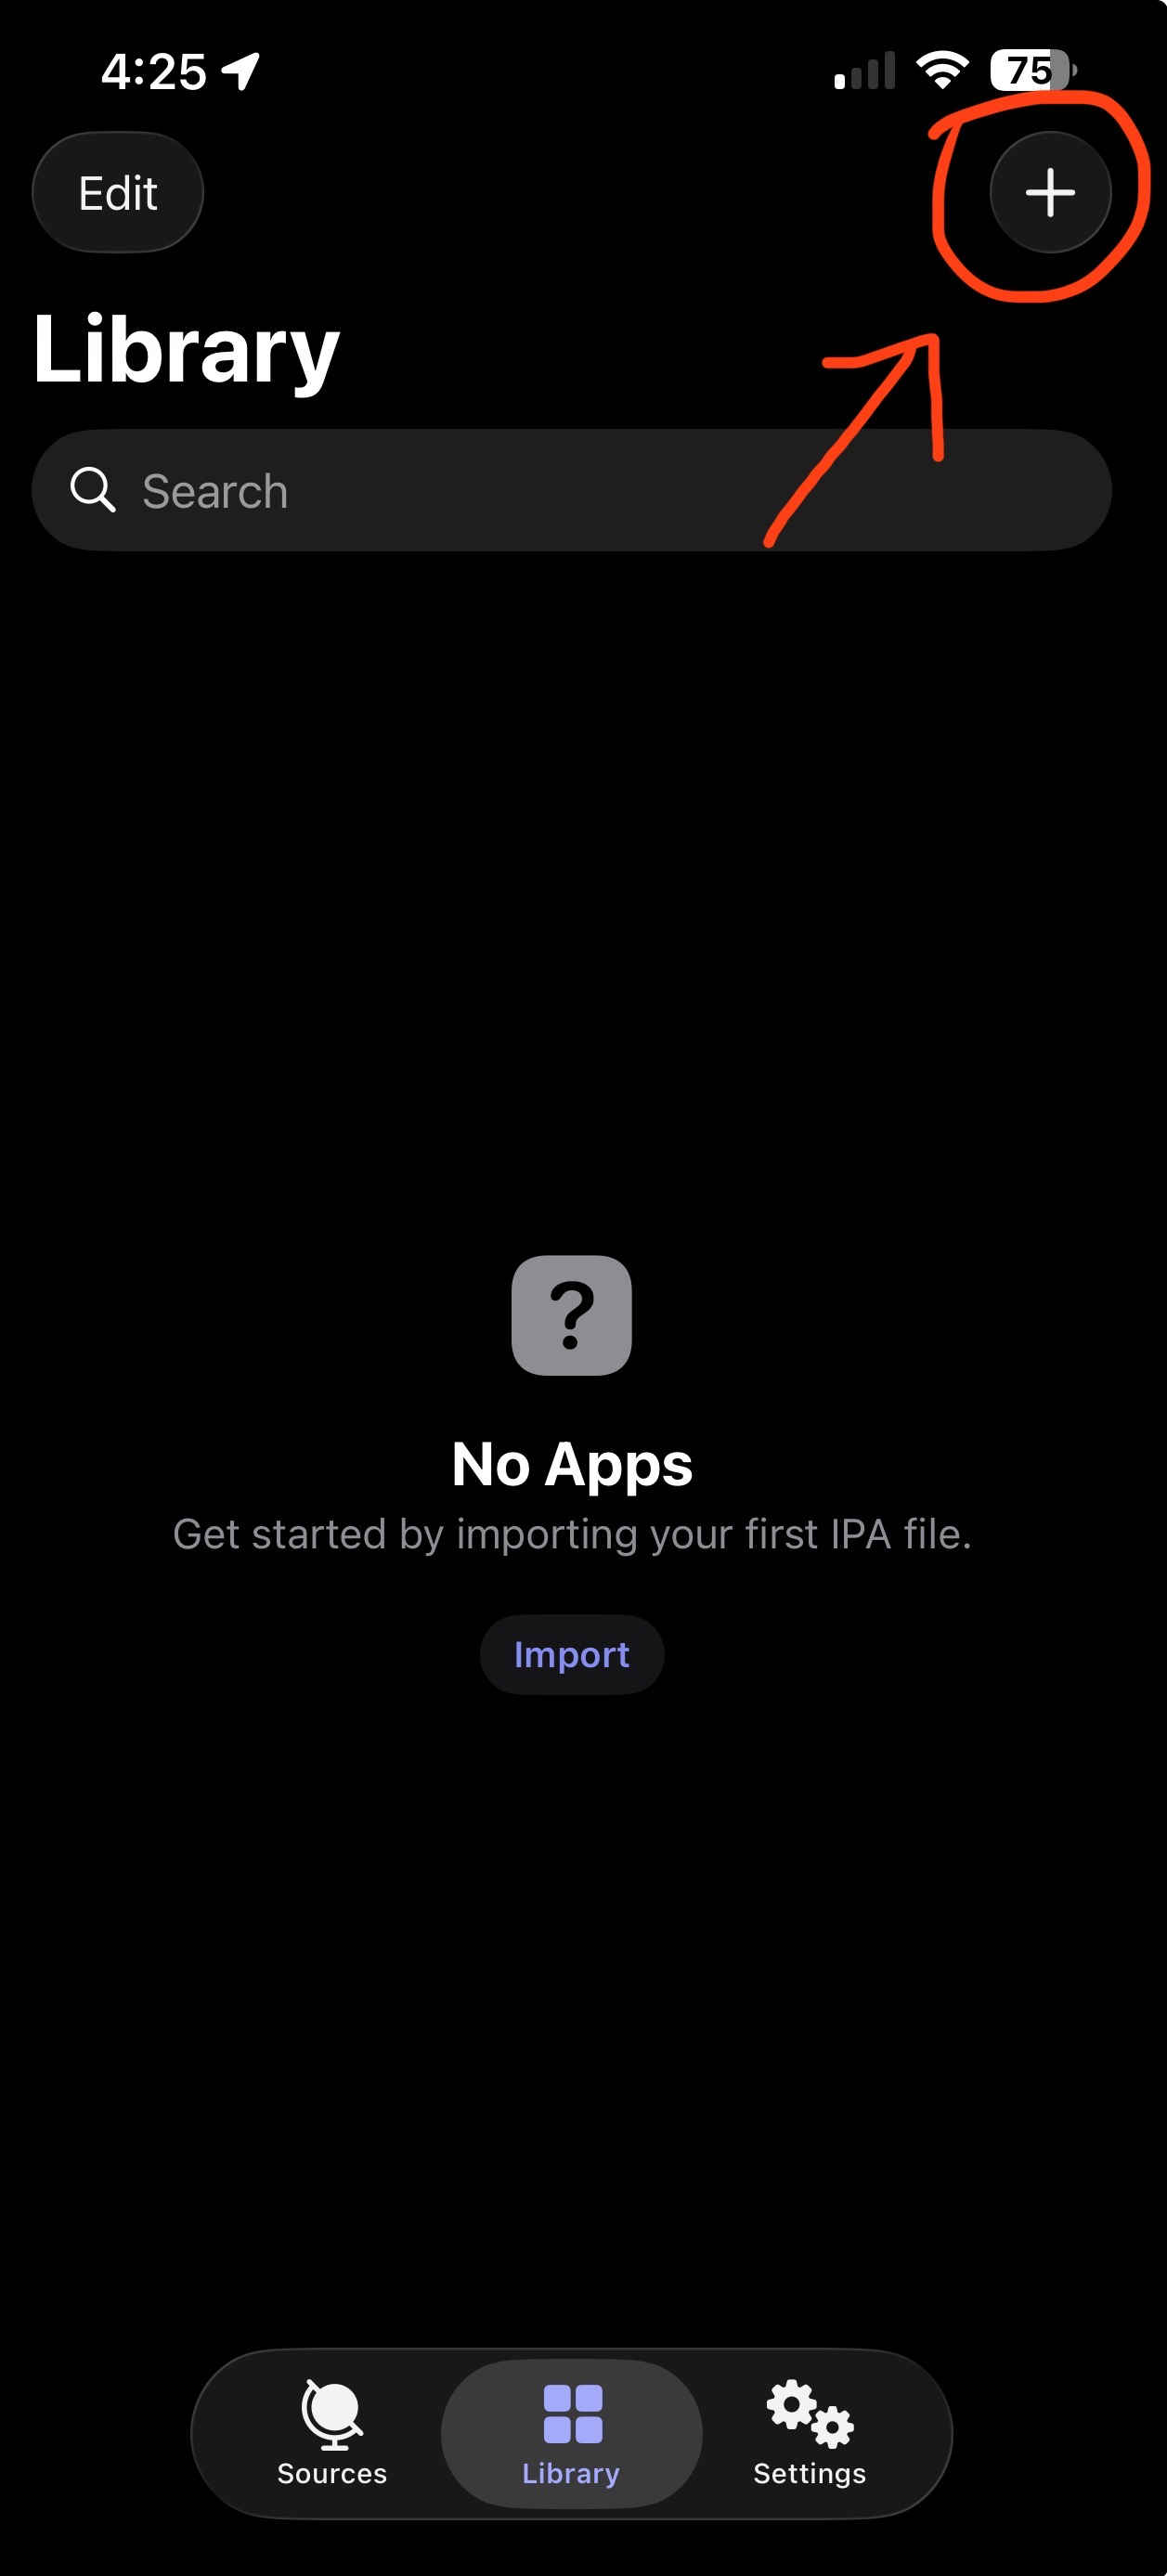
- Go to the “Library” Page in Feather and click the “+” on the top right of the screen. Select “Import from Files” and import the app you want to sideload.
- After its done importing click “Sign”
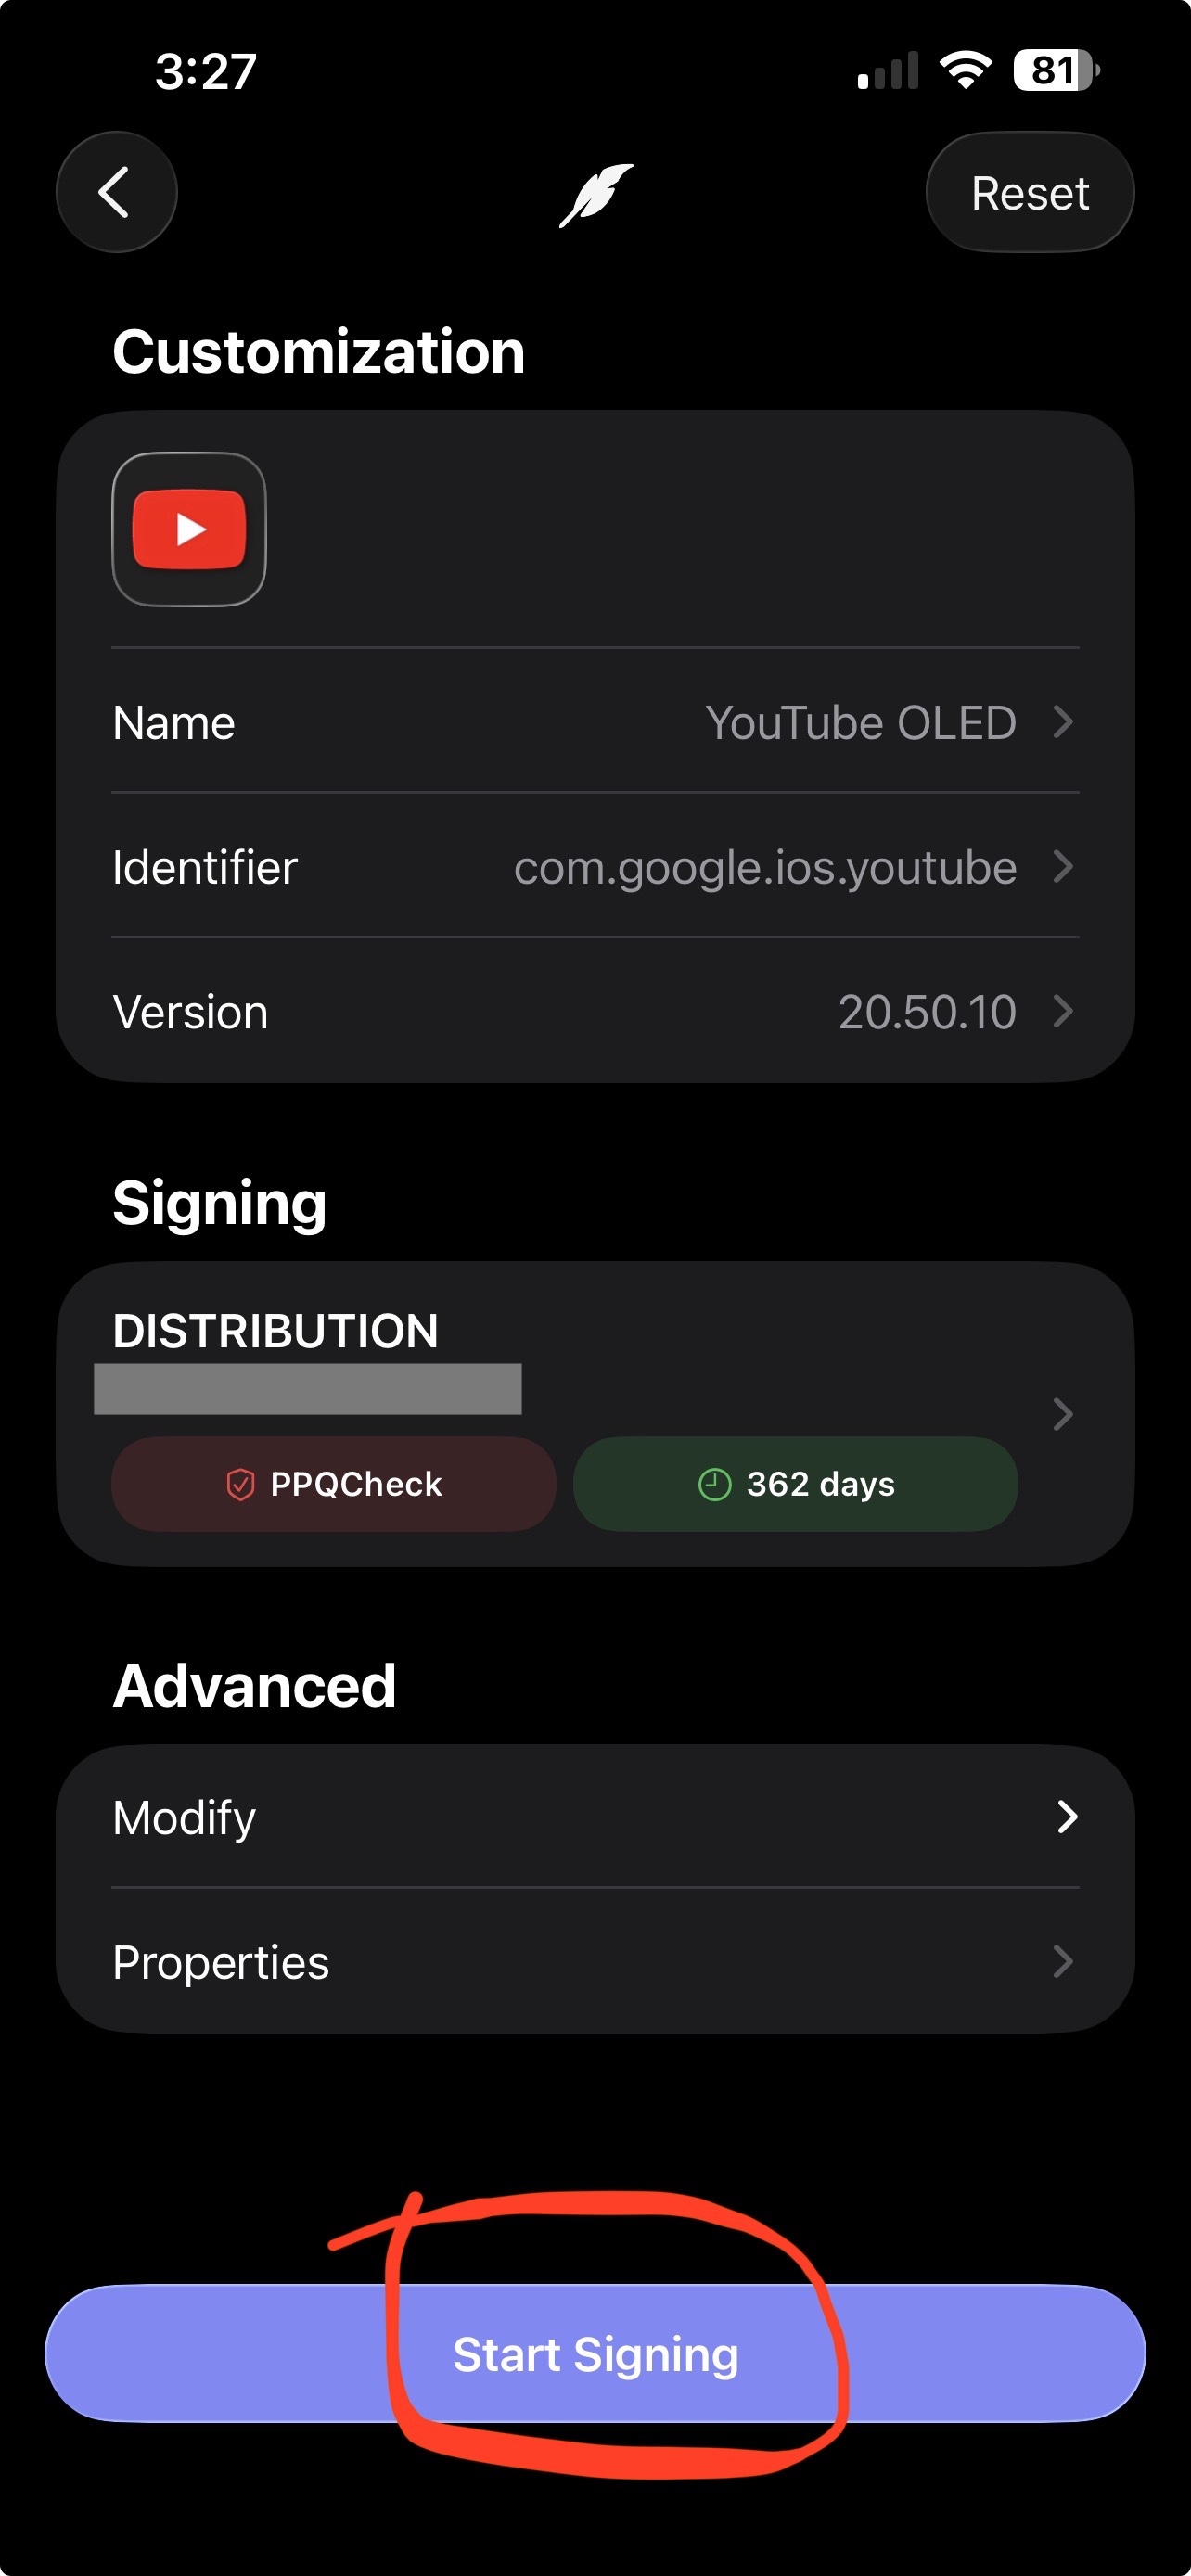
- In this menu we can change a lot of settings, but for the sake of this uide just go right ahead and click “Start Signing”
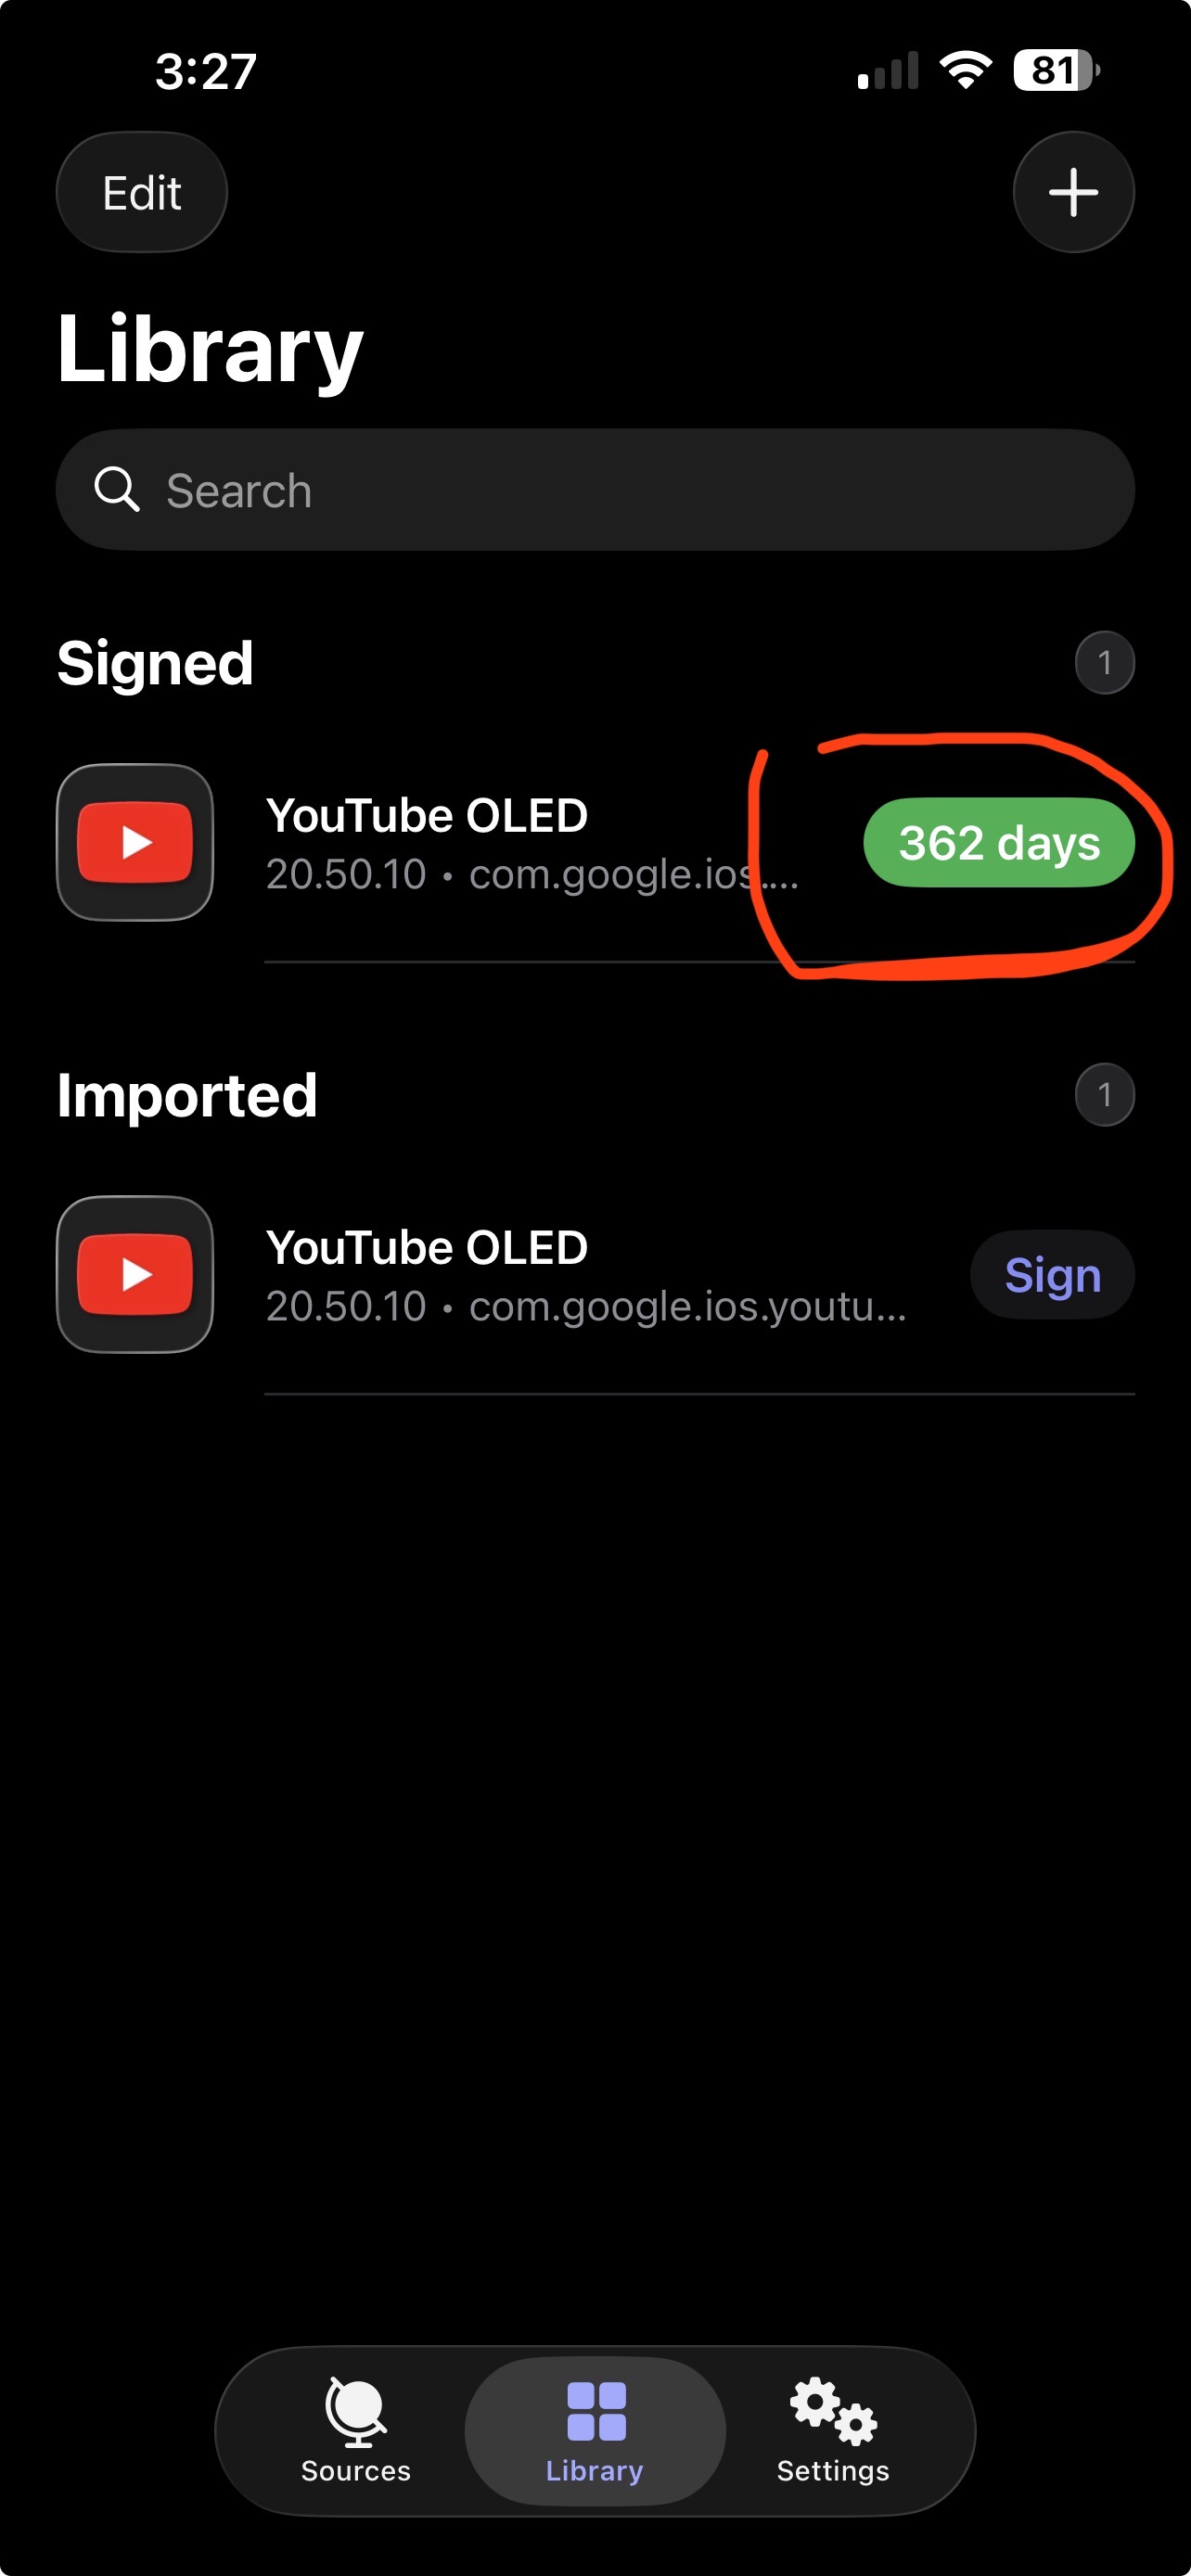
- Now in the “Signed” area find the app you signed and click on the date to install it.
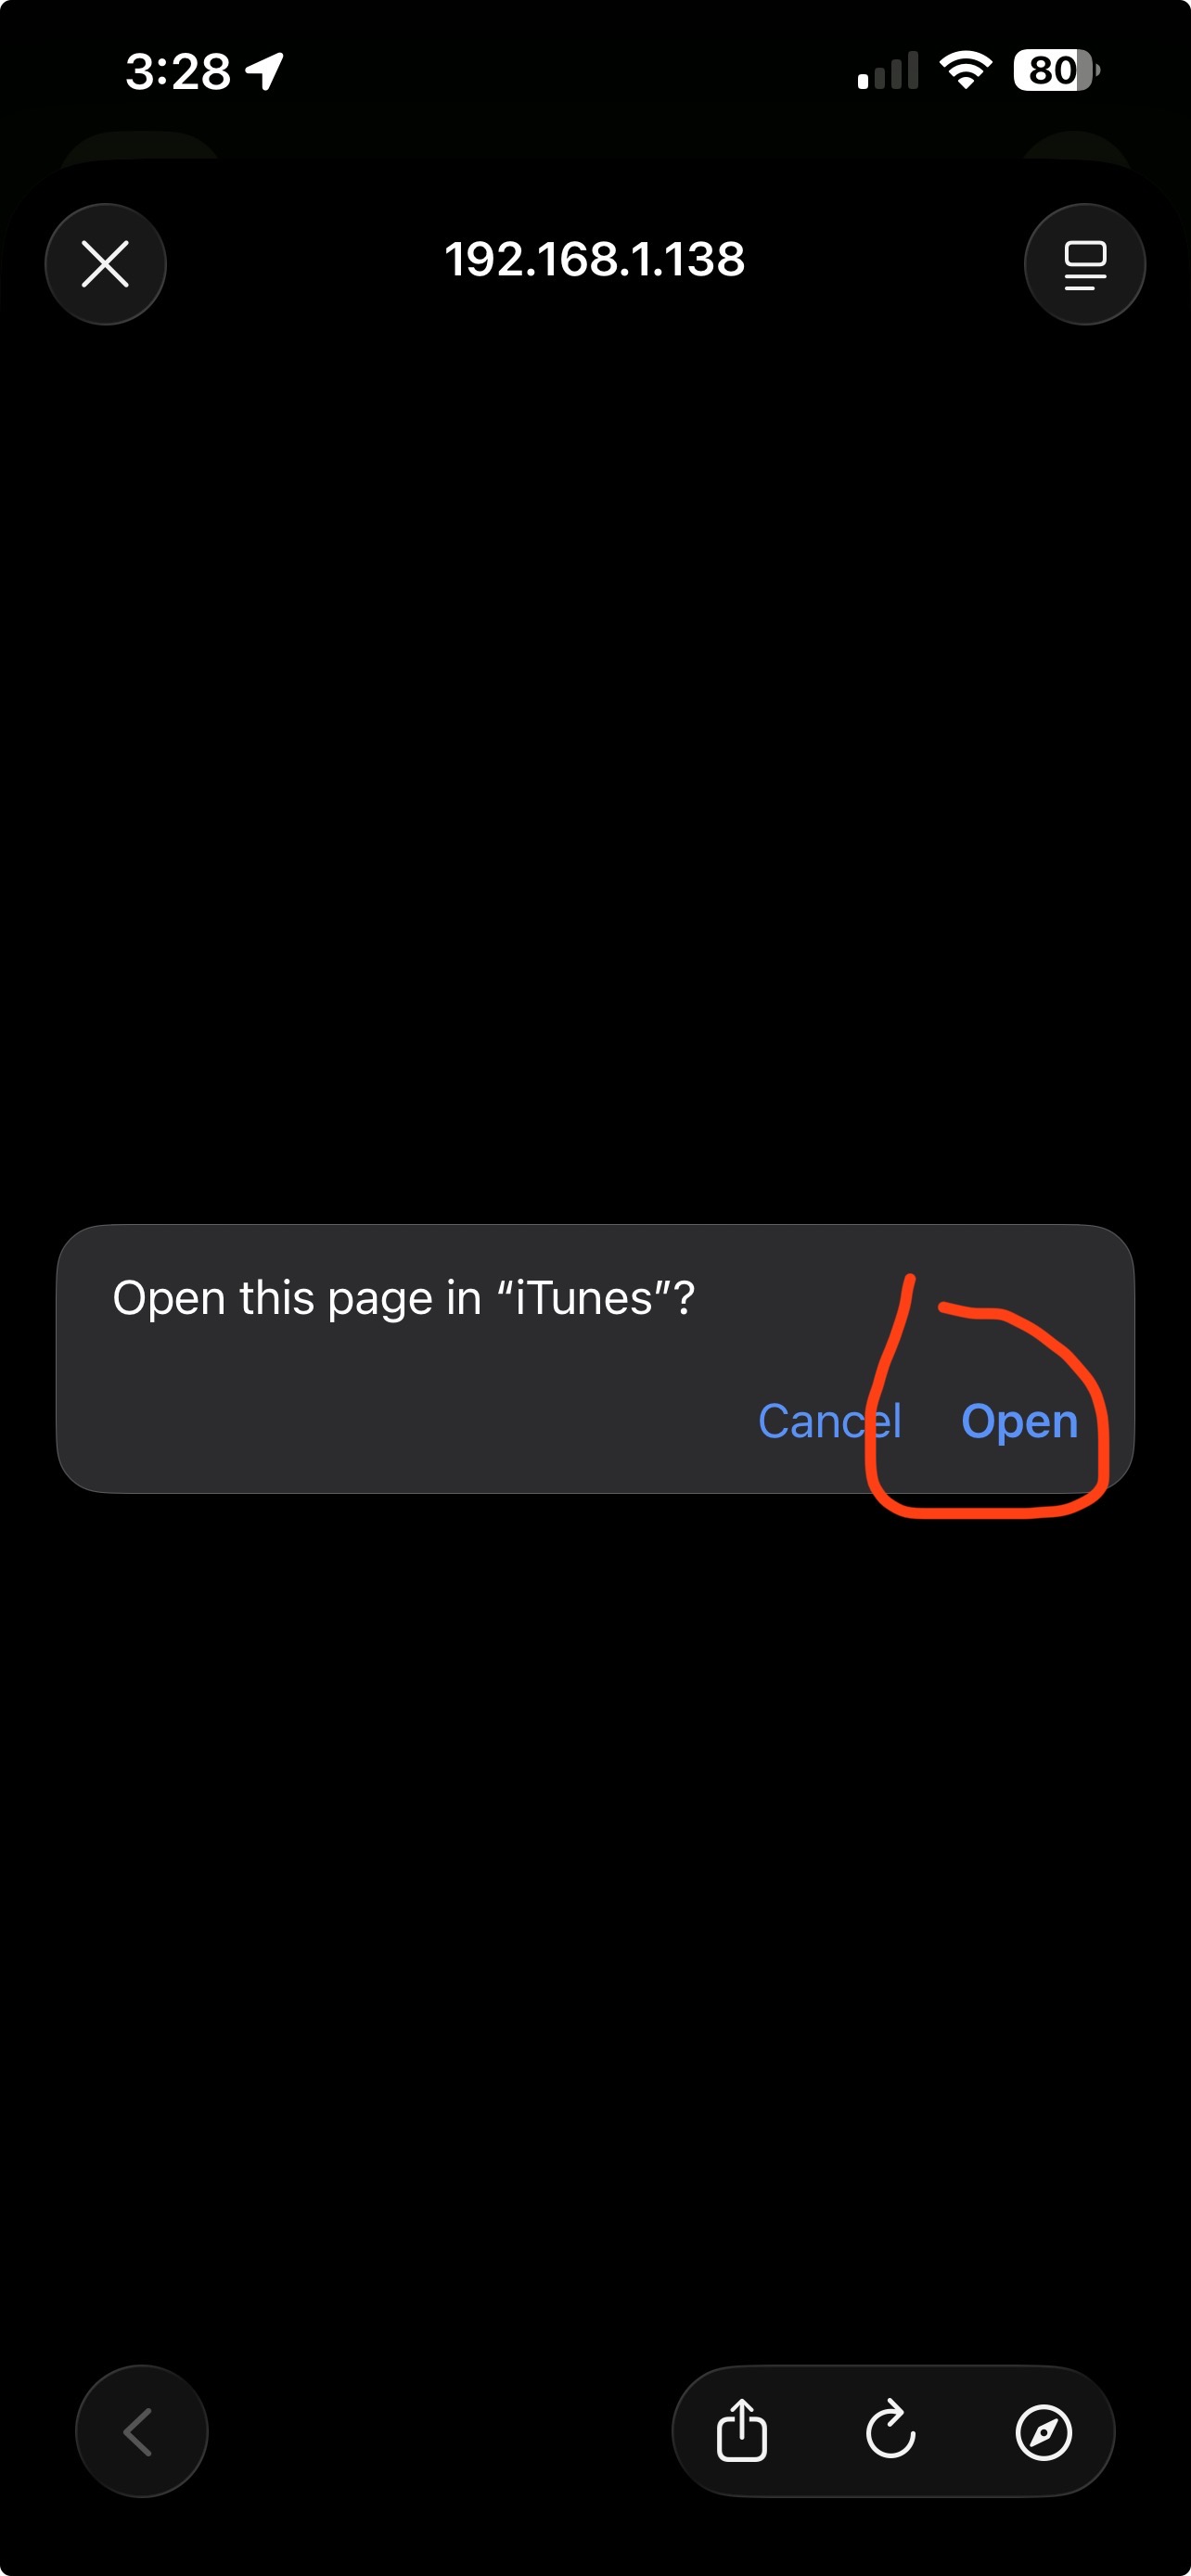
- Give it a little to package the app then you will get a popup saying “Open this page in iTunes.” Click Open.
- And finally click install!
Now don’t close out of the app right away, just leave it running in the background as you go to you homescreen to check if your app is installing.
If it successfully installed go ahead and close out of feather.
And Congrats you have now signed and sideloaded your first ever app on your device!
Final Note’s
Now, there are a lot of different places you can go to learn about sideloading.
r/sideloaded is a great subreddit for beginners: Good for learning the basics and asking questions.
When it comes to actually finding apps/repositories, the sideloading scene mostly lives in a few places: Reddit, Telegram, and a handful of websites. Below are a few solid starting points.
A quick note / disclaimer
I’m not affiliated with any of the developers, repos, websites, or Telegram channels listed here. I’m sharing these because they’ve been useful in my own experience, but this list can change if something sketchy happens or a source goes downhill, I’ll remove it off here.
In the Feather app under “sources” go in and import these repos:
https://raw.githubusercontent.com/khcrysalis/Feather/refs/heads/main/app-repo.json

https://xitrix.github.io/iTorrent/AltStore.json

https://altstore.oatmealdome.me/

https://provenance-emu.com/apps.json

https://alt.getutm.app

https://repository.apptesters.org

https://raw.githubusercontent.com/Nyasami/Ksign/refs/heads/main/repo.json
That should give you a pretty decent starting set of apps.
Dev shout-out!
My favorite developer in the scene right now is @Dayanch96. You can browse his apps here, and you can add his repo to Feather from the same page.
My favorite tweaked app from him is his modified YouTube build (the project is open source here: YTLite).
Also check this Reddit post out! Someone made a tweaked version of youtube for Apple TVs! kinda like the “smarttube android tv app” but for Apple TV’s!
Bigger sites / repos
There are also hundreds of devs and sites out there! Personally, I don’t use the huge repos sites much (I mostly grab IPAs from a few Telegram channels).
Telegram channels
Here are some Telegram channels worth checking out:
Dayanch96’s channel: https://t.me/dvntms
Spotify Tweaked Apps: https://t.me/eeveespotifyrevived
Rifty’s iPA Library: https://t.me/riftysIPAlibrary
Blatant’s iPA Library: https://t.me/blatants
Scholars Lounge: https://t.me/thescholarslounge
binnichtaktiv’s iPA Library: https://t.me/binnichtaktivsipas
These are a solid starting point and, in my experience, have been reasonably trustworthy. But obviously this is the internet, so use your judgment. Also, I’m not as plugged into these communities as I used to be, so I might not catch changes immediately. If anything ever turns shady (or people start reporting problems), I’ll remove it from the list.
And that’s the whole pipeline. Apple makes this stuff way more annoying than it needs to be, but once you’ve got a paid dev account set up, you’re basically done for the year. No 7-day refresh crap, and no hoping your signing service doesn’t get nuked.
From here it’s simple: import IPA → sign → install. The setup is the hard part, the day-to-day use is easy.
If you learned something from this, awesome! if Apple changes things again (they will), I’ll either update this post with whatever the new “least painful” workflow ends up being. Or ill make a new post outlining the fixes. This whole scene changes fast, but the main points always stays the same: keep it local, be vigilant in what you download, and keep your certs safe!